Annie Monaghan's Art Room
  • Home
  • Elementary Art
  • Middle School Art
  • Camp projects
  • Lesson Plans
  • About Me
  • My Artwork
  • Art is everywhere!
  • Contact me
  • Professional

5th grade papier Mâché AlEbrijes

11/22/2018

1 Comment

 
Picture
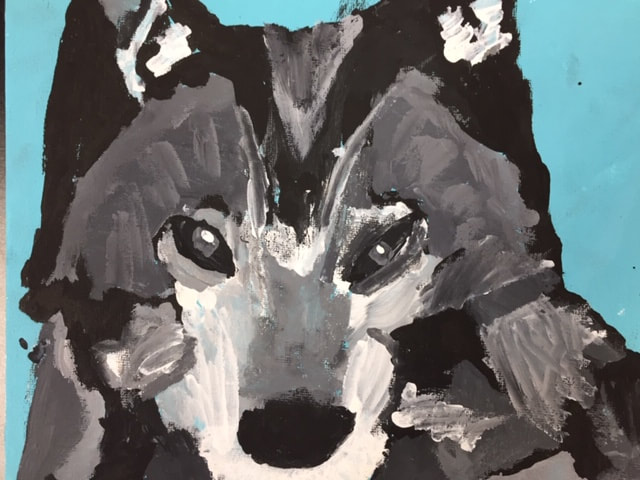
Wow, what an exciting project!  I've taught paper mâché in the past but I always tend to wait until the end of the year and we end up doing tiny sculptures with not much details.  This year I decided to start 5th grade art with this project.  After recently seeing and love the movie Coco, I was super inspired by the Alebrijes in the movie and started doing some research. 
I learned that the way that Alebrijes are depicted in the movie is quite different from the traditional story of Alebrijes and made sure that my students knew that when I taught them about the intriguing folklore of the creatures.  

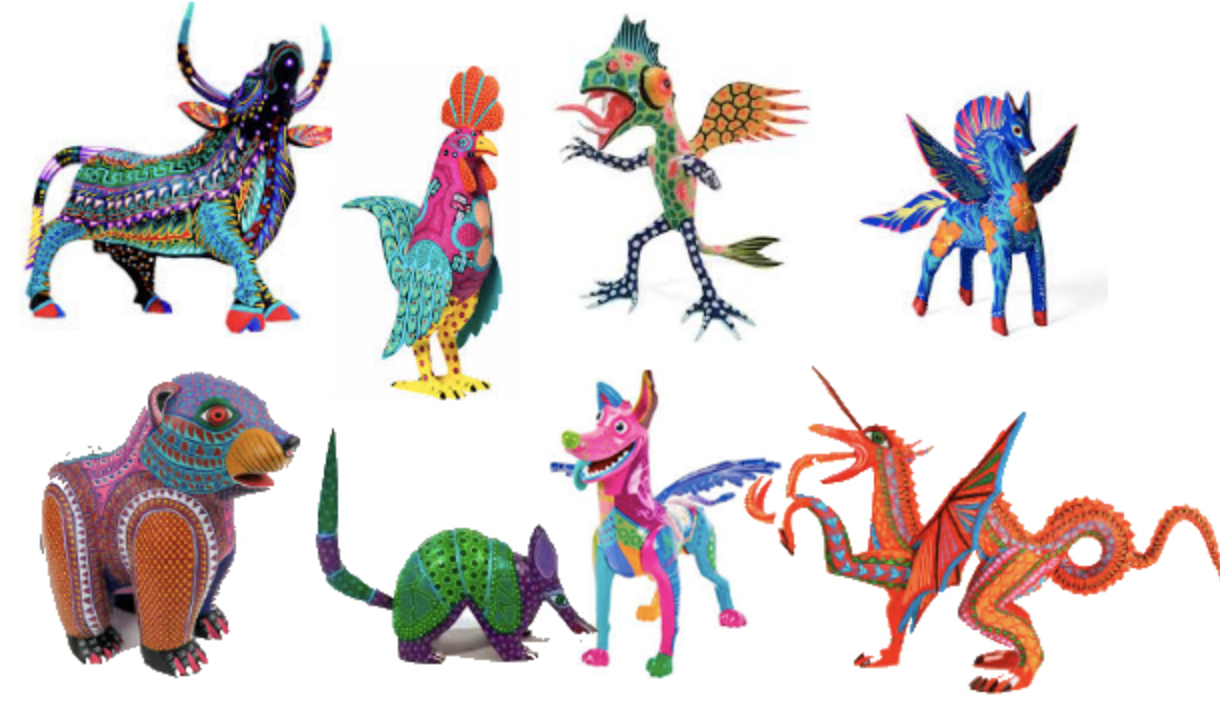
The story goes that Pedro Linares Lopez, an artist in 1930's Mexico City, was ill with a fever.  He hallucinated/dreamt that he was in a strange forest where he saw these weird creatures, a mixture of donkey and a butterfly, a rooster and a cat, and many more.  These creatures were all shouting one word- "Alebrijes!"

After the artist awoke from his dream and got well, he began making these Alebrijes out of cardboard and paper mâché.  These were very colorful, patterned creatures, a combination of two or more animals. 

Famous artists Frida Kahlo and Diego Rivera discovered the art and loved them, commissioning more to be made for them to have.  The wonder of these beautiful sculptures became very popular and continue to be so to this day. 
Picture
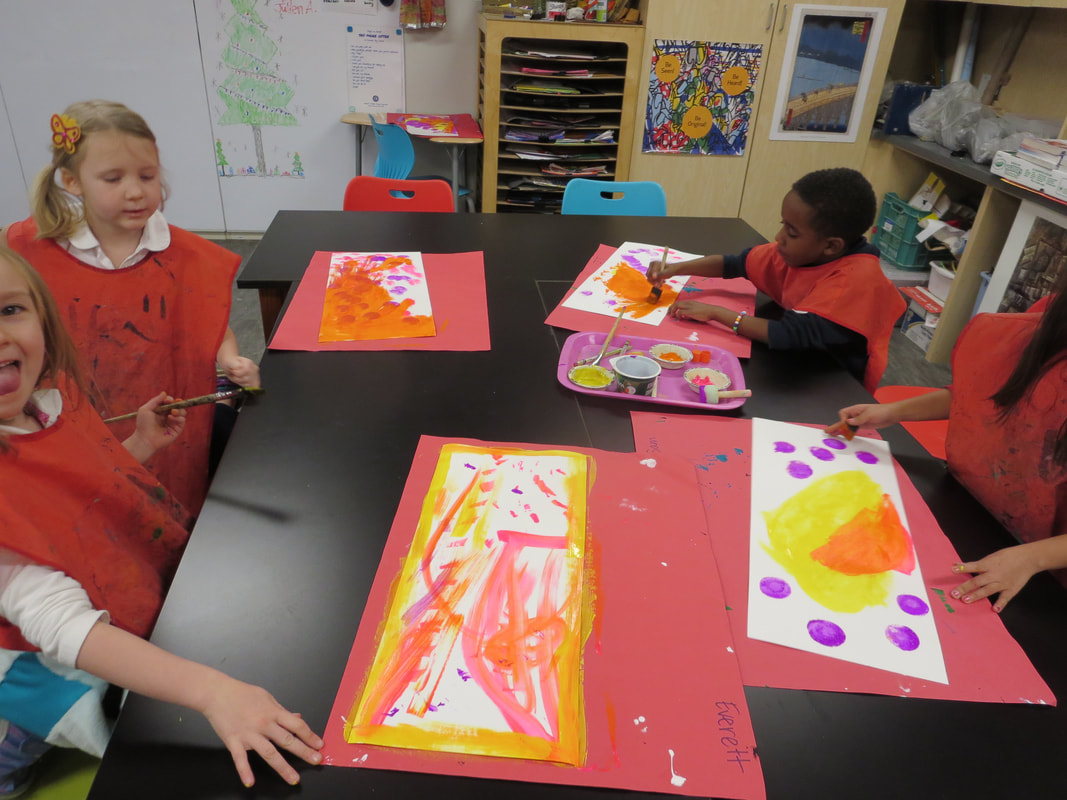
To begin this project, I showed 5th grade artists a slideshow including the history of Alibrijes and many images.  The students were immediately excited about this fun project.  

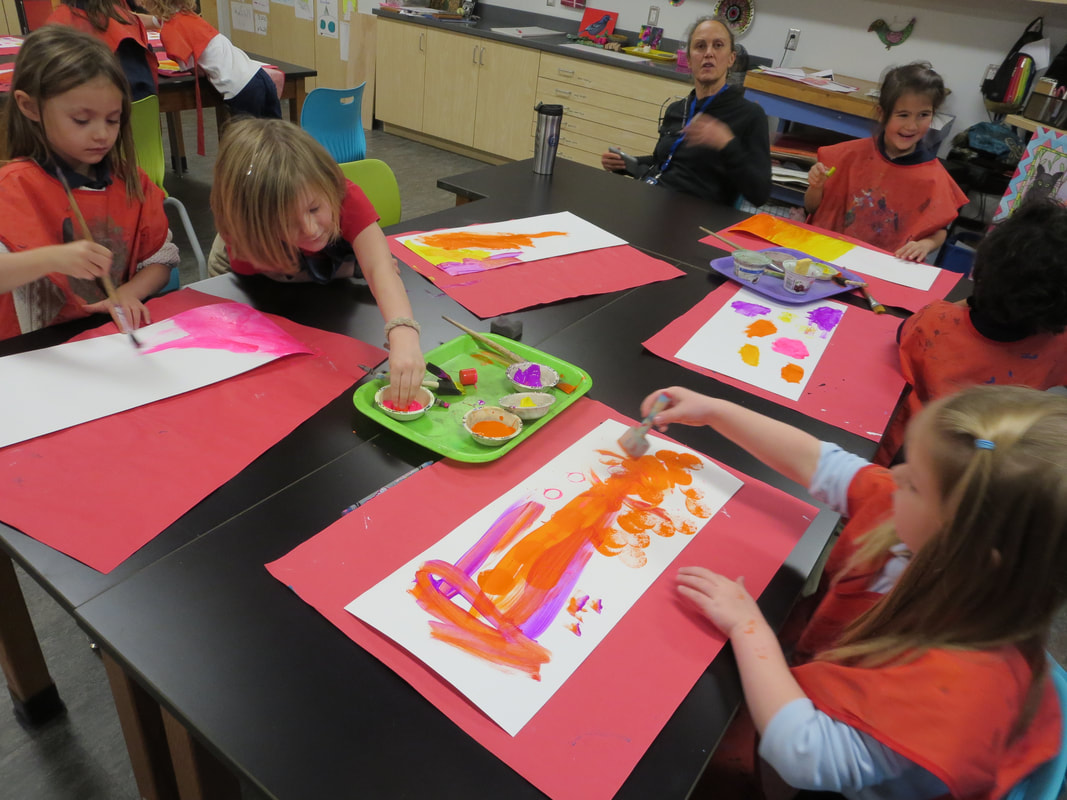
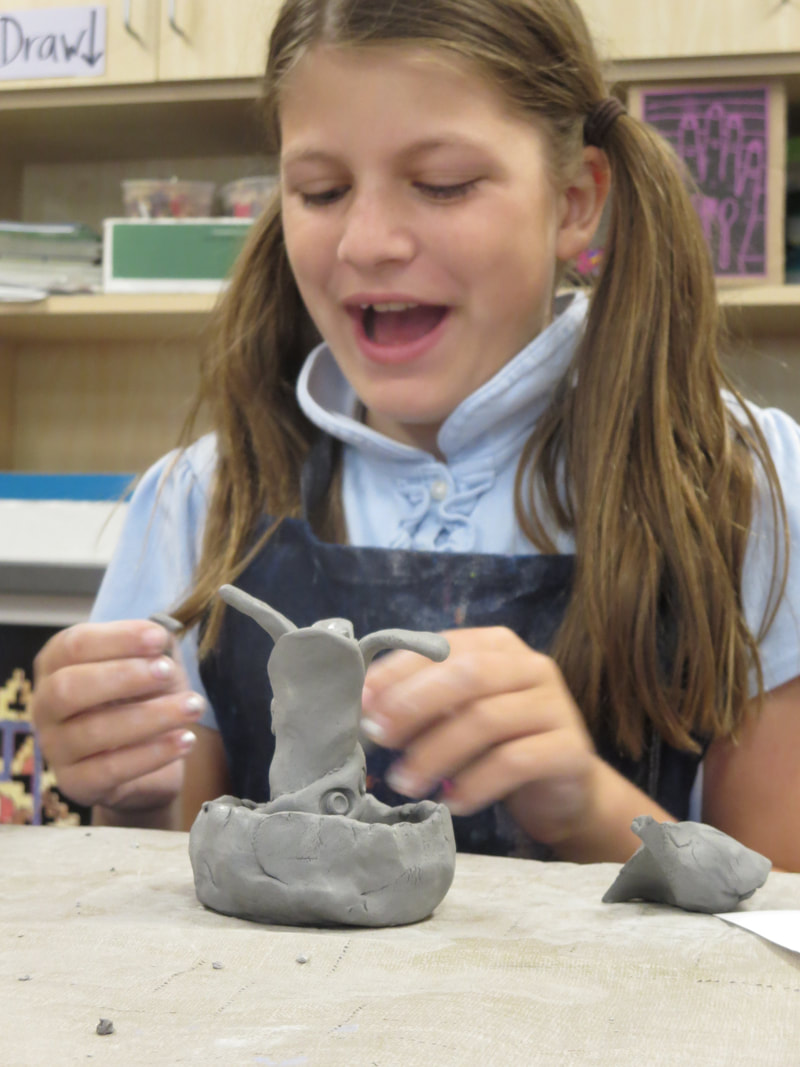
We started by doing a few sketches of ideas for their sculpture.  After doing at least two drawings, they chose one to create.

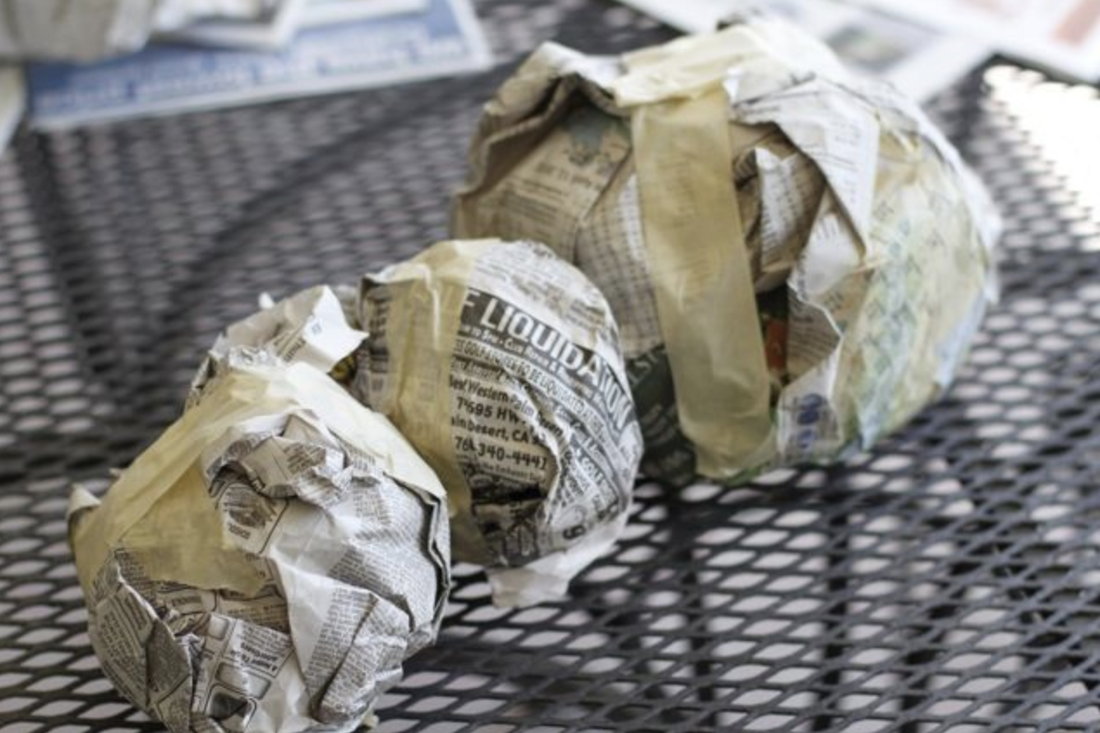
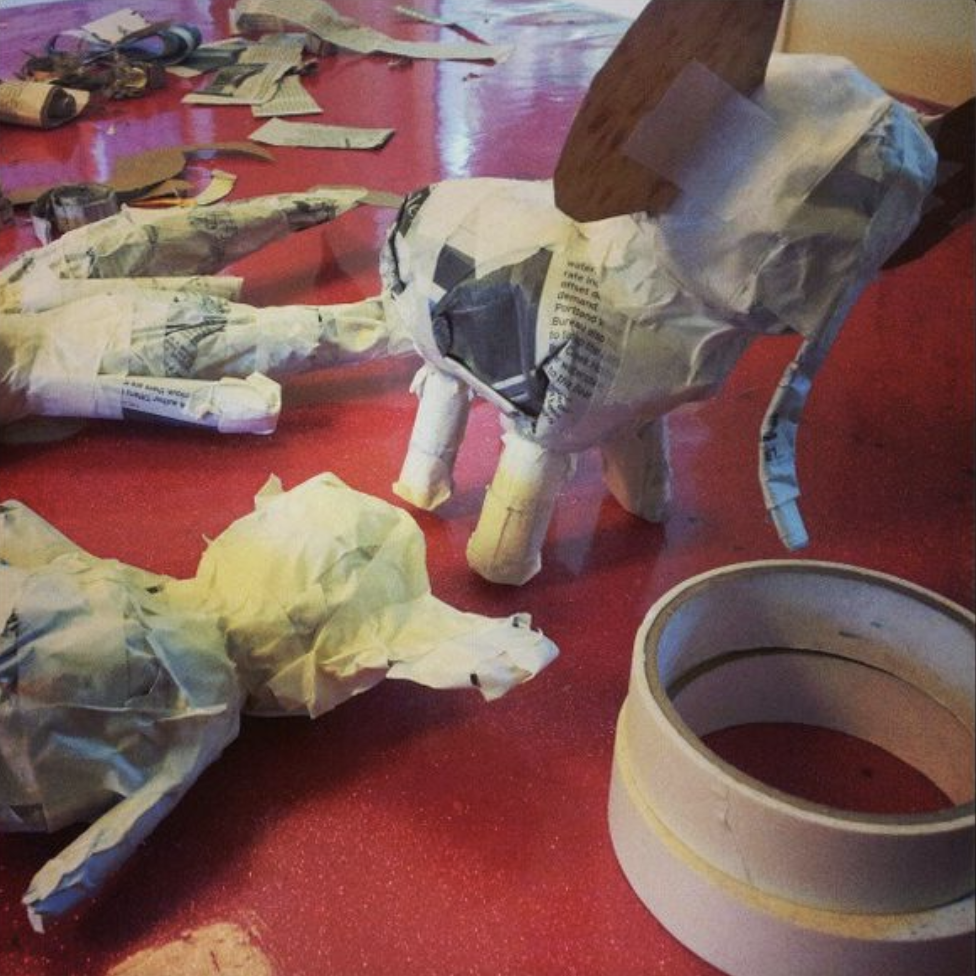
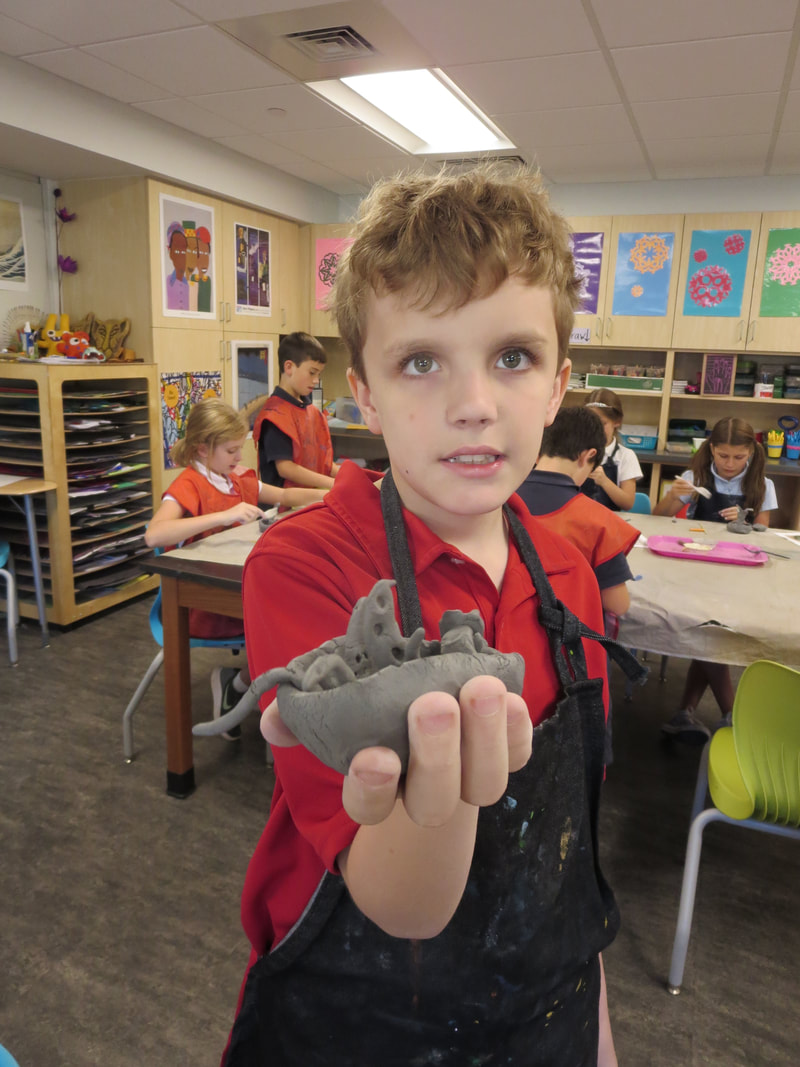
Using newspaper and masking tape to create balls, and rolling the newspaper like a yoga mat, students were able to assemble their pieces for their creature and attach them.  They also had access to cardboard if needed.  This step actually takes a few days as the students figure out how to manipulate the newspaper and how to attach pieces.

Once they had their forms created, we used more newspaper and paper mâché paste to cover their sculptures.  This step helps create a firm finished sculpture.  Most of the students love this process as it is wet and sticky but I provide rubber gloves for those few students who just can't handle it or find it extremely gross.
Picture
Picture
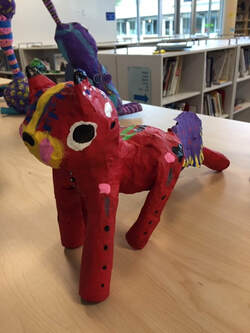
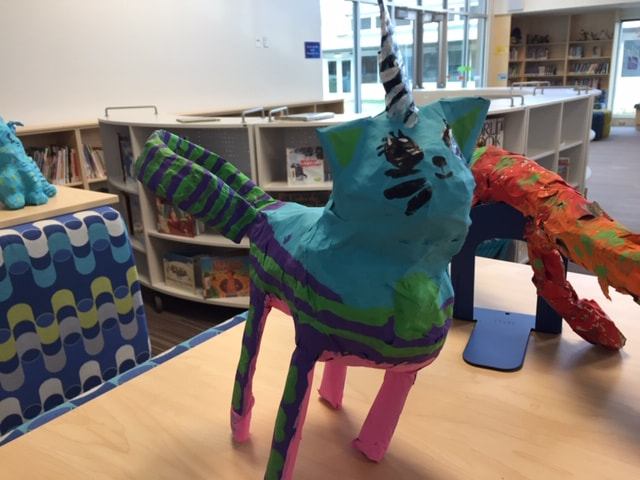
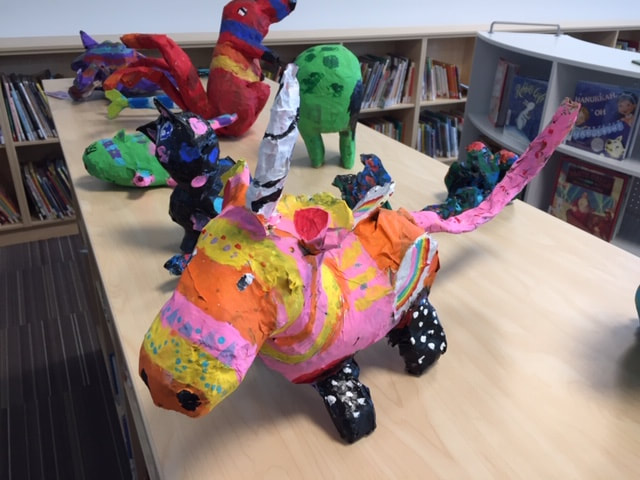
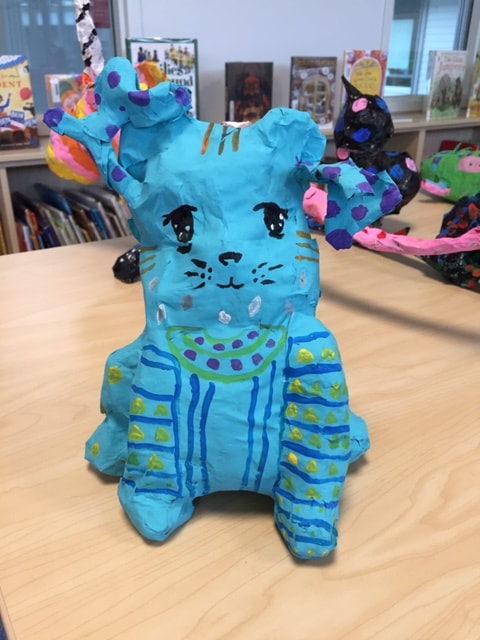
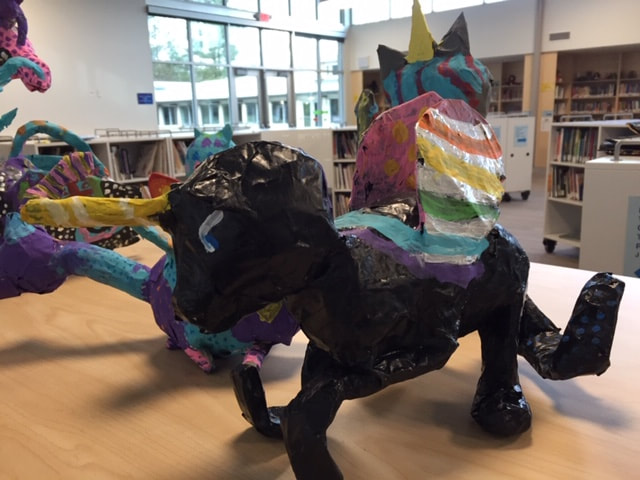
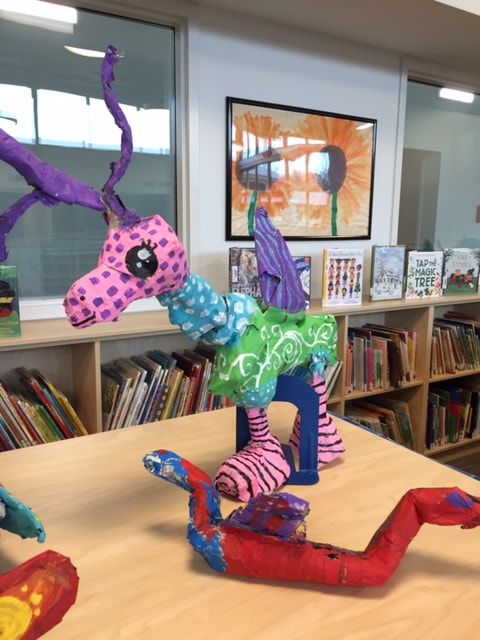
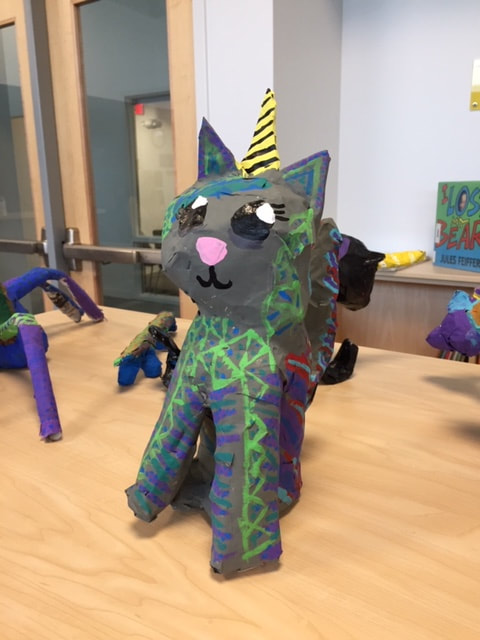
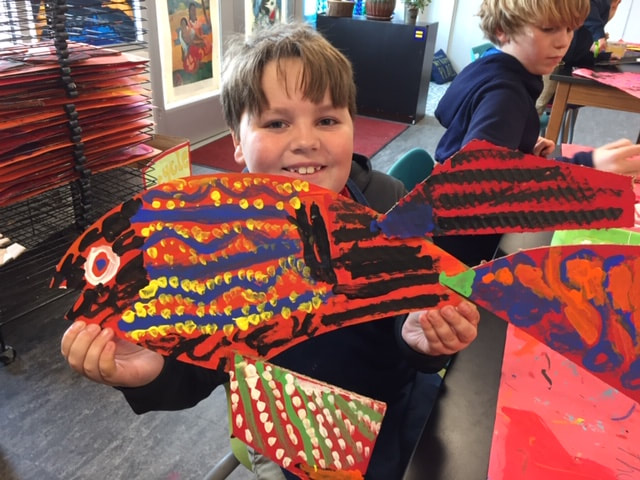
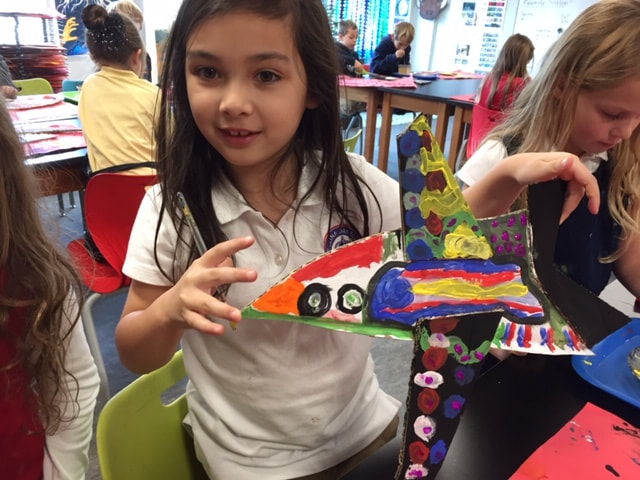
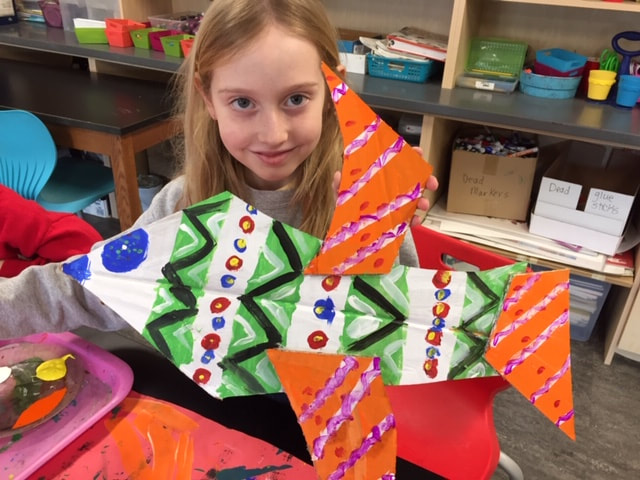
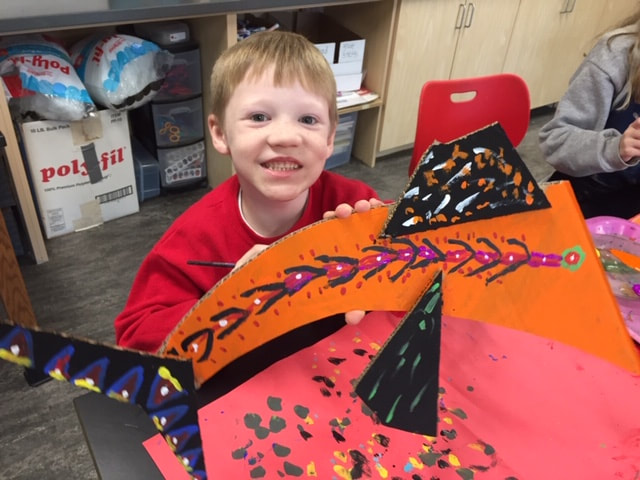
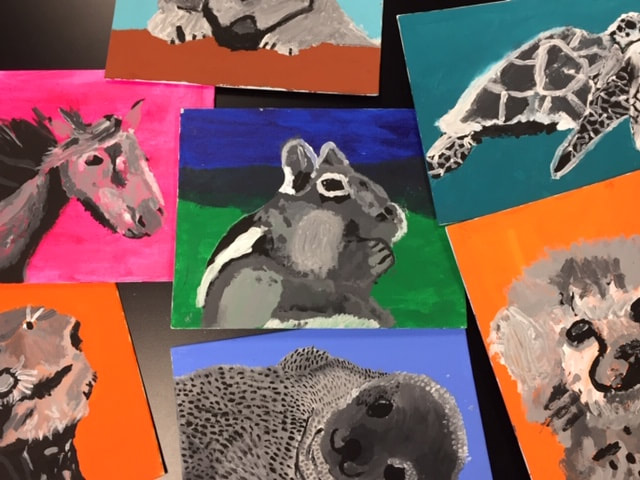
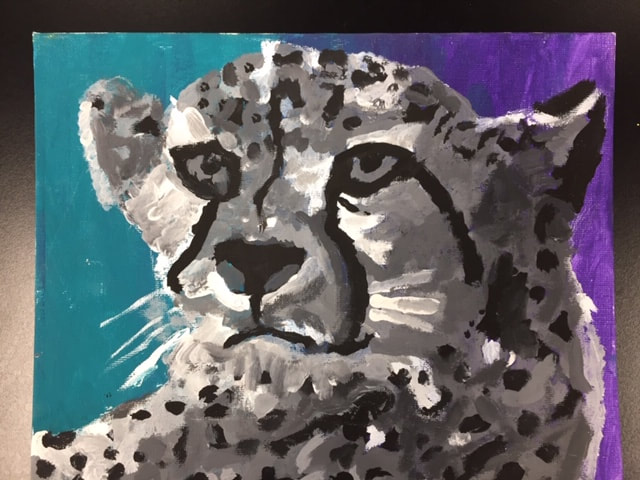
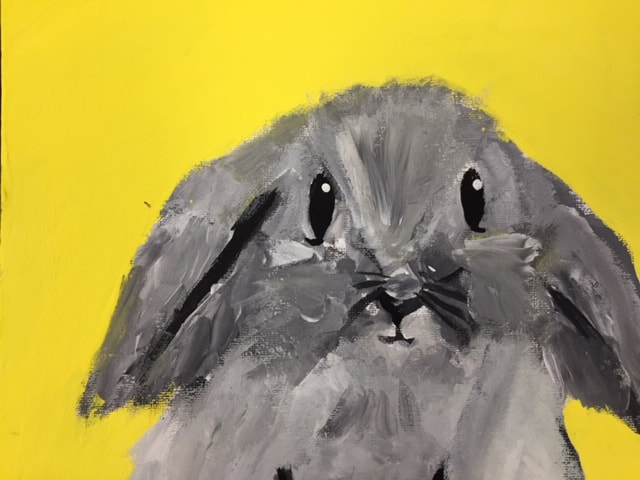
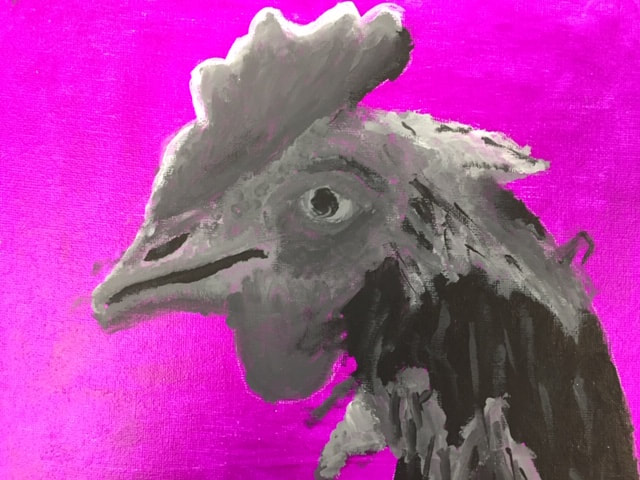
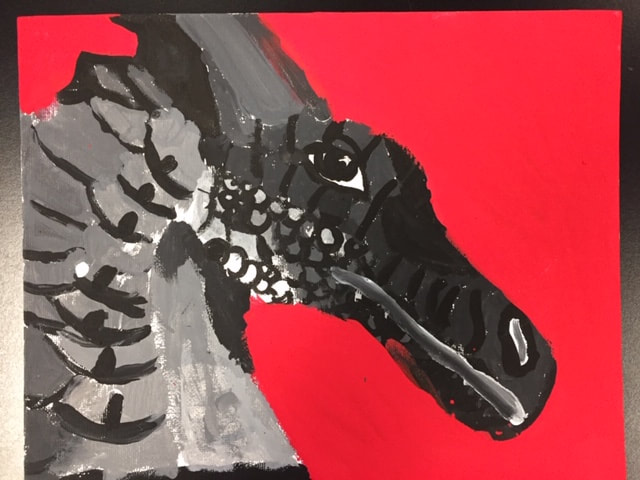
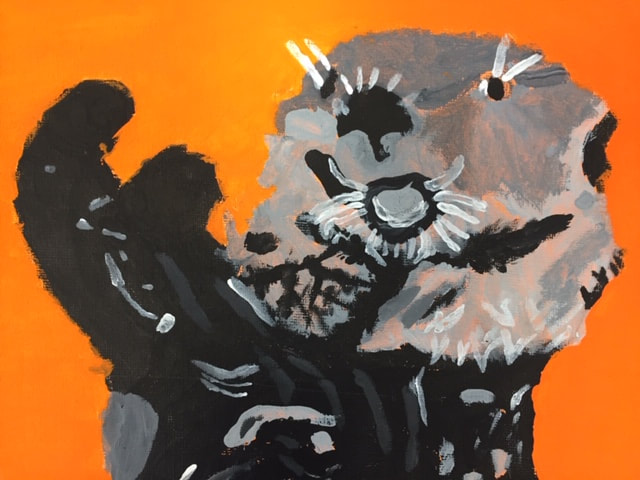
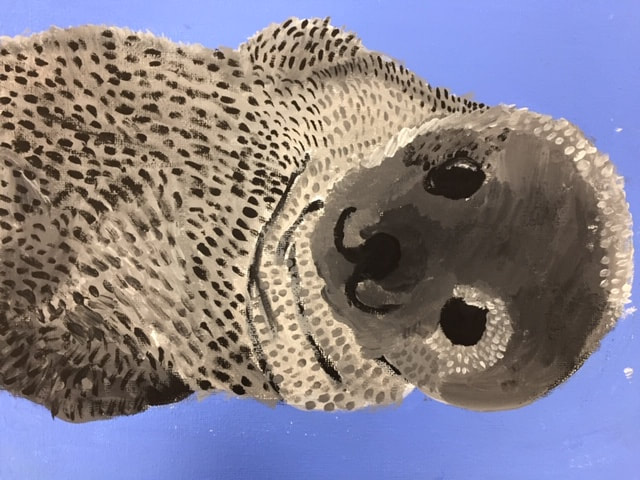
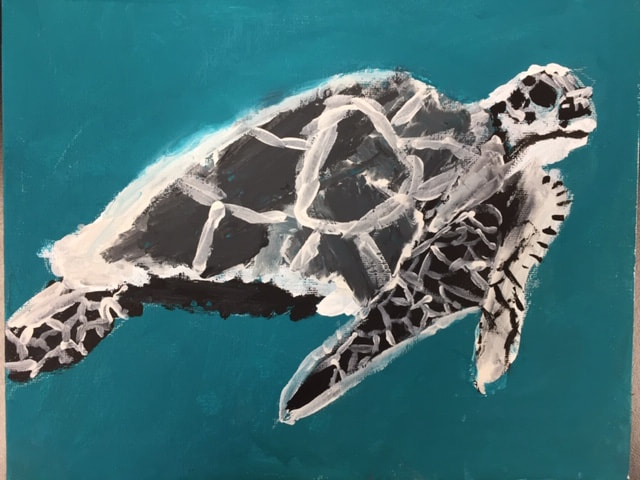
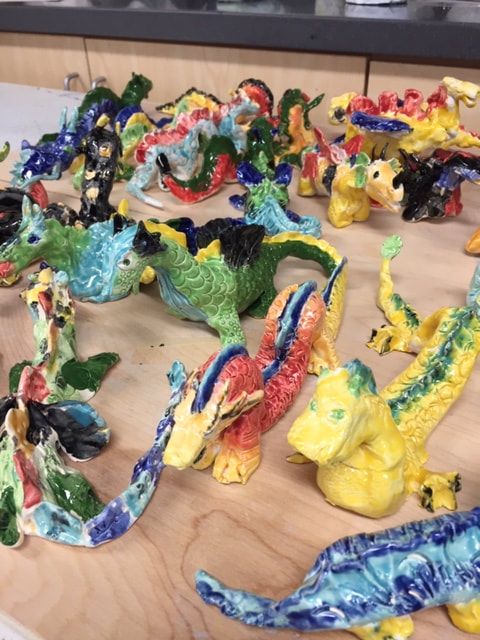
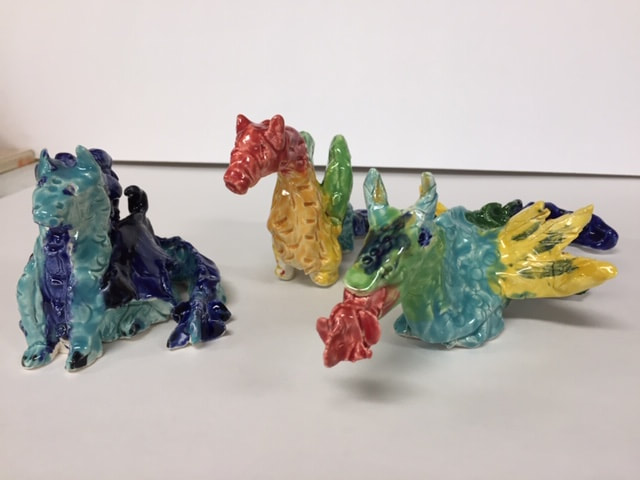
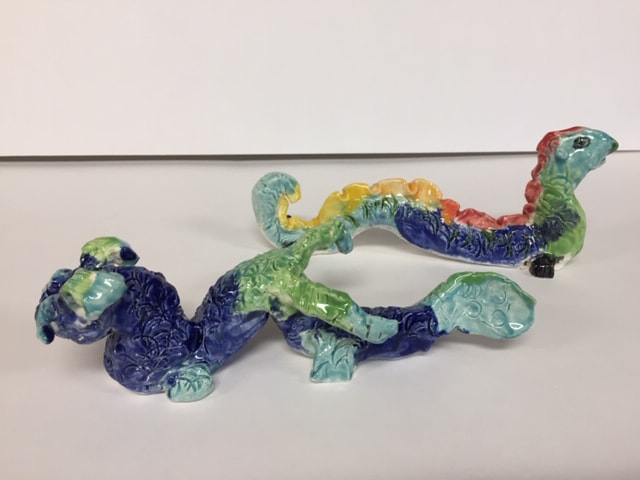
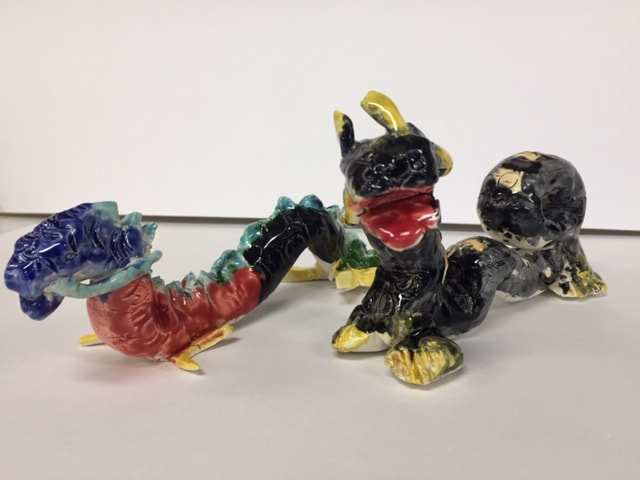
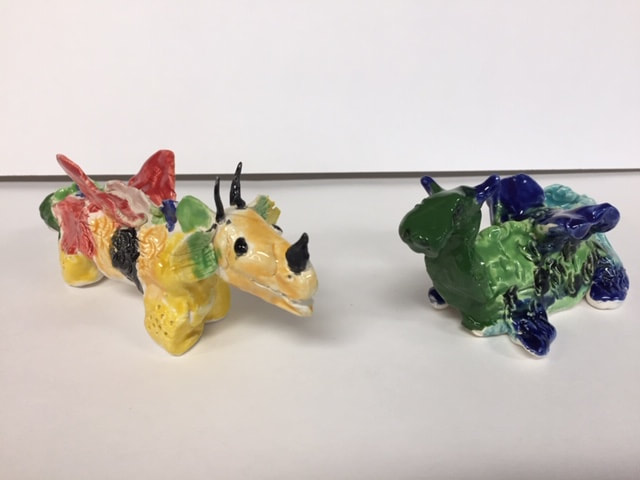
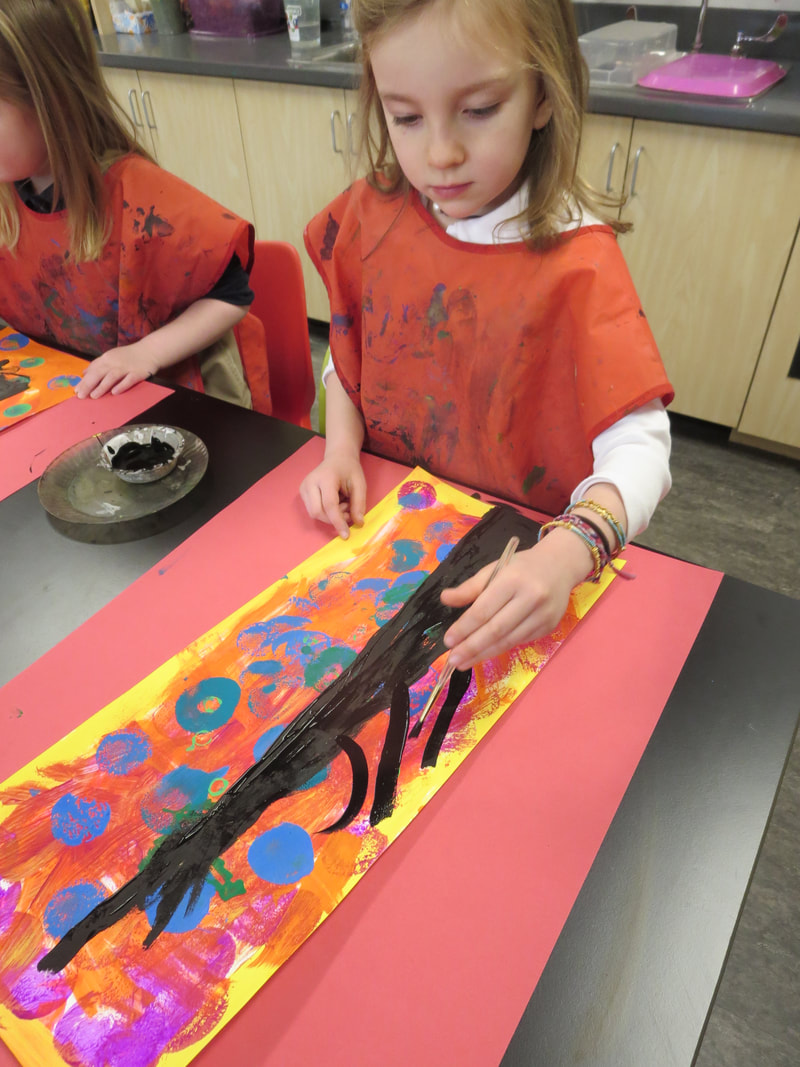
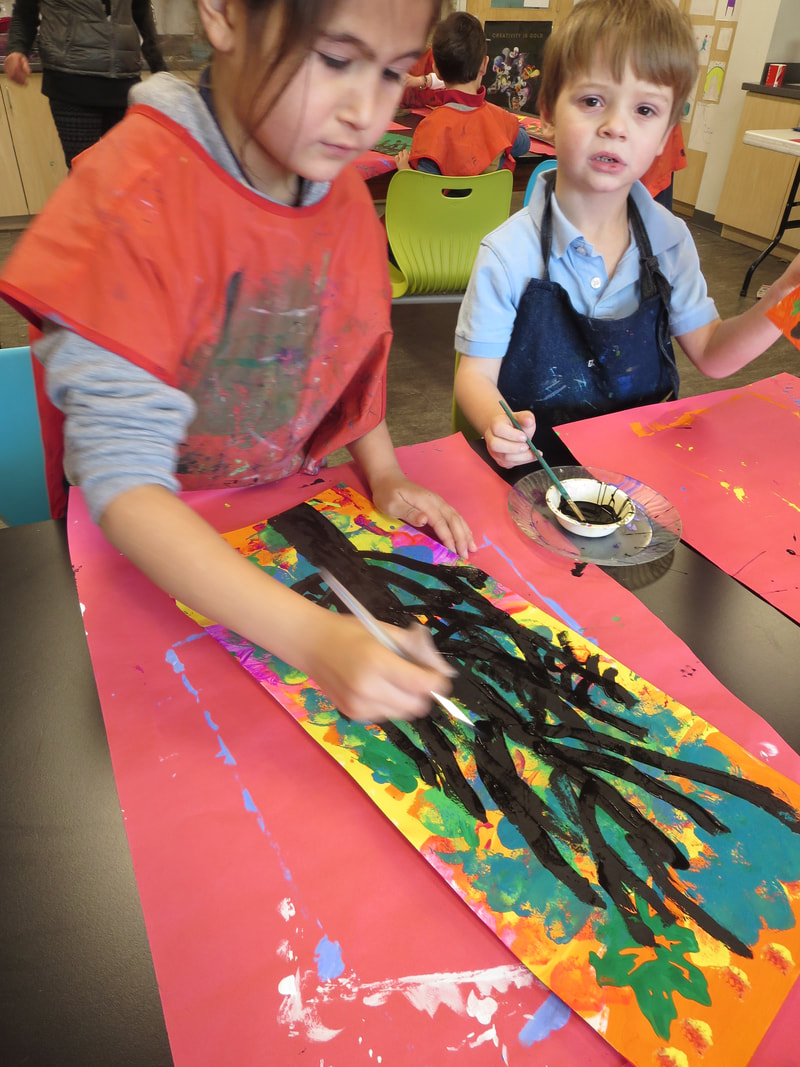
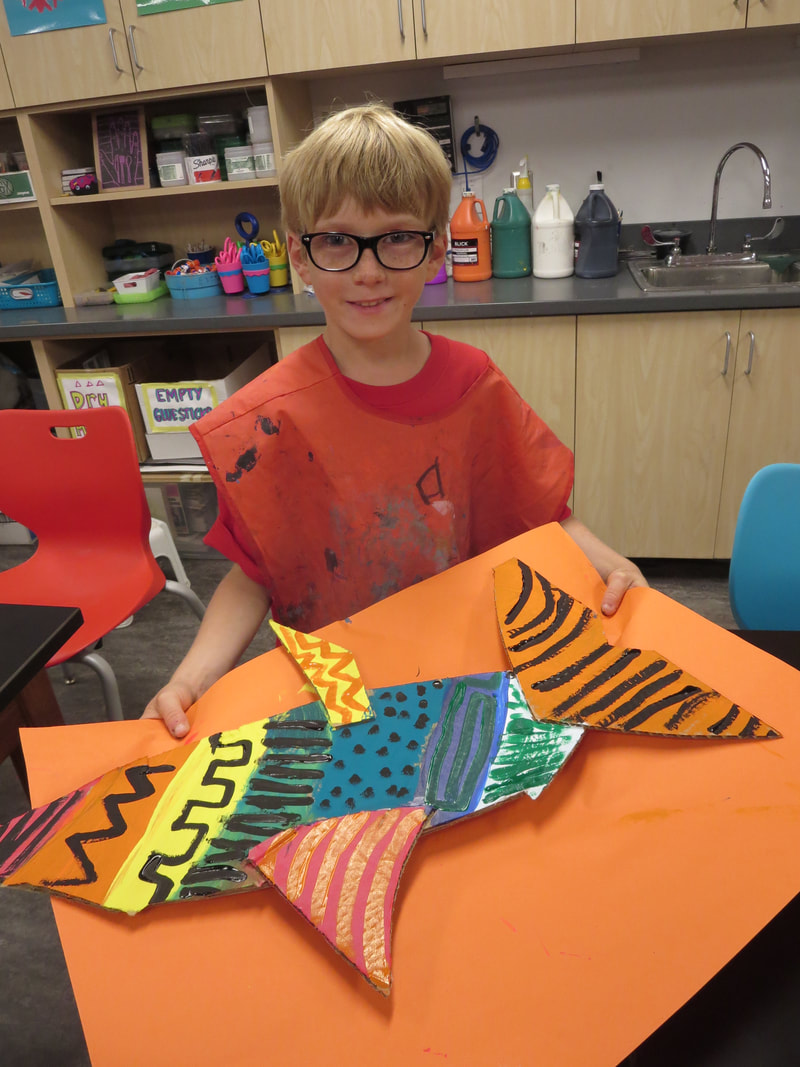
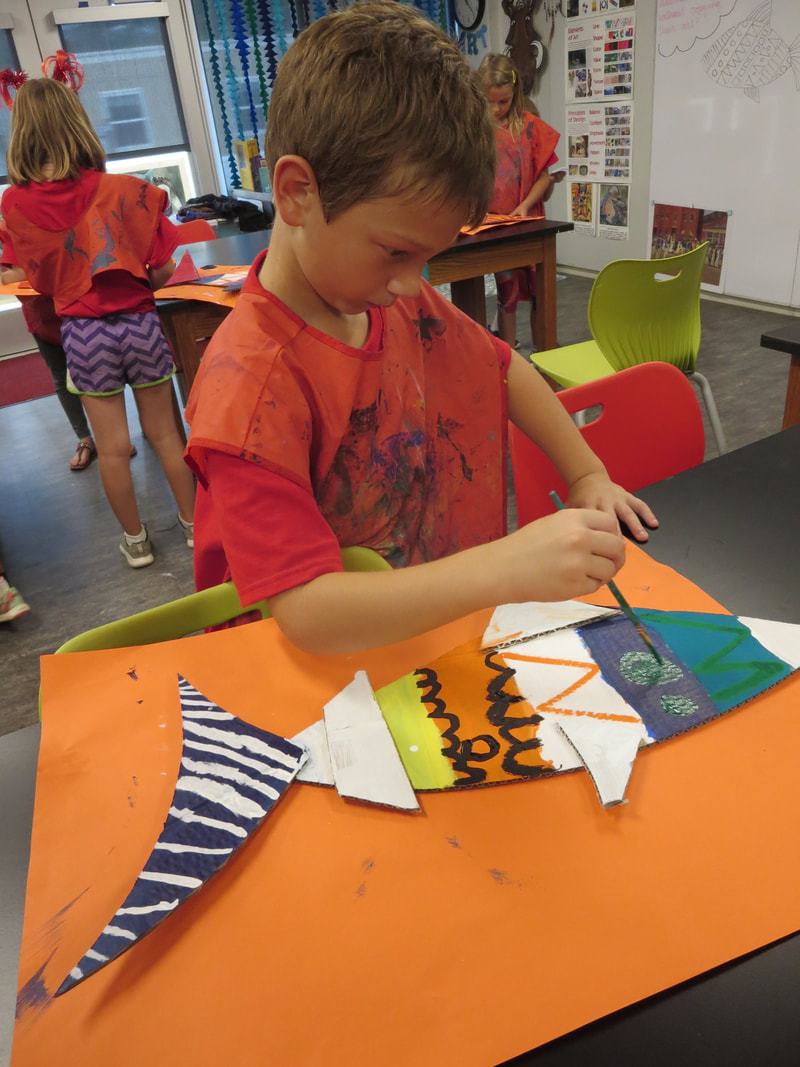
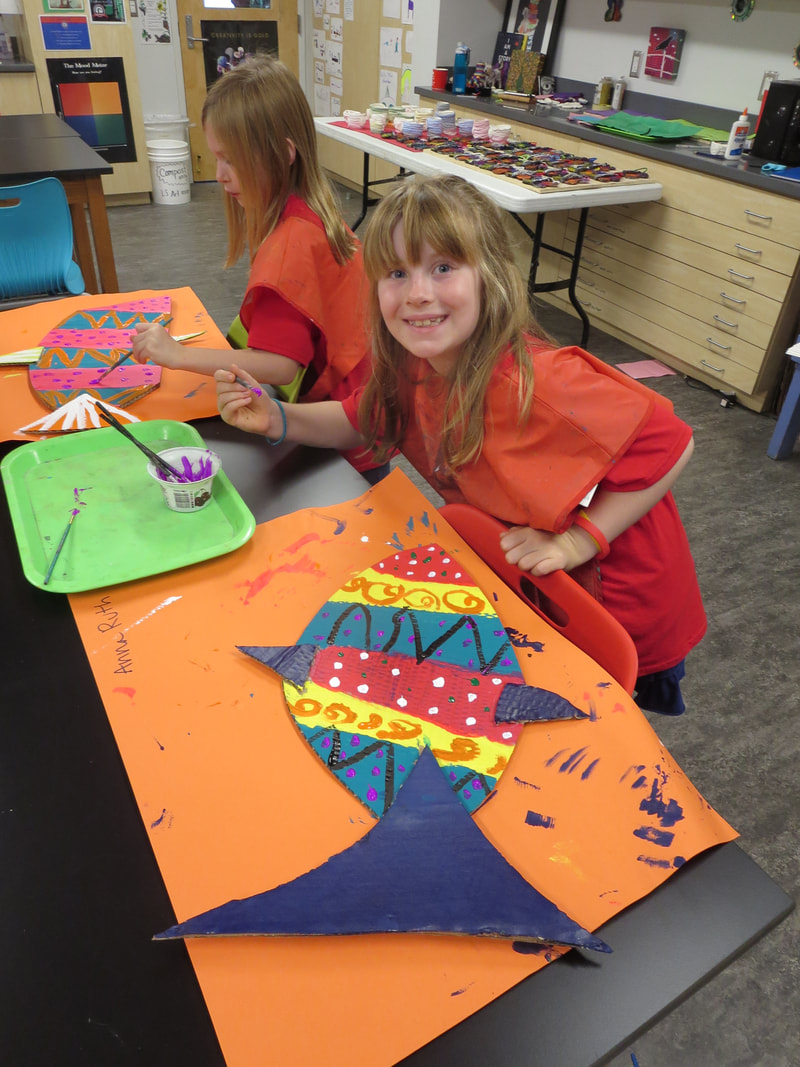
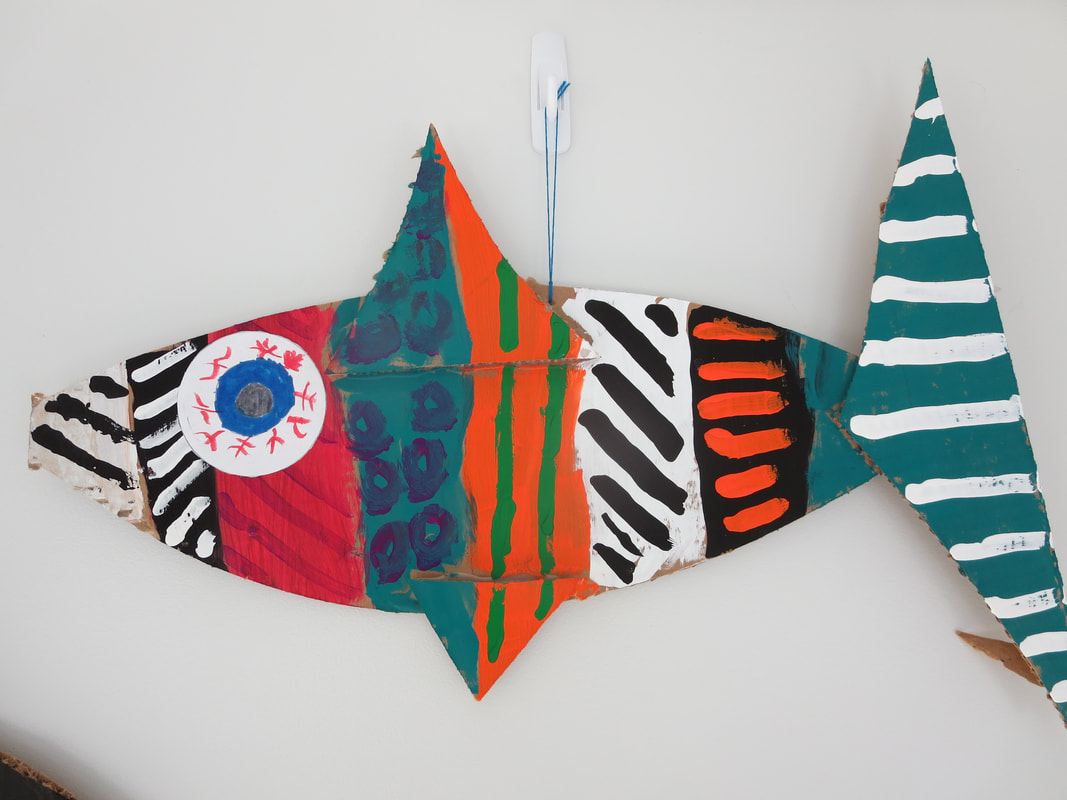
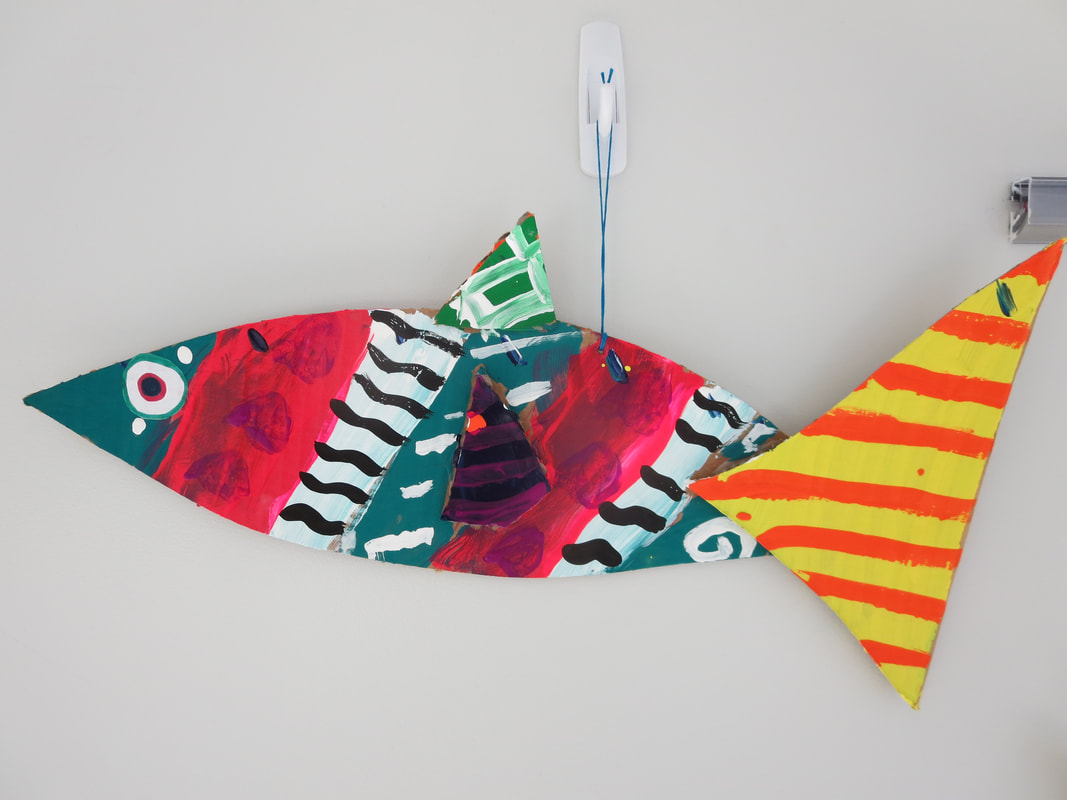
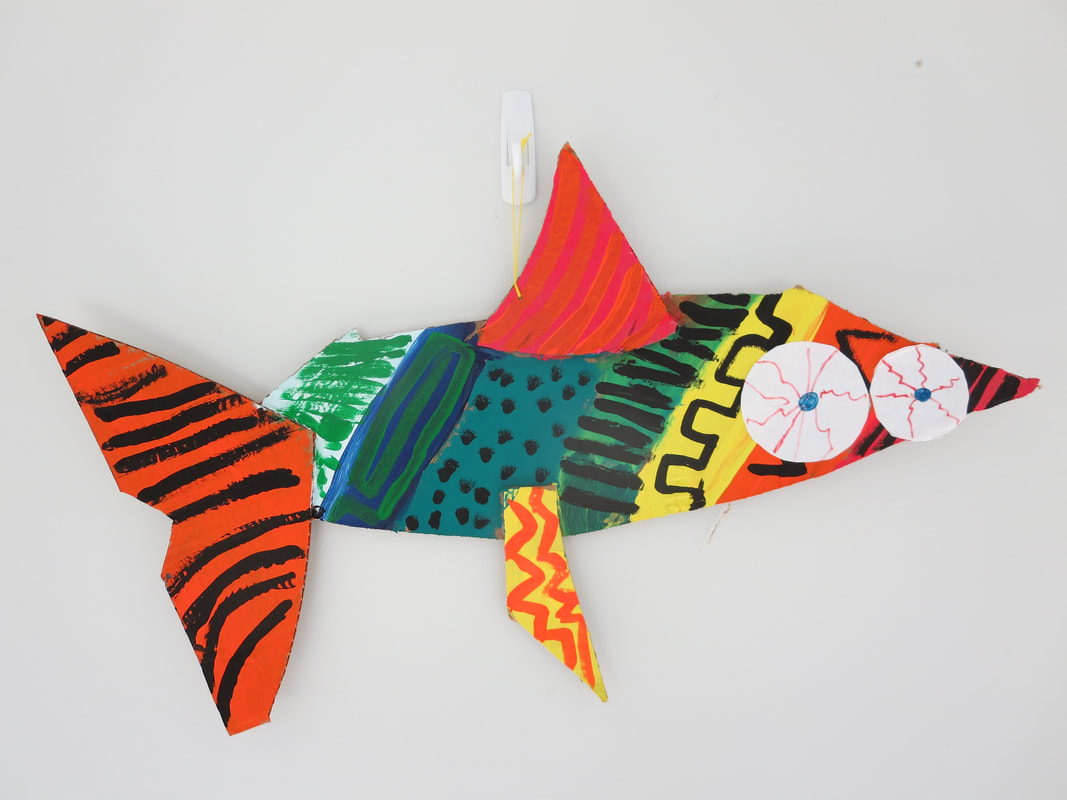
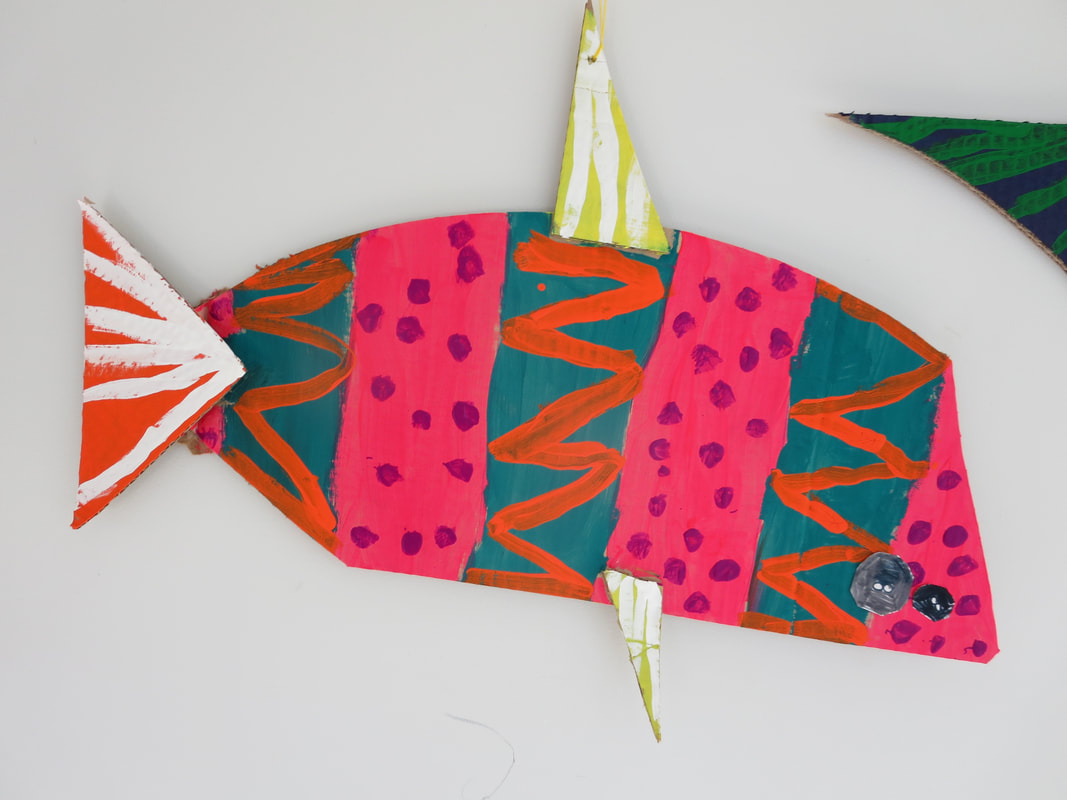
The last step in the process was of course adding color.  We used acrylic paint (I've used tempera in the past and it flakes off...) to paint a base color on the sculptures and then added lots of patterns.

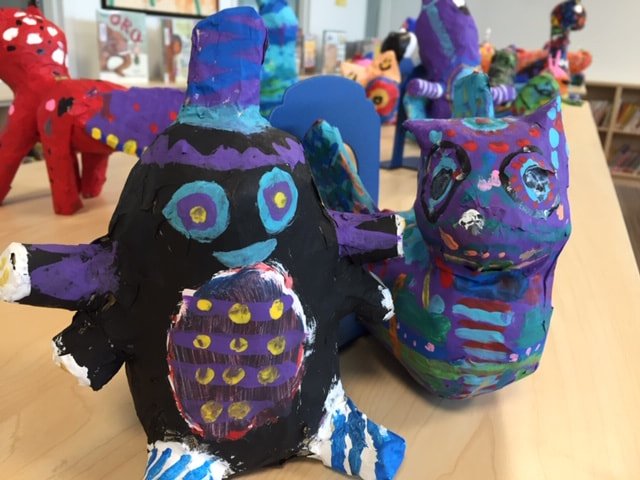
This entire process from day one of the slideshow until completion actually ended up taking like two months!  BUT these turned out sooooo cool and the students love them.

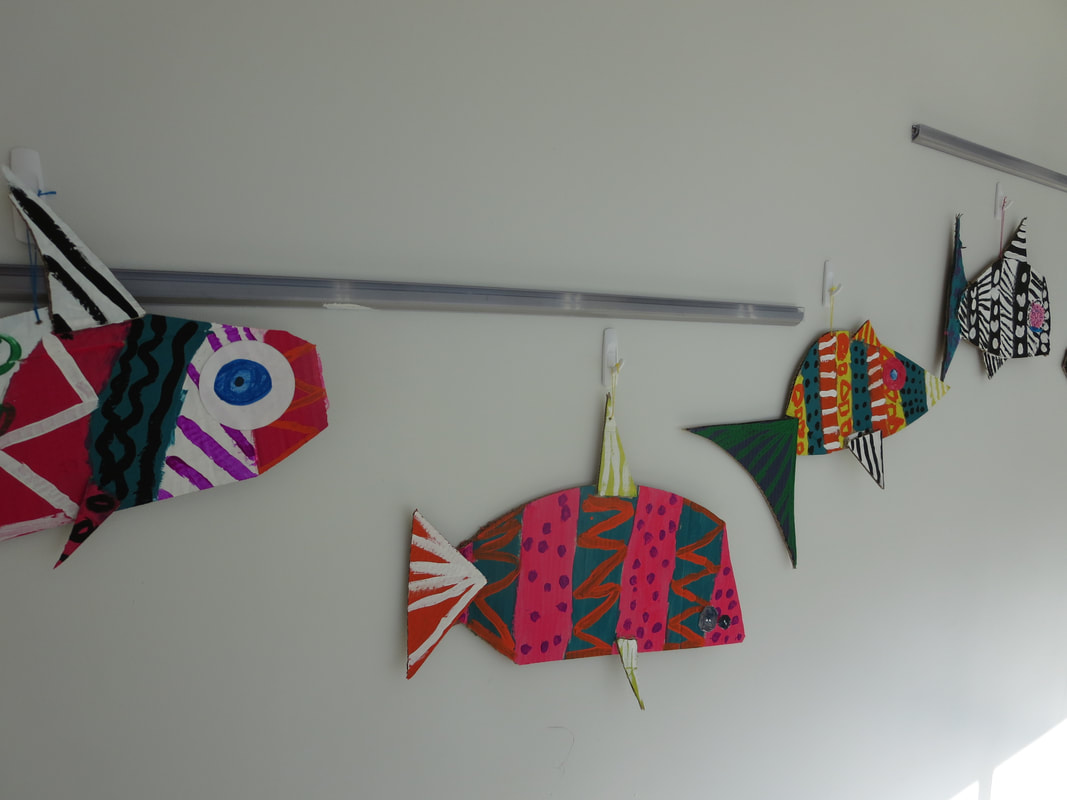
I was able to put these on display in the library after they were finished and everyone loved seeing the colorful creations!
Picture

Picture
Picture
Picture
Picture
Picture
Picture
Picture
Picture
1 Comment

2nd grade cardboard fish

10/10/2018

0 Comments

 
This is such a super, duper fun project that I do with my students every year.  Some years we do fish, others we do birds.  This is a quick 3-4 class project.  All of the details can be found HERE in my previous post. 
Picture
Picture
Picture
Picture
0 Comments

2nd grade tint study with trees

9/12/2018

0 Comments

 
Picture
Woo-hoo, mixing colors is so much fun!

2nd graders learned how to mix tints during this painting project.  

To get started, students each got to select a color of construction paper for their background color.  I had all of the colors of the rainbow available (plus pink).  After selection their background color, they had about 5 different paint colors to choose from as well.  The paint color was what the would be mixing with white.

I demonstrated how to paint three concentric circles of paint by starting with white and painting three dots spread out on the paper.  Next they took just a tiny bit of the other color on their paintbrush, mixed it completely with the white and used that new color to paint a circle around the white.  This process continued until the circles were so big that they started to overlap.  

I was impressed with how focused the students were on this process.  They were determined and in the zone.  Another proud teacher moment for sure. 
Picture
Picture
Picture
During the next art class, I taught students what the word 'silhouette' means and demonstrated by standing in front of a window with the classroom light on and then turning it off so that they could see my silhouette.  Always exciting!

I showed them how to paint a tree silhouette by starting with a big thick line in the middle of the paper, and adding branches that reach up and out.  The students, again, loved this step of the process as well.

This was such a fun and successful project and only took two class periods!
Picture
Picture
Picture
Picture
Picture
0 Comments

4th grade monochrome animal paintings

4/27/2018

0 Comments

 
Picture
OK, so here's the thing.  My 4th graders did an incredible job on this project, they did better than I could've even imagined and silly Art teacher me forgot to take any in-process photos. I'll do my best , though, to explain what we did.

Before beginning the project, I gave the students a two week notice that they each needed to provide a grayscale printed photo of an animal.  I gave them the option to email it to me if they don't have a printer at home.  I told them that it could really be any animal as long as it was a close up and the photo should be about the size of their hand.

When it was time to begin the project, the first step was to have the students paint their background.  I asked them to select one color but a few begged to use two colors and I agreed, because why not.  I suggested bright colors that the grays would really pop on.  Turquoise and pink were popular choices.

The next step was setting up my two classroom projectors around the classroom, dimming the lights and teaching the students how to use them to project their image onto their canvas.  They worked together with a partner to figure it out and then traced their animals with a white pencil onto the background.  This ended up taking a lot longer than I expected and if I teach this project in the future, I'll definitely find a couple more projectors to borrow.

From here, I printed out some grayscale images for the students to reference that went from white to black in 10 steps and were number 1,2,3......10.  I had the students all start by looking at their photo and finding the areas that were a shade of 10 (black).  They all used their photo for reference and paint the black into their image.  The next step was to find all of the 1 shade (white) and paint that.  Next we all found the shade 5 and painted that.  From there the students were to find the different shaded 2-9 and to paint them accordingly.  Although this is easy to explain, it is a quite difficult process, especially for 9 year olds.

They really blew my mind though, I didn't realize how amazing that these would turn out and it was sooooo awesome watching the students persevere through this.  They were sooooo proud of themselves and I was an extremely proud teacher (like usual).
Picture
Picture
Picture
Picture
Picture
Picture
Picture
Picture
Picture
0 Comments

5th grade clay dragons

4/18/2018

0 Comments

 
Picture
Students sure love doing clay projects.  I'll be honest and say that I've always been a 2D artist and have been reluctant to teaching clay very often.  Recently, though, I've fallen in love with teaching 3D art projects and seeing how much the students love it!

Before beginning this project, I printed a few reference images for the students of different types of dragons, both Western and Chinese. I demonstrated for the students how to start both types of dragons.  The Western dragons have a more rounded bodies and have wings. The Chinese dragons have long, snake-like bodies and no wings.  The students could, of course, though come up with their own dragon design as well.  Using these basic techniques that I showed them, students used the rest of the class period to create textured, detailed dragons.

After being fired in the kiln (I'm so grateful to work at a school with a kiln), we used glazes to make them super colorful.  
Picture
Picture
Picture
Picture
Picture
0 Comments

Kindergarten Abstract Tree Paintings

1/11/2018

0 Comments

 
Picture
This is my new favorite Kindergarten art project and it only took three 30 minute art classes!

We began this colorful project by learning about abstract art.  When I explain abstract art to the younger grades, I tell them that it is art with lots of lines, colors and shapes but nothing recognizable.  There is no cat or house, etc.  I was proud to hear that after this first class, students were using markers to create abstract art in their classroom during free time.  The first day of this project, students used lots of warm colors like yellow, pink and orange to fill their paper with color.  They used tempera paints and different tools such as sponge brushes, stamps, marker caps, cardboard scraps, etc to create a colorful abstract painting.  The second day, they did the same thing but used cool colors such as blue, turquoise and green and added layers of patterns on top of the warm colors.  They were instructed to just have fun and experiment.  
Picture
Picture
On the third day of class, we added a black tree silhouette on top of our abstract paintings.  I demonstrated what a silhouette is by having a student stand in front of a window and then turning off the light so they were heavily backlit by the sun, creating a dark silhouette of the students body.  
I also showed them how to paint trees by first painting a large tall triangle in the middle of the paper and adding big branches reaching to the sky.  Then they added little branches reaching to the sky off of the big branches.  Watching the students paint these trees was really magical as if seeing their artwork really come to life.  

​I absolutely LOVE how this art project turned out and am proud of the students for being so exploratory and brave as they tried new things in the art room. 
Picture
Picture
Picture
Picture
Picture
Picture
Picture
0 Comments

5th grade Artist-inspired selfies

12/7/2017

2 Comments

 
Picture
Nyah in the style of Frida Kahlo 


​Ever since I started using my art room instagram this year (@anniesartroom), I've been slacking at taking pictures on my camera for my blog here.  So, I don't have too many in-progress photos of this project....

I love teaching self-portraits and I do them with almost every grade every year and switch up the project every time.  I thought it would be fun to give the 5th graders some choice as they did theirs this year so they each followed the same process of creating their self-portrait but did it in the style of one of 6 artists that I introduced them to.  The artists that they were able to choose from were: Frida Kahlo, Kehinde Wiley, Diela Maharanie, Vincent Van Gogh, Heather Foust and Jean-Michel Basquiat.  

Before starting the project we looked at a bunch of images via a slideshow and chatted about the different characteristics of each artist.  I loved seeing the kids reactions as I showed them the work.  I was shocked (and excited) that Jean-Micheal Basquiat seemed to be the most liked by the students and the least popular was Kehinde WIley (which was ironic because he is one of my top artists and probably my favorite from this bunch).  

I took pictures of each student and printed them on 8.5" x 11" paper before beginning and the first step for everyone was to trace the contour lines of their faces and shoulders onto 11" x 14" white paper using a lightbox.  Students love using lightboxes for some reason....
The next step was to use the images provided as inspiration to make a background design that represented both their selected artist as well as themselves.  They seemed to really enjoy this step and there were some really cool designs.
Picture
Layla in the style of Heather Foust
Picture
Julien in the style of Vincent Van Gogh
Picture
Ezra in the style of Kehinde Wiley


After the students drew their faces and background designs, they also had a choice of which art medium to use.  Their choices were tempera cakes (I just bought Richeson semi-moist tempera cakes for my classroom www.dickblick.com/products/richeson-semi-moist-tempera-cakes/ and am in LOVE with them), markers (basic Crayolas) or colored pencils.    Some students chose two-one for their faces and another for their backgrounds,  Paints were a popular choice for this project.  

The results of these are really great and the best part is that I have a bunch of proud 5th grade artists!
Picture
Cammy in the style of Heather Foust 
Picture
Alex in the style of Diela Maharanie
Picture
James in the style of Jen-Michel Basquiat
Picture
Harry in the style of Vincent Van Gogh
Picture
Maya in the style of Diela Maharanie
Picture
Joe in the style of Jean-Michel Basquiat
Picture
Tyree in the style of Diela Maharanie
2 Comments

4th grade clay succulents

12/1/2017

0 Comments

 
Picture

4th graders first clay project this year was inspired by this blog post I found a couple of years ago (​room9art.blogspot.com/2011/06/plants-on-parade.html).

After we all circled around a table and I demonstrated for the students, they began the project by ripping their clay in half and making a pinch pot with one half of clay and using the other half to make different sized and shaped coils.  They attached the coils to the pinch pot and formed them to look like different succulent plants.  The goal was to have at least 3 plants in their pots.  Some students only had three and some probably had closer to ten.  

Picture

Picture
Picture
Picture
Once the clay sculptures were dried and fired in the kiln, students used bright colored acrylic paints to paint the succulents and the pots.  Once dried, I filled them with small stones as well.  This made them look more finished and realistic.
Picture
Picture
Picture
Picture
0 Comments

George Littlechild inspired self-portraits

11/24/2017

0 Comments

 
Picture
I've recently fallen in love with the art of George Littlechild.  He is a Native American artist who uses "bold colours and playful images, belying the serious undertones of his work." (click here to learn more​)  His art speaks of how we view the world and connections to ancestors.  I personally am drawn to his bold, vibrant colors and the almost-not-quite symmetrical decorative designs.  
Picture
Picture
I failed to take any in-progress pictures of my 3rd graders working on their self-portraits inspired by the work of Littlechild but the end results are quite stunning.

We started this lesson, of course, by looking at the work of George Littlechild and having conversations about what we see, what the work might mean, etc.  A few things we took note of was the use of pattern on the faces, the images on the foreheads, and the colorful backgrounds.  
As students planned their self-portrait, they had to think of an image to draw on their foreheads that was a symbol for themselves.  

We revisited the 'rules' of drawing proportionate faces and students began their art with a pencil line drawing of their face and shoulders and then added patterns to their face and the background and added their personal symbol.  They each had the choice of using markers or paints to finish their work.  

3rd graders spent four-five 40 minute class periods working on these masterpieces. 
Picture
Picture
Picture
Picture
Picture
0 Comments

2nd grade observational flowers

11/13/2017

0 Comments

 
Picture


For more information about the process of creating these awesome Georgia O'keeffe-inspired flowers, see my blog post from a few years ago
​ ​http://anniesartroom.weebly.com/elementary-art/2nd-grade-georgia-okeefe-flowers

​

Picture
Picture
Picture
Picture
Picture
0 Comments

2nd grade cardboard fish

11/1/2017

0 Comments

 
Picture
The kids LOVE this project.  This is the second year I've taught it (though last year we did birds) and the students have a blast making them and the results are colorful and exciting.

This project definitely takes a couple hours of prep work by me but is totally worth it.  Before beginning this project, I cut coardboard into a ton of different shapes such as ovals, triangles, diamonds, circles, etc.  I make sure I have a bunch of large body shapes (they are between like 8" to 14") and a bunch of smaller pieces for fins, tails and eyes.  If I have 30 students, I make like 35 of each so that they each have a choice.  Even with box cutters this is pretty time consuming, but that's ok with me.

The first day of this project, students each go to different piles of the cardboard pieces and play with the pieces arranging them until they have a fish shape they like.  I tell each student that they must have a tail and at least two fins.  Once they come up with a design they like, they use Elmer's glue all to attach the pieces.  

The second class, we begin painting.  The tail is one color, the fins are each one color and the body is painted with large stripes.  The stripes can go horizontal, vertical or diagonal, whichever they prefer.  Some students even do squiggly stripes.  

The third class, they use other colors to paint patterns over the stripes.  Also, they paint and attach the eye(s).

This is a super quick, super successful project and I will probably do something like this every year (maybe robots next year?)...
Picture
Picture
Picture
Picture
Picture
Picture
Picture
Picture
Picture
0 Comments

4th grade romare bearden collage

10/18/2017

1 Comment

 
Picture
Teaching this project was such a cool experience for me!  I learned so much about Romare Bearden, I jumped out of my comfort zone by teaching a collage, and the students wow'd me with their awesome creations during this super fun collage project.

Last summer our 4th grade language arts teacher reached out to me and asked if I could do an art project to accompany her classroom study of Langston Hughes and the Harlem Renaissance.  I love doing cross-curricular projects and was excited about the opportunity.  I went into the project planning on doing a project inspired by Aaron Douglas as I've taught his work before and love him but instead decided to try something new.  At the NAEA conference in New Orleans a few years back I took a workshop on Romare Bearden so this was a perfect opportunity to use that experience in my classroom.

I started by researching Romare Bearden because I honestly knew next to nothing about him and his work.  As I did so, I fell in love with his collages and am so intrigued by his process.  
Picture
Picture
Bearden created his art using painted paper, magazines, photos, and patterned paper.  He did layers of paper and also painted some to create very intricate images depicting stories from his life and stories from the bible and books.  

4th graders watched a slide show of his artwork and we discussed his life and his process of creating art.  The students had lots of interesting insight and ideas about his work.

Before beginning the project, students had to come up with a design inspired by a dream, a memory or a story.  They began by doing a quick sketch of the composition.

The class before beginning the collage, students used texture plates, oil pastels and watercolor paints to make colorful textured painted paper.  
Using this, construction paper and magazine clippings, students started their collage. 

They began by collaging the backgrounds of their designs, they thought about the sky, the ground and things such as clouds, mountains or lakes in their images.  
Picture
Picture
After their background layer was done and the entire white paper was filled, students began to layer the rest of their designs on top.  They added people, animals, buildings, trees, furniture and more.

The results were really awesome and best of all, the 4th graders really seemed to love this project.  They were super engaged with the process until the very end.  A lot of proud artists with this one.
Picture
Picture
Picture
Picture
Picture
Picture
Picture
1 Comment

4th grade Clay flower Bowls

6/21/2017

2 Comments

 
Picture
An oldie but goodie.  There is an obvious reason why this is such a popular art project in the elementary art world.  It is one of those projects that is always really successful and the end product is vibrant and stunning.  I wish I could take credit for coming up with this project, but regardless, I'm proud of my students and their hard work they put into it.

This project takes 3-4 class periods and is very engaging for all students.  Even my students who "don't like art" got really involved in this clay project.

Each student begins with a styrofoam bowl.  Make sure to write the students name on the bottom with Sharpie before beginning.  This will save you a lot of hassle, I promise.  

I did the clay sculpting with the students in two 40 minute class periods but you could do it in one if you're rushed for time

The first day was spent creating the flower petals.  They each started with a slab of clay and cut out 10-15 diamond (or oval or almond) shapes.  They put a chunk of clay in the middle to create a base and "scratch and attached" the petals to that base.  Next they used tools to create texture and some students cut out other shapes to add more dimension to the petals.

The next class we added details to our center.   They began by rolling out a ball of clay, squashing it with their palm and "scratching and attaching" it to the middle to start with a smooth area.  Then they added texture and detail to this area as well.  Between the two classes we kept the clay wrapped up in plastic bags so that it would stay good and moist.

When the clay sculptures are dry, you can easily remove them from the styrofoam bowls and scratch the students name onto the bottom of the flower bowl. 
Picture
Picture
Picture
After the pieces are fired in the kiln, students used colorful Amaco teachers palette glazes to paint their sculptures.  This is my favorite brand of glaze for the classroom.  With just two coats of glaze, the result is bright and vivid!
Picture
Picture
Picture
Picture
Picture
2 Comments

Pre-K Flowers

6/3/2017

0 Comments

 
Picture
 If you're anything like me, you may struggle to come up with projects for Pre-K that are both engaging and age appropriate.

This project, let me tell you, has been one of the most successful that I've done with this age.  I absolutely love the end result and seeing how each students artwork turns out so unique.  They really enjoyed the process too and got a little messy along the way.

Students each started with a long strip of paper, probably 6" x 18".  I cut up strips of poster board so they would be nice and sturdy but any paper would work fine.  

They started by using a blue crayon, laying it on it's side and rubbing it all over the paper to create the sky.  Some students selected dark blue while others chose light blue and some even chose more of a seafoam color.  

Before they begin printing and adding the flowers, I cut up a bunch of cardboard into little squares and rectangles.  I put a paint tray on each table with three different shades of green and they use the edges of the rectangles to print 'grass' all along the bottom of the paper.  They also did a few tall grasses to use next time for their flower stems.
Picture
During the next class, I prep the same by cutting new rectangles and squares from cardboard and also provide them with some old pencils, maker tops, etc.  This time I give them a few colors to choose from that will work well with flowers.  I used yellow, orange, pink and purple this year.  

After discussing how there are tons of different types of flowers, they went to town creating their own flowers.  This is where the students really had fun and their individuality began to shine.  There were big flowers, little flowers, silly flowers, realistic flowers, etc.
Picture
Picture
I absolutely love how these turned out, look at some of these awesome flowers!
Picture
Picture
Picture
0 Comments

5th grade glue batik quilt

4/27/2017

33 Comments

 
Picture
 This project is one of my favorites that I have ever done!

The students all felt super successful and it is a really fun process.  I wish I had done a better job of documenting the first few steps but I'll explain it anyhow.

You can get a copy of a similar lesson plan of mine by clicking here. 

We began this by doing observational drawings of a bunch of different plants.  I borrowed houseplants from my fellow teachers classrooms for this.  The students did multiple large contour line drawings of the plants, mostly focusing on the leaves.

The next step is to trace the drawing with Sharpie and then put the drawing underneath a piece of wax paper and a piece of white fabric over that.  The wax paper is crucial so that the glue doesn't go to the fabric and stick to the drawing or to the table.  Tape it all to a table of board so that it doesn't move.  After taping it down, you will be able to see the drawing through the fabric.  Use blue gel glue to trace over the drawing onto the fabric.  I've tried other glues as well and others work but the blue gel glue is absolutely the best.  

Let the glue dry completely.  Overnight is the best.  Once it is totally dried, use watered down acrylic (or fabric) paints to paint over the entire fabric.  Be sure to cover the glue with paint too.  This assures that you have a great batik effect with strong white lines.  

​
Picture
Picture
Again, let it dry completely. 

The next step is to run warm/hot water and fill a bin.  Separate the fabric from the wax paper and drawing.  Soak the fabric for at least 10 minutes.  After about 10-20 minutes, use hands to rub all of the excess glue.  

Once the glue is completely removed from the fabric, rinse it in warm water and hang it to dry. 
Picture

The images turn our very vivid and colorful!  You can see how each students design turned out very different.  I gave them a limited color palette to work with since they will be used to make a quilt.  
I wish I could take credit for the next step but I passed the batiks over to my friend and she took care of the rest.  She sewed it all into this fabulous quilt.  I love it sooooo much and wish I could keep it forever....but we sold it at the school auction.  
Picture
Picture
Picture
33 Comments
<<Previous
Forward>>

    Author

    Annie Monaghan.
    Art lover.
    Art creator.
    Art teacher.

    RSS Feed

    Categories

    All
    1st Grade
    2nd Grade
    3rd Grade
    4th Grade
    5th Grade
    Abstract
    Art History
    Art Videos
    Auction
    Batik
    Cardboard
    Chalk Pastel
    Clay
    Collaboration
    Collage
    Colored Pencil
    Color Wheel
    Contour Lines
    Drawing
    Highlights And Shadows
    Kindergarten
    Landscape
    Mural
    Names
    Notan
    Observational Drawing
    Oil Pastel
    Online Art
    Origami
    Paint
    Painting
    Papier Mâché
    Patterns
    Portraits
    Pre K
    Printmaking
    Relief Sculpture
    Remote Art
    Remote Learning
    Sculpture
    Self Portrait
    Self-portrait
    Sewing
    Shapes
    Sharpies
    Still-life
    Symmetry
    Texture
    Tissue Paper
    Warm And Cool Colors
    Watercolor
    Weaving

Powered by Create your own unique website with customizable templates.