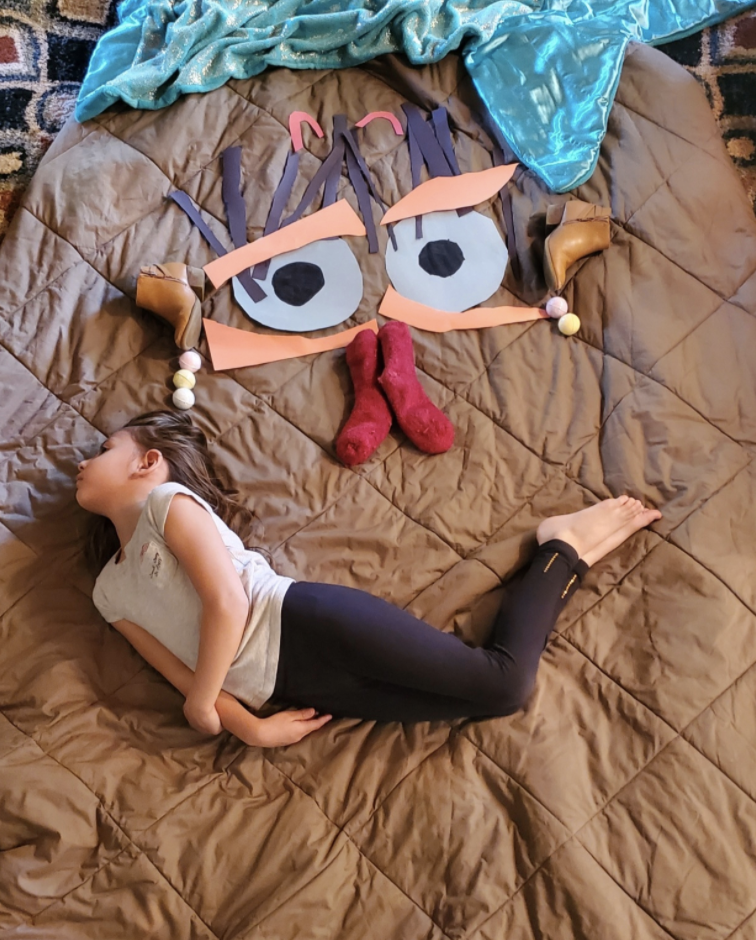
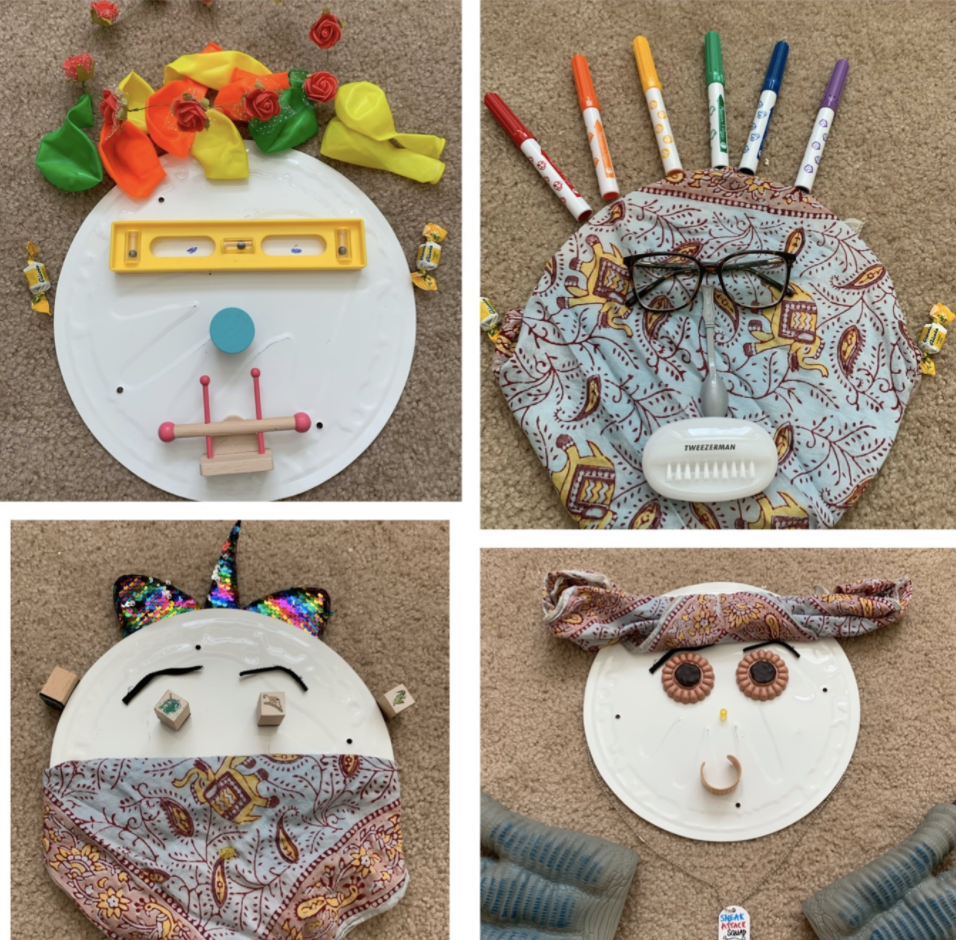
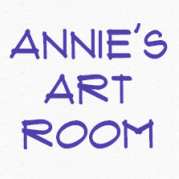
This was such a fun and successful remote learning project with Kindergarten! They simply had to go around their home, collect items and make them into a face!
|
This was such a fun and successful remote learning project with Kindergarten! They simply had to go around their home, collect items and make them into a face!
0 Comments
 I'll be honest and say that when I was growing up and even through my college career as an art major, I never used to appreciate abstract art. I always thought it was kinda pointless and silly. Over the last few years though, I've really learned to love it. The more I learn about it, the more I appreciate it and I've found that it's a style of artwork that is super fun and expressive to make and kids love it too. It's a great way to be free and uncritical of oneself while creating! I've been doing abstract artwork with Pre-K, Kindergarten,1st and 2nd graders and just having the best time teaching it. Each grade has used a different process and different materials. The basic goal is to do lots of layers of lines, shapes, and colors to build up an aesthetically pleasing piece of artwork that was super fun to make. Enjoy these photos of the process and final work.  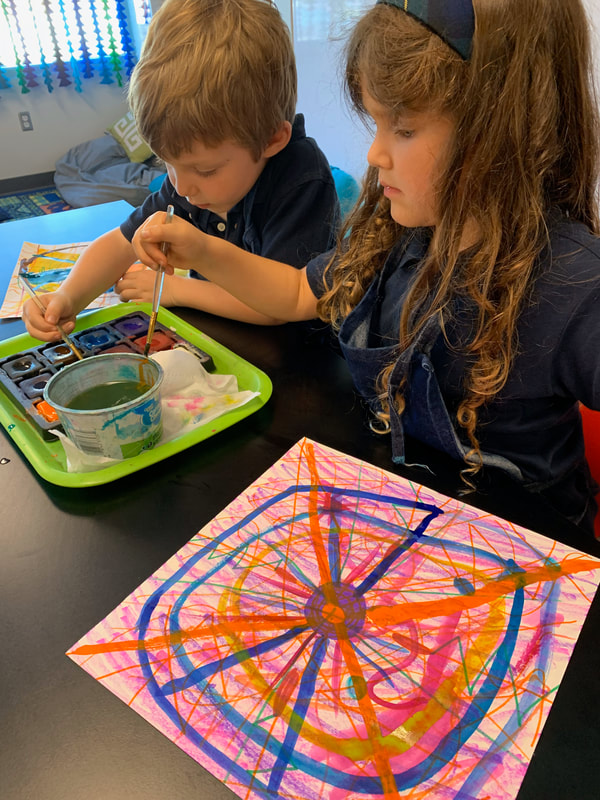 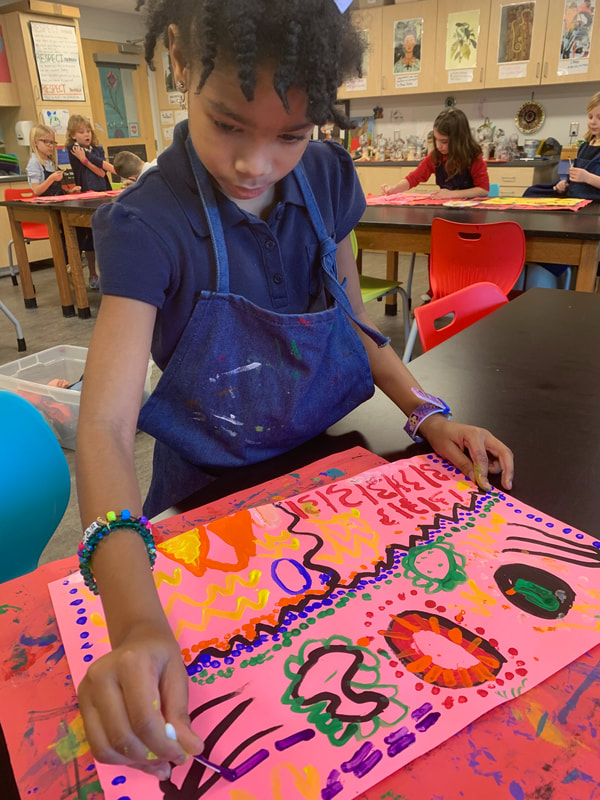 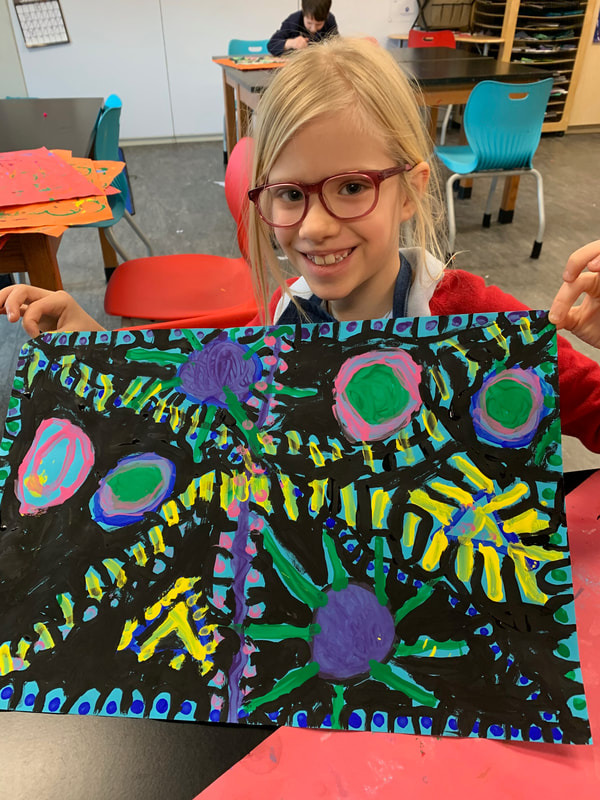 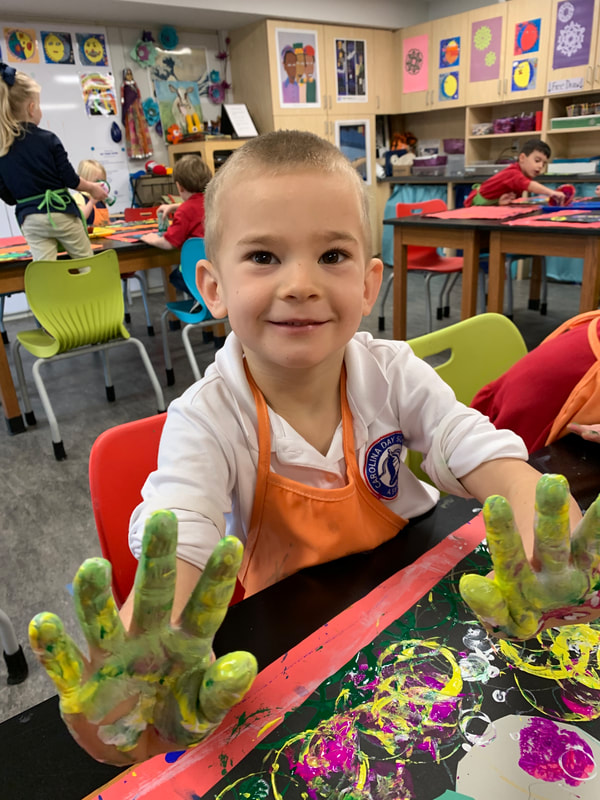 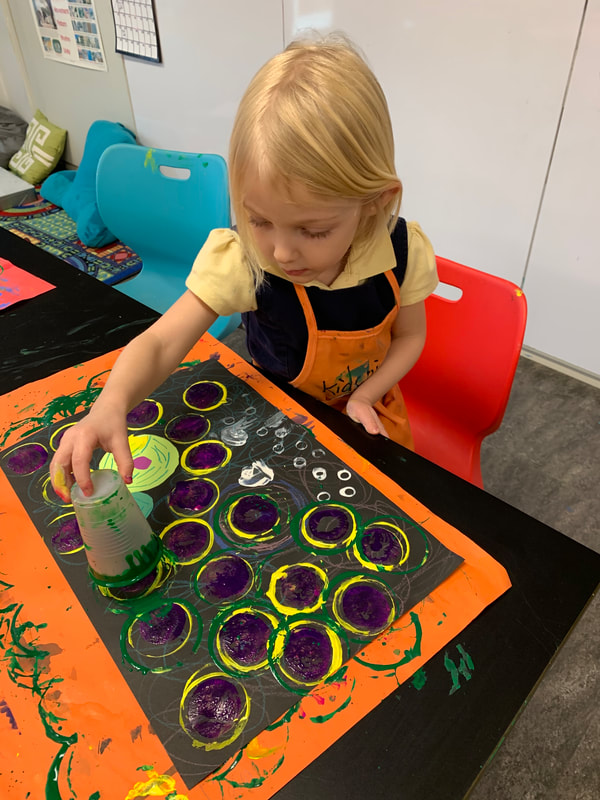  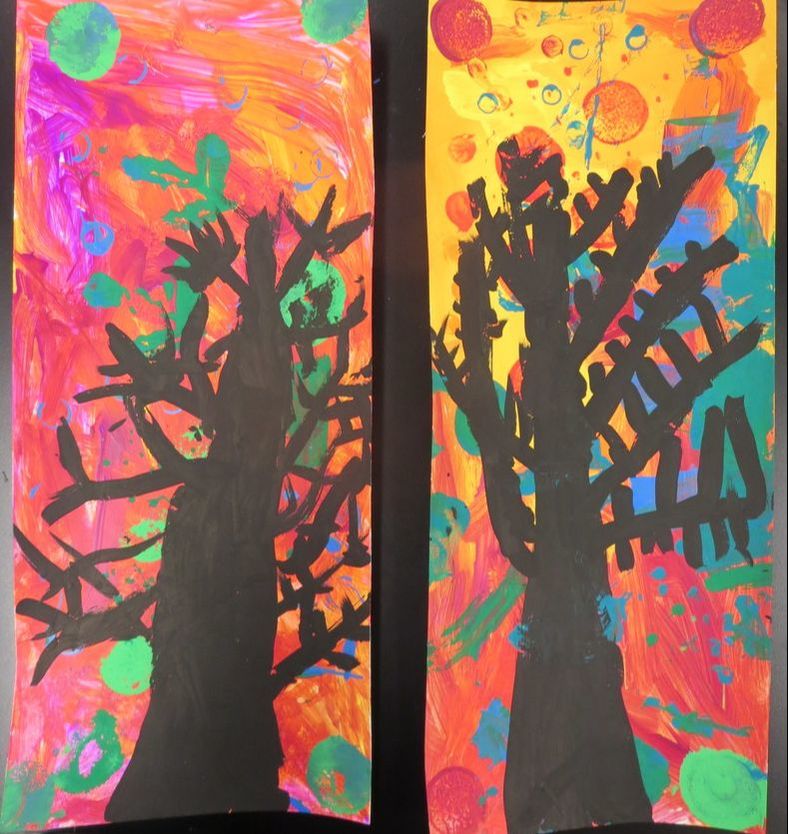 This is my new favorite Kindergarten art project and it only took three 30 minute art classes! We began this colorful project by learning about abstract art. When I explain abstract art to the younger grades, I tell them that it is art with lots of lines, colors and shapes but nothing recognizable. There is no cat or house, etc. I was proud to hear that after this first class, students were using markers to create abstract art in their classroom during free time. The first day of this project, students used lots of warm colors like yellow, pink and orange to fill their paper with color. They used tempera paints and different tools such as sponge brushes, stamps, marker caps, cardboard scraps, etc to create a colorful abstract painting. The second day, they did the same thing but used cool colors such as blue, turquoise and green and added layers of patterns on top of the warm colors. They were instructed to just have fun and experiment. 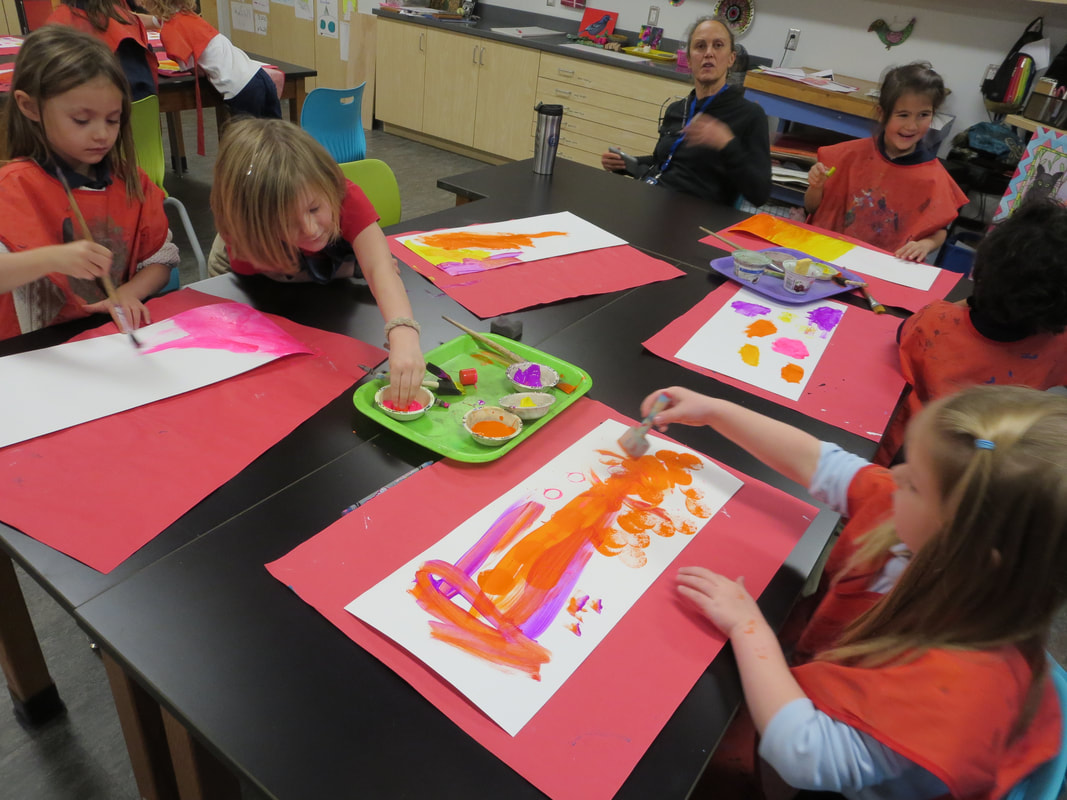 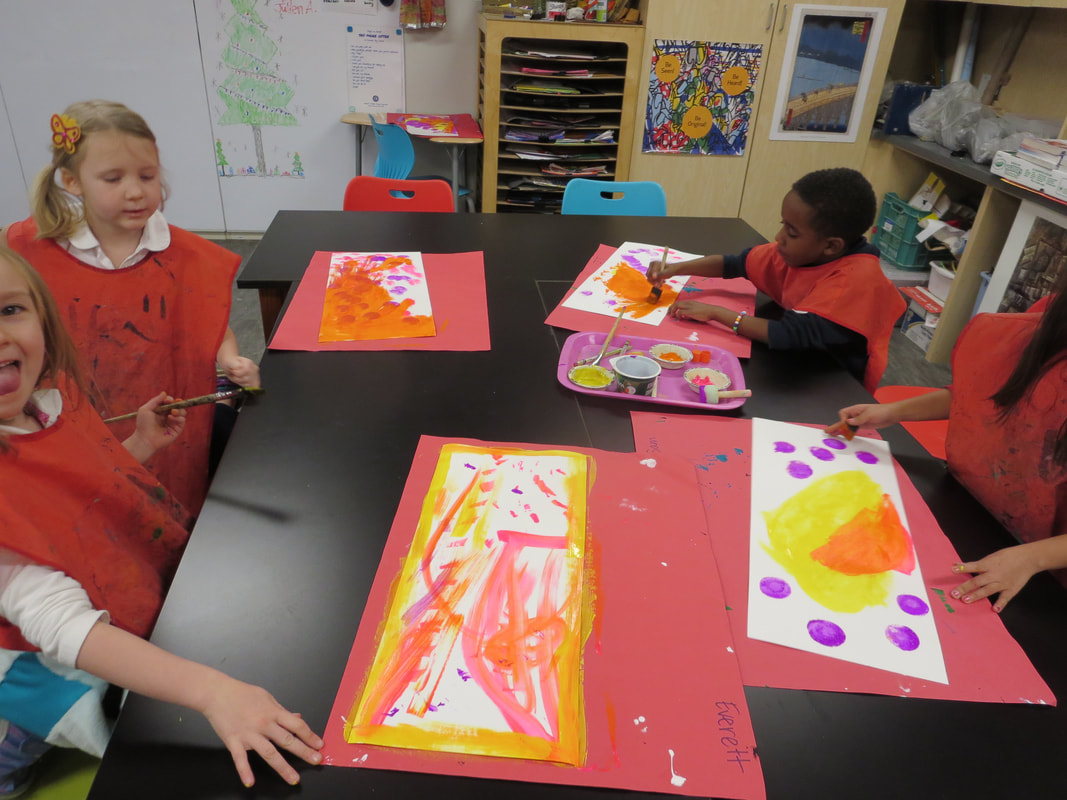 On the third day of class, we added a black tree silhouette on top of our abstract paintings. I demonstrated what a silhouette is by having a student stand in front of a window and then turning off the light so they were heavily backlit by the sun, creating a dark silhouette of the students body. I also showed them how to paint trees by first painting a large tall triangle in the middle of the paper and adding big branches reaching to the sky. Then they added little branches reaching to the sky off of the big branches. Watching the students paint these trees was really magical as if seeing their artwork really come to life. I absolutely LOVE how this art project turned out and am proud of the students for being so exploratory and brave as they tried new things in the art room. 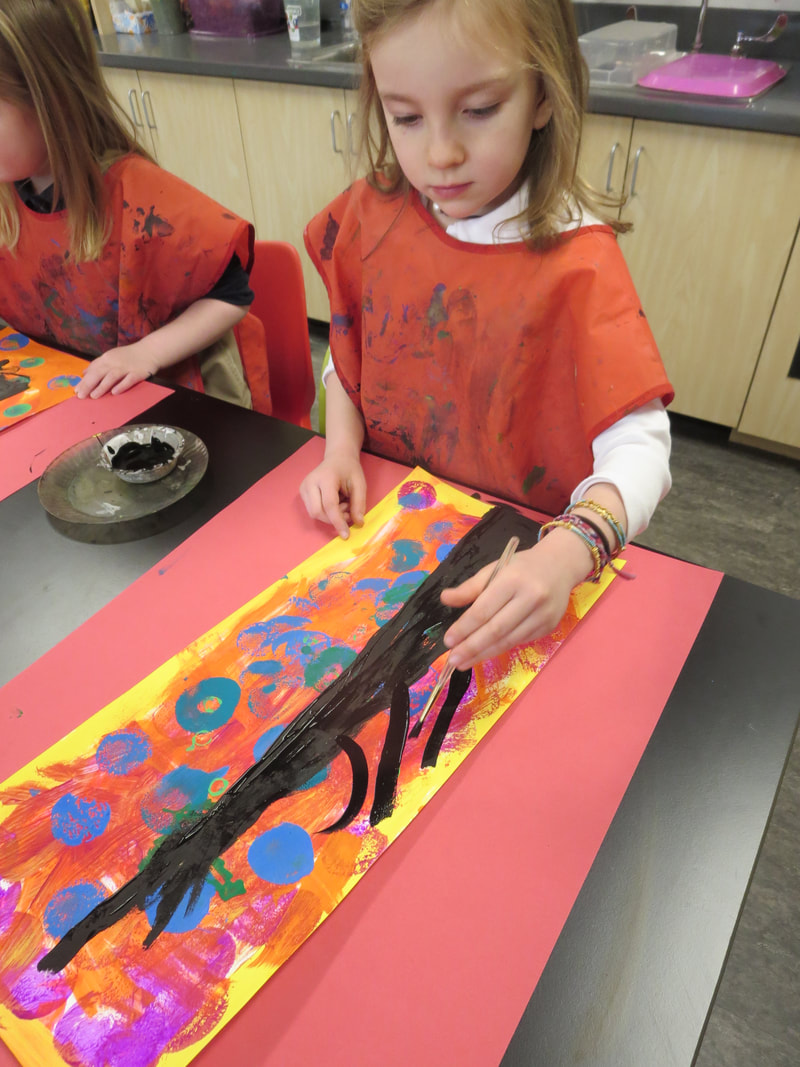 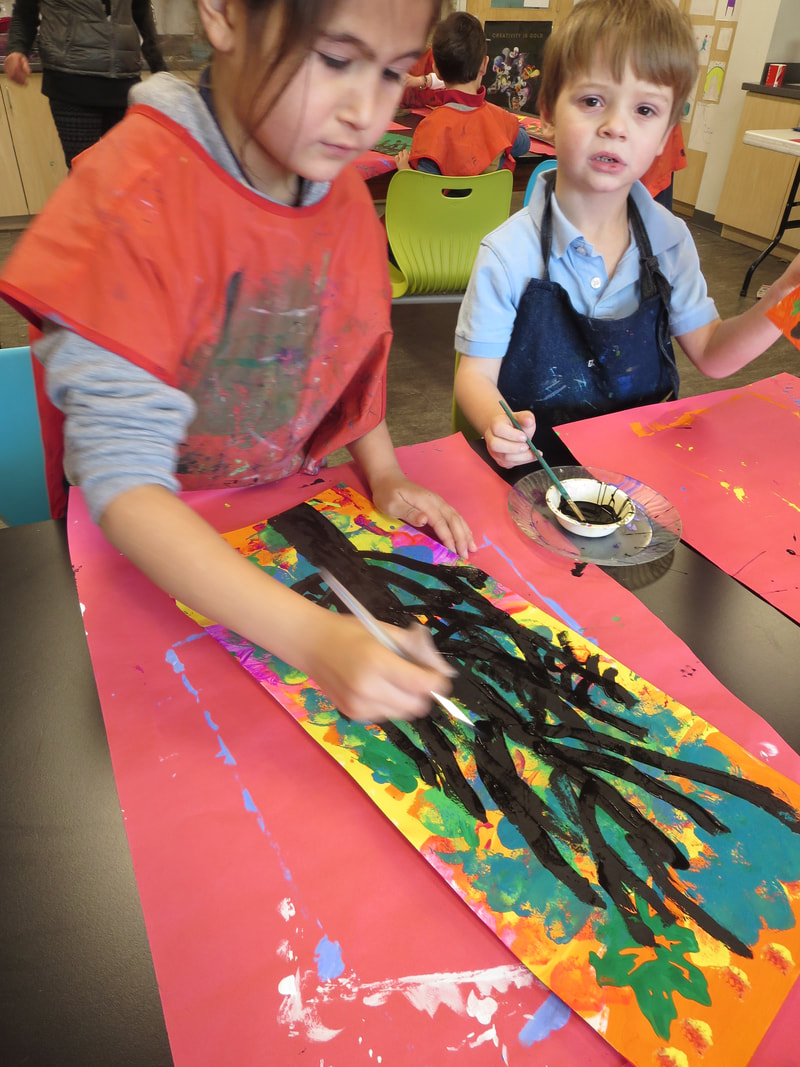  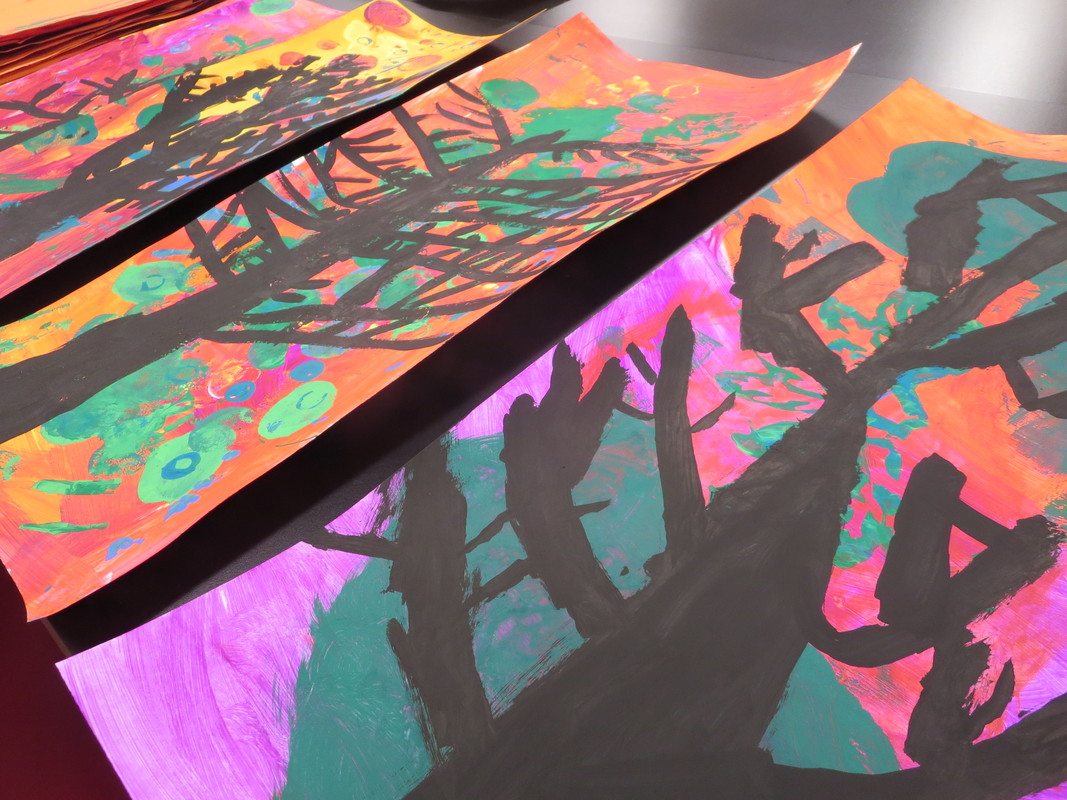 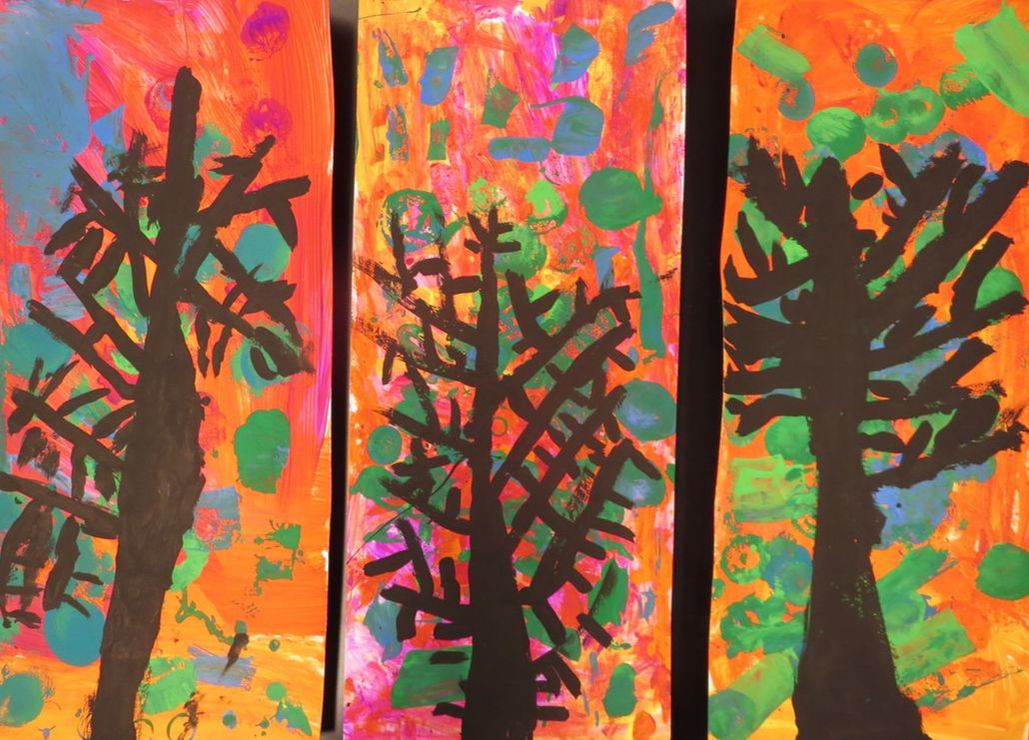 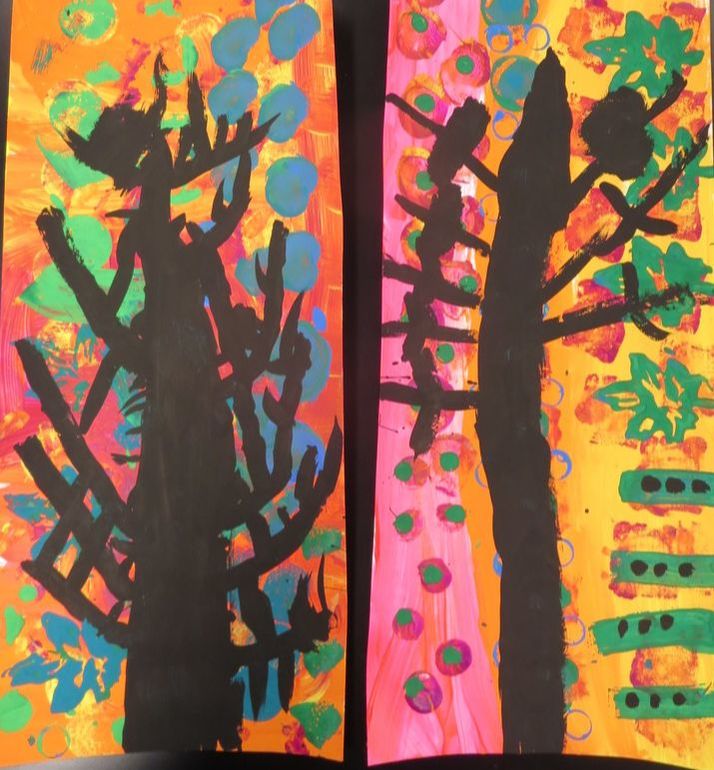 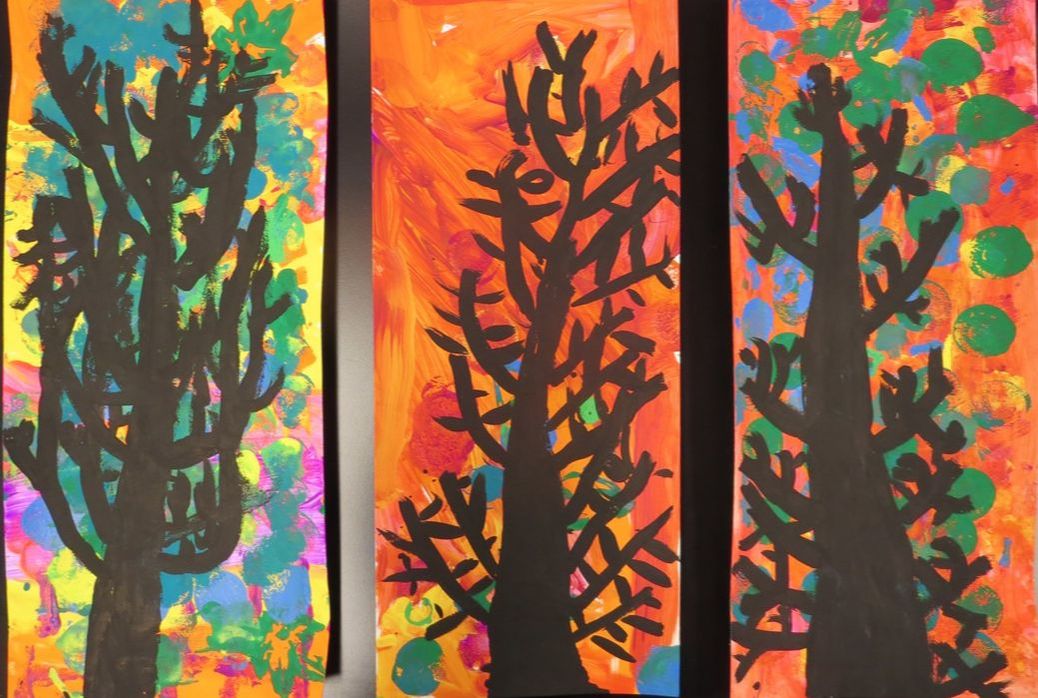 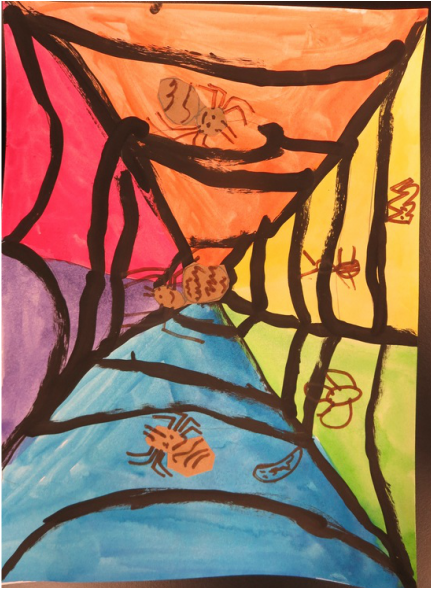 I switch up how I teach color wheels with the Kindergarteners every year because I get bored teaching the same projects over and over. This year I decided to do spider web color wheels as we were approaching Halloween. I came across THIS blog on pinterest which inspired my lesson. I always start the Kindergarten color wheel project by showing the wonderful OKGO's music video "Three Primary Colors." I take any opportunity I have to show students music videos by OKGO. They are brilliant. This song gets stuck in my head for weeks every time I watch it which hopefully means that it gets stuck in the Kindergartener's heads too! After watching the OKGO video, we started our spiderwebs by drawing a little dot in the middle of our paper with pencil and drawing six straight lines spread out that started at the dot in the middle and went all the way to the edge of the paper. As they worked, I made sure to walk around and check that each student did exactly 6 lines so that the color wheel would work out. Next, we used watercolors to paint in the three 'corners' (every other slice) with the three primary colors: red, blue and yellow. TO fill in the other three slices, we mixed our paints together to create the secondary colors: purple, green and orange. Our next step was definitely the most tricky for the students, which is why I am super thankful that I thought to have them start with pencil BEFORE painting with black. I showed them how to draw the spiderweb design by starting with one color slice at a time. Look at the slice so that it is pointing upward and draw about 5 hills that go from one side of the slice to the other. Continue this for each color slice. Some students figured this out right away but there were quite a few who really struggled with making these hill shapes and making sure they went all the way across each color slice. After I helped everyone get their hills correct, we used black tempera paint to paint the straight lines that separate each slice and to paint over the hills. 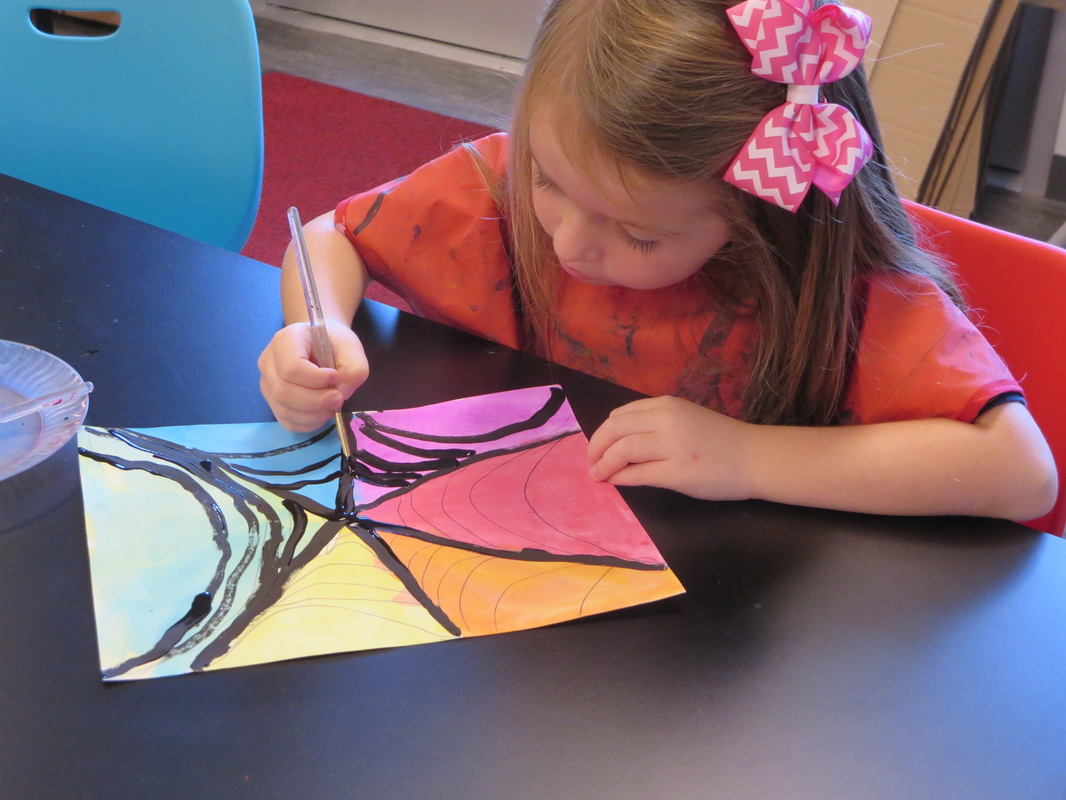 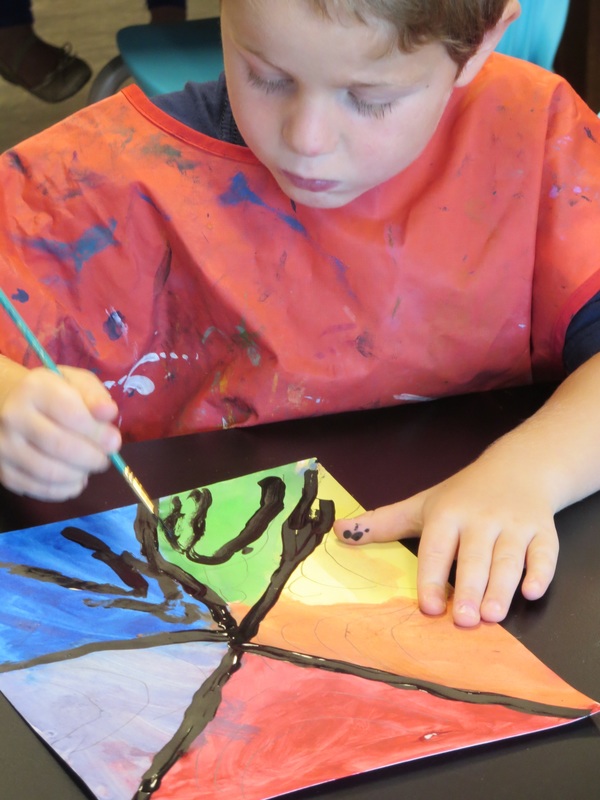 On the last day of this project, I taught them a little bit about spiders bodies and asked them what kinds of spiders they knew of. I was impressed with how many they were able to list. The main thing I focused on was that there are 8 legs on spiders that actually come out of the head region and NOT out of the abdomen. To create the spiders, they cut out two ovals of brown paper for the head and abdomen and then used markers to draw texture, glued them on the web, and drew their 8 legs. Students could make as many spiders as they wanted. Some students did only 1, while others make like 7 spiders. They turned out pretty cute overall. If I do this project again though I will come up with a different way to make the spiders probably. 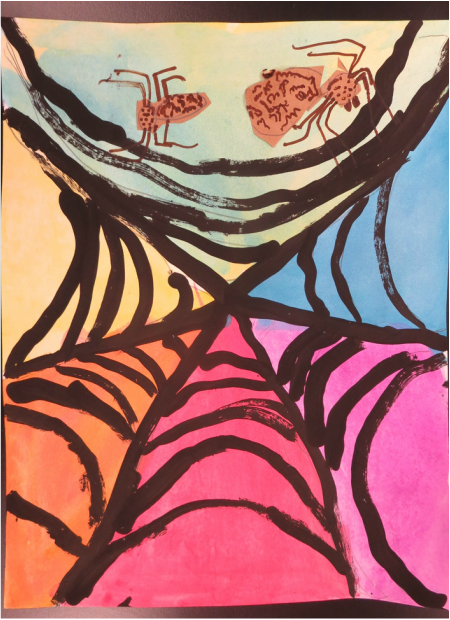
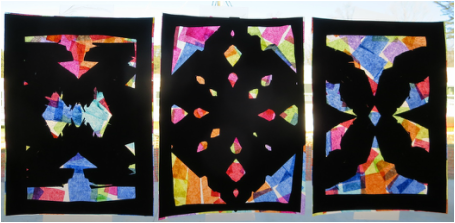 At CDS, Kindergarten students spend a lot of time studying different countries and cultures around the world. To accompany their study of Europe and castles, in art class we created these fun stained glass collages. We looked at pictures of a bunch of different stained glass in Europe. Most were in cathedrals and churches and others in castles. We talked about how the sunlight coming through the window is what makes it look so colorful and how stained glass windows were often used to tell stories. 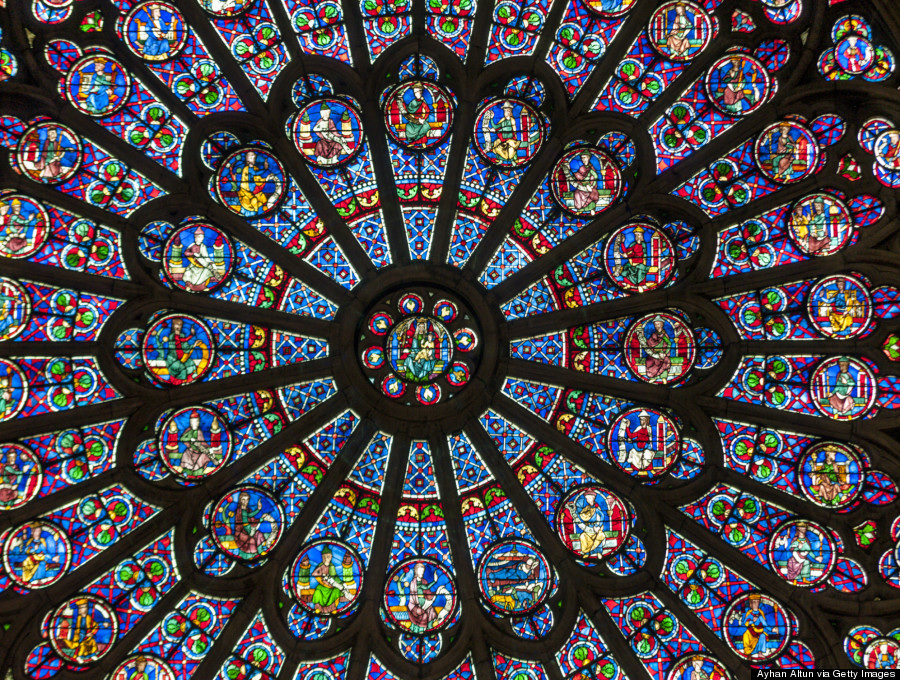 Students began this project by using watered down glue to collage colored tissue paper squares to a piece of wax paper. Students spent 2 1/2 class periods doing this. Some students used all of the colors available, while others used only two or three colors. This was a messy process and it was neat watching the different techniques that different students used. I taught them to use their paintbrush to put glue on just a small area of the wax paper, apply tissue paper, then brush more glue overtop of the tissue paper. Some students did so and applied the tissue paper totally random while others created patterns with the pieces. 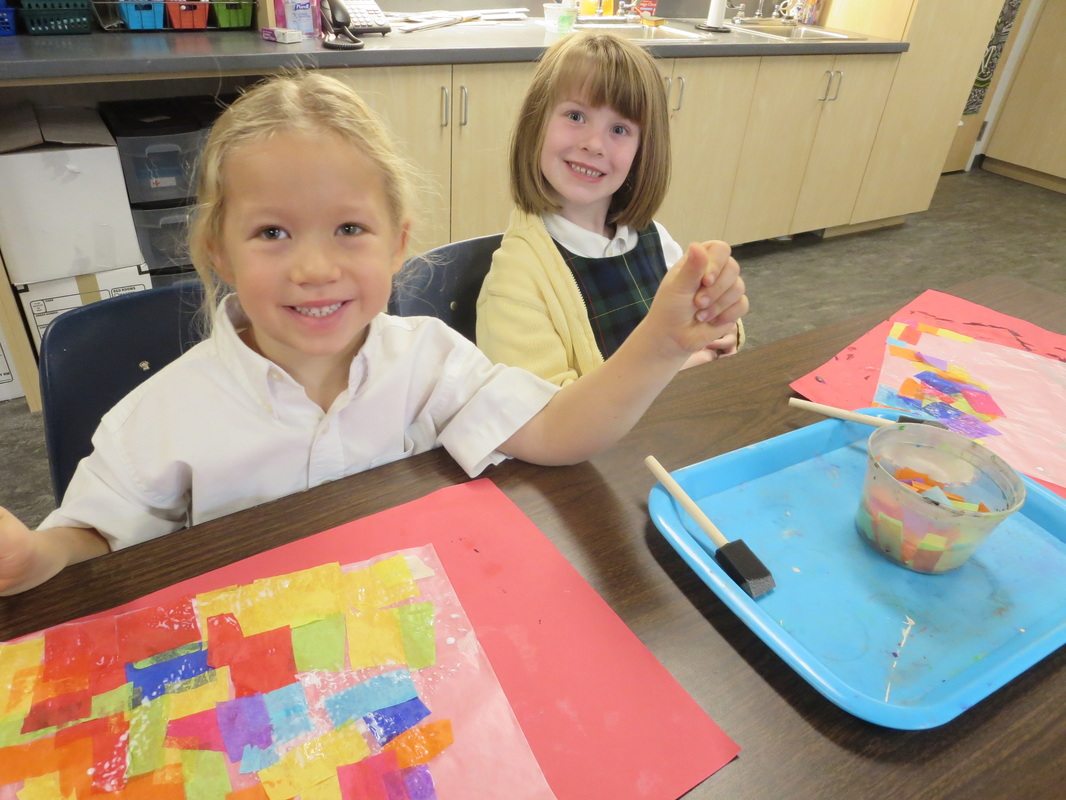 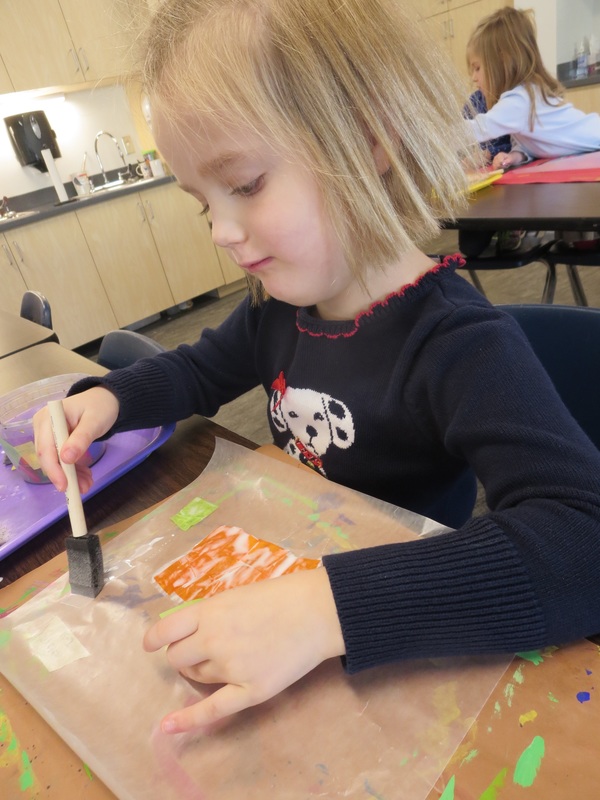 For the next part of the project, students cut out a black frame with construction paper. ** I hit a very small bump with teaching this project when I realized that not only would it be quite difficult for the students to successfully glue the construction paper onto their finished tissue paper collages, but that the glue stick glue didn't stick very well. So, as any teacher would, I decided to have the students do all of the cutting, but I ended up glueing all of the construction paper cut outs down myself. I still used glue sticks, but I realized that once glued down, they needed to be weighted, so I stacked books on top until they were fully dry.** We also spent one day practicing folding paper into 4's and cutting out shapes from the sides and corners. We practiced making 'snowflakes' as well. After practicing, I gave students the black construction paper and had them cut out a symmetrical, fun design. To be honest, students got a bit frazzled because the construction paper was hard to cut through but once they finished and opened up their 'snowflake,' they were full of joy! I ended up having to glue all of these pieces on too which was fine. The end result of this project is beautiful. Especially when hung in a window so that the sun can shine through. I will definitely teach this project again next year but I have to figure out a few things to make it go a bit more smooth.  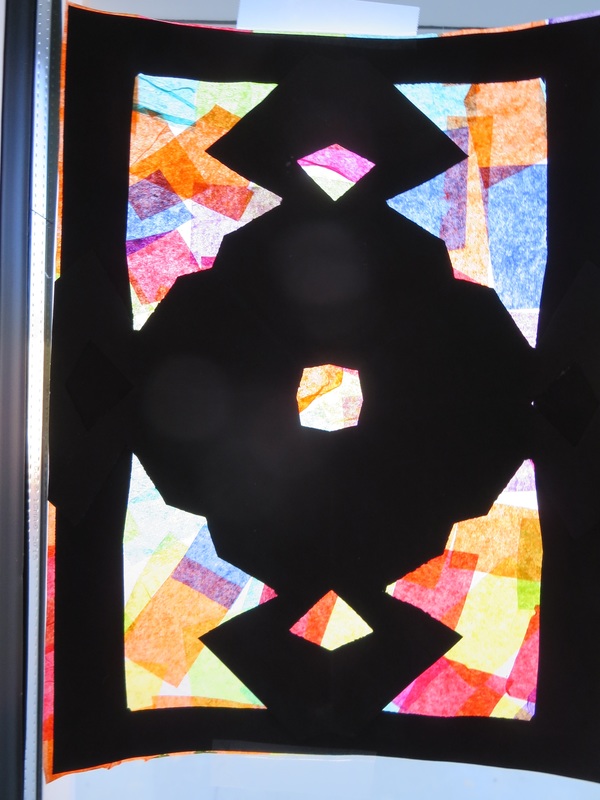 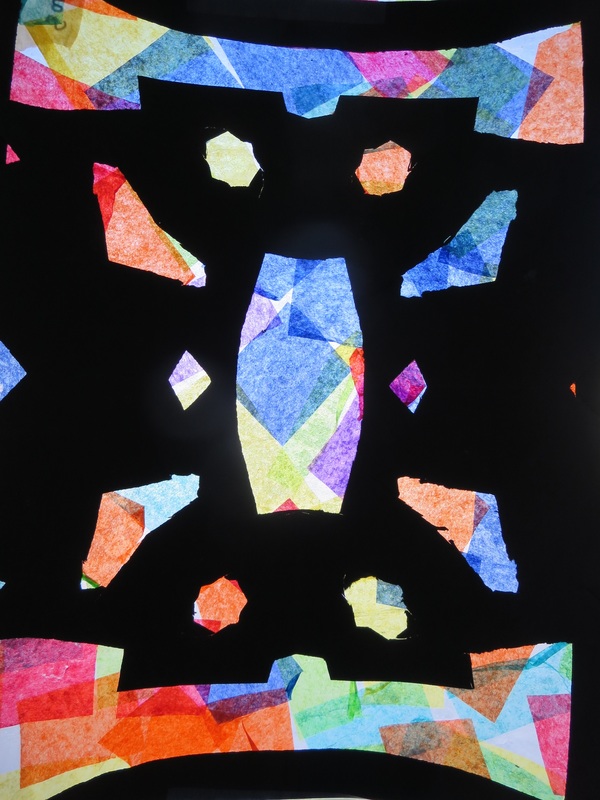 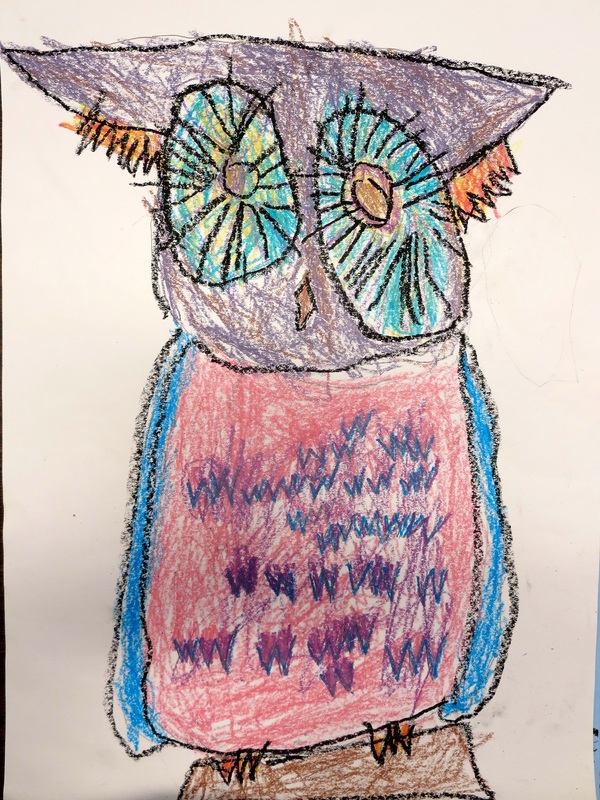 I don't often do these step-by-step drawing projects with students in art class but when I do, they have so much fun and the results are always wonderful! To do this owl drawing, I demonstrated each step on the board and the students would follow my lead to create their own drawing. I would start by telling them and showing them to draw two large circles towards the top of the paper. Next, draw two smaller circles inside of each large circle. Those are the eyes....and on and on for the whole drawings. There are some art teachers who are against this sort of art teaching because they think that the student is simply "copying" the teacher rather than creating something of their own imagination. I, on the other hand, find that this sort of project once in a while allows students to create something that they are very proud of and would probably not have otherwise been able to draw on their own. I've also witnessed that after teaching students these types of step-by-step drawings they begin to draw their own outside of class with adjustments to make it more unique. 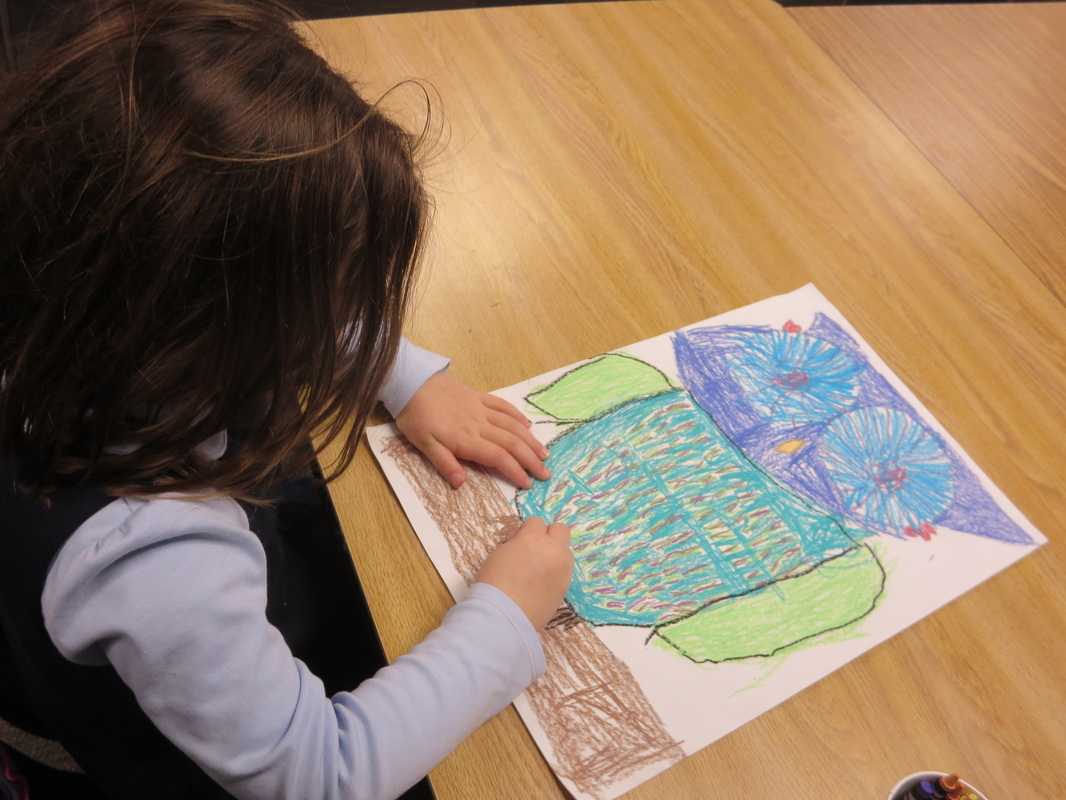 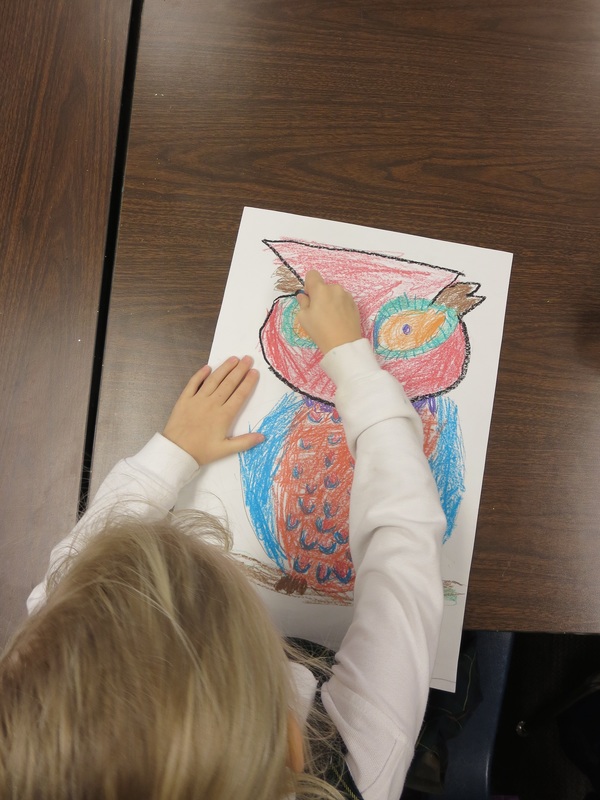 I always make sure to give students opportunities to add their own flair to the drawings by giving them a sort of template to create a drawing, but leaving enough room for them to make some of their own choices. It is exciting to see how, although given the same instructions, each drawing turns out so different. Some have big giant eyes, others smaller. Some with big round bodies and others tall and thin. Either way the students take pride in their drawings. After finishing the line drawing, students colored in their owls with colorful construction paper crayons and outlined their contour lines to really make the owls pop. The Kindergarten students seemed to really love drawing these owls and the results are truly adorable! 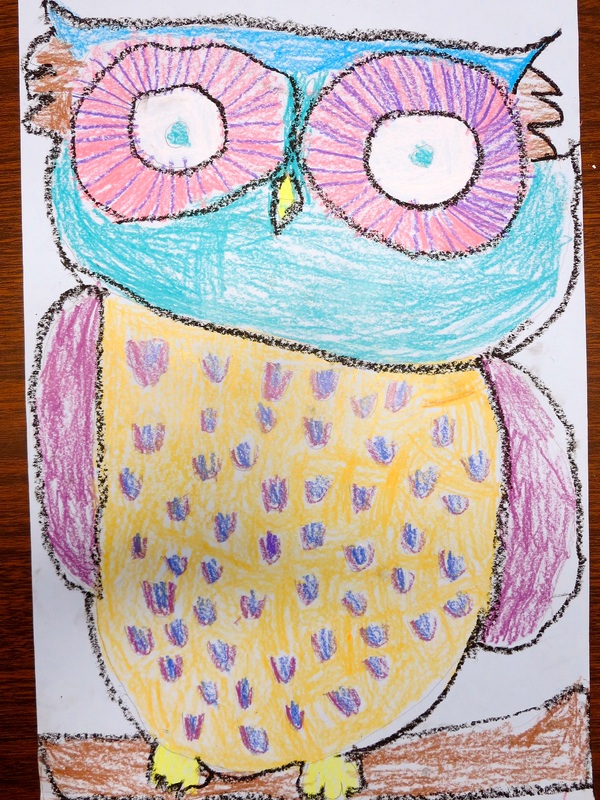 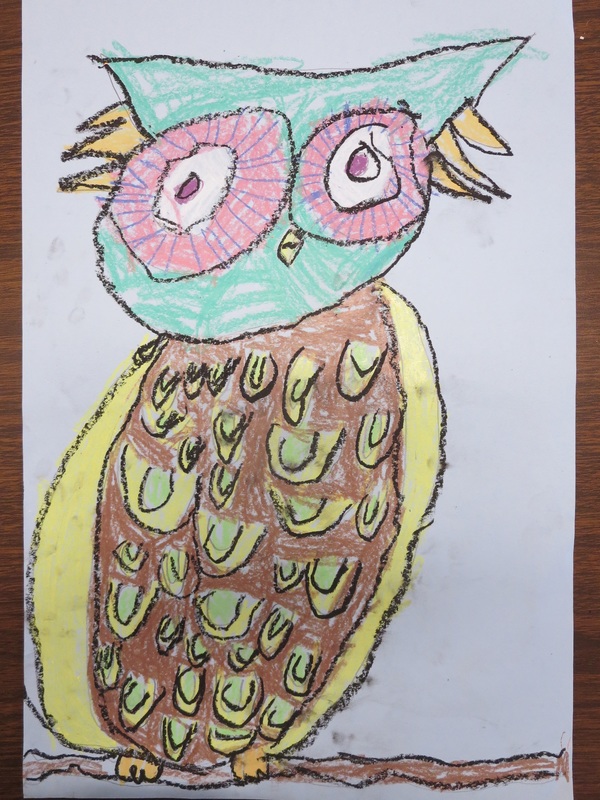  First new blog of the new school year hooray! This year has gotten off to a brilliant start and I am so excited about my talented students and the amazing art that they have already created and about seeing what they will make in the future!!! To start off the new school year very strong, Kindergarten students created these awesomely adorable multimedia snails. We began by learning about lines. There are many different sorts of lines, straight lines, curvy lines, curly lines, and spiral lines. After practicing drawing spiral lines many times, students created a snail shell by using oil pastels to draw a very large spiral to fill their paper. Next, they took on the task of filling the spiral with their name repeating. This was a great exercise for Kinders to practice writing their name and also created an interesting pattern throughout the shell. After adding a head and tail with oil pastel as well, students used watercolor paints to make a colorful, fun snail. They were very excited as they watched the watercolor and oil pastel resist and the drawings showed through the paint. Once the snails were done, students carefully cut around the snail and glued it onto a blue (or black) piece of paper and drew some clouds. Before adding the 'dirt' and 'grass,' we discussed texture. Texture is what something feels like or what it looks like it feels like. Kinders recognized that puppies may feel "soft, "fuzzy," and "squishy" whereas a tree bark may feel "rough," "hard," and "bumpy." They glued down cut pieces of paper to create a dirty and grassy texture. The favorite part of the project was probably adding the finishing touch of the silly goggley eyes. What I have learned is that googley eyes make a kindergarten student a very, very happy student. 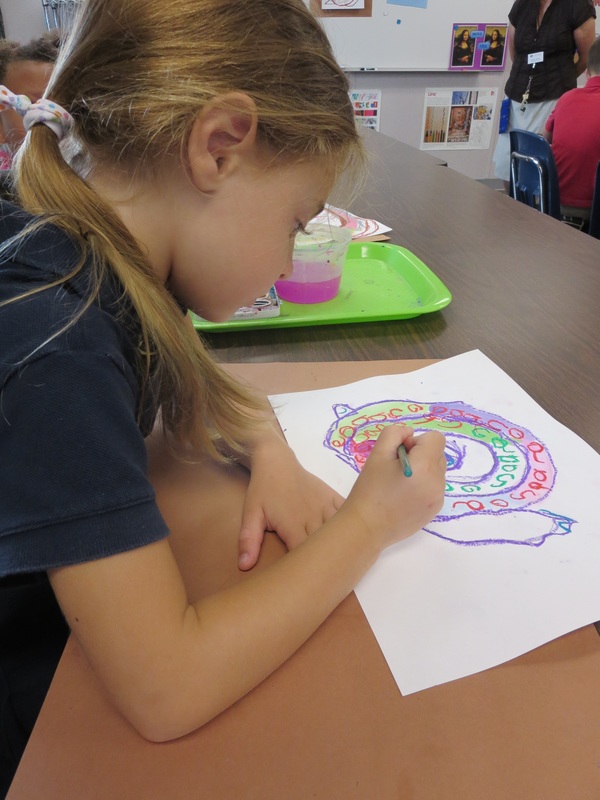 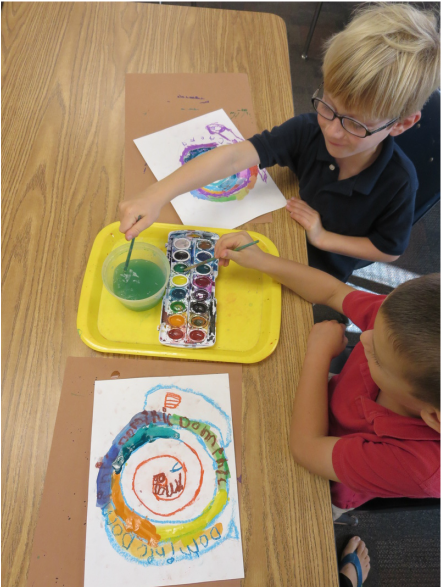 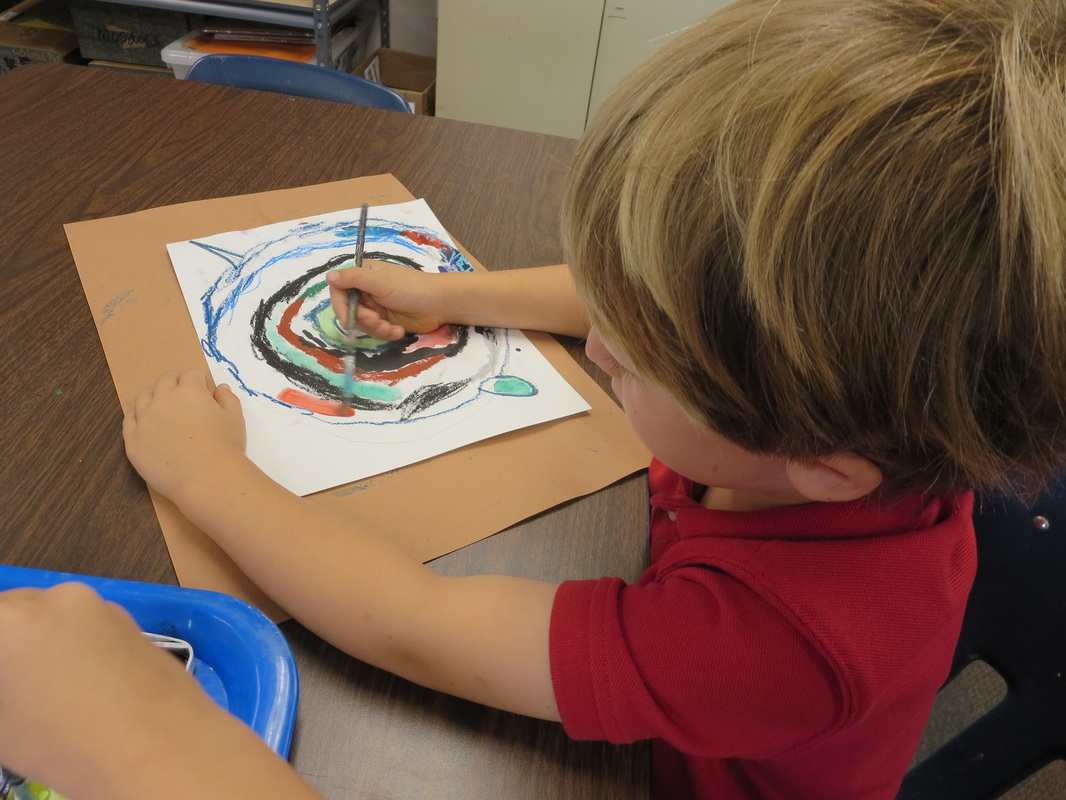 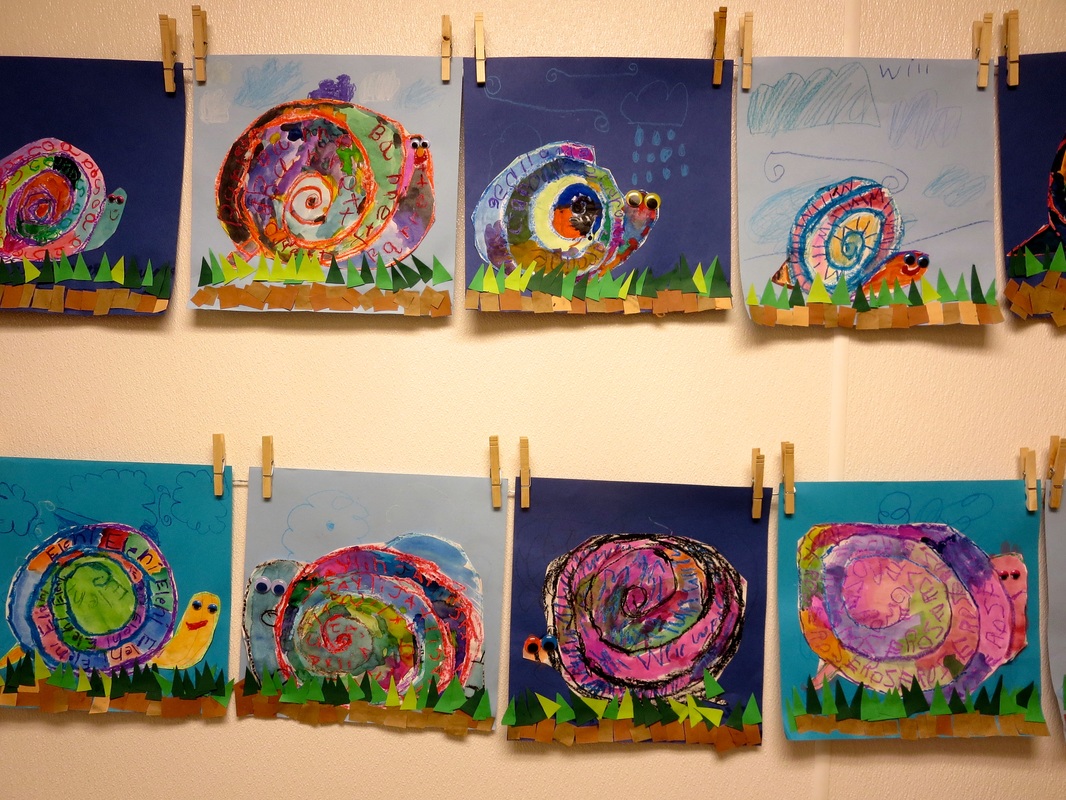 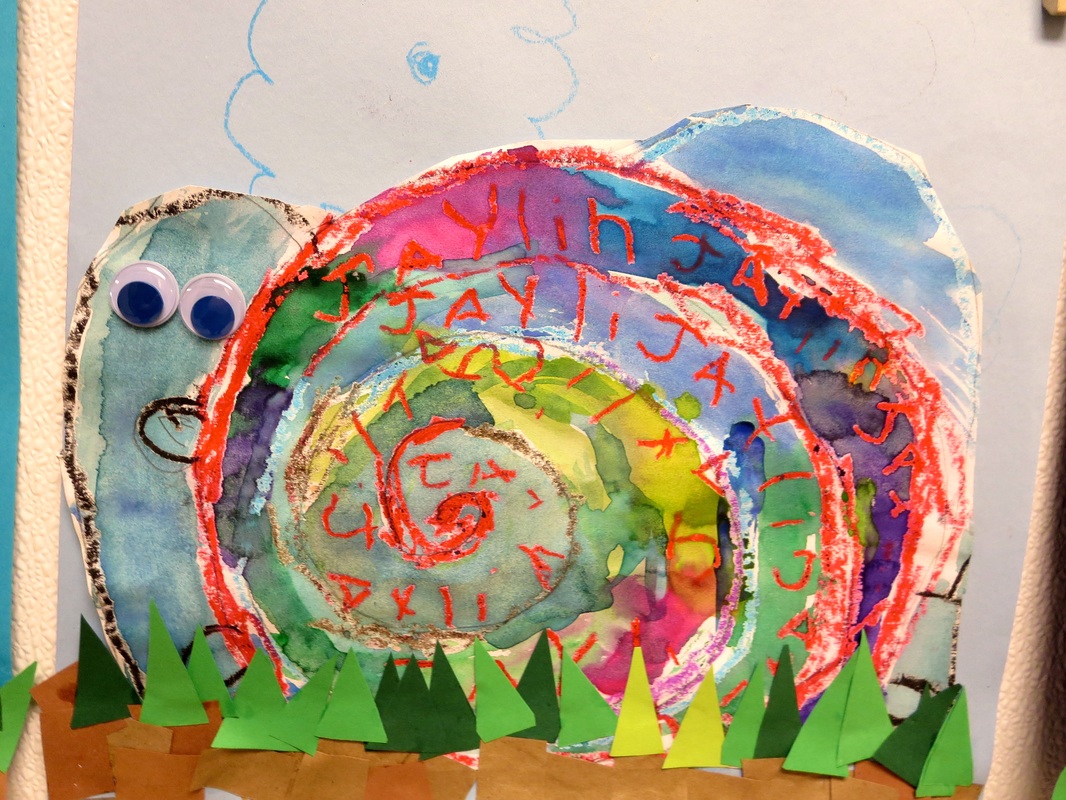 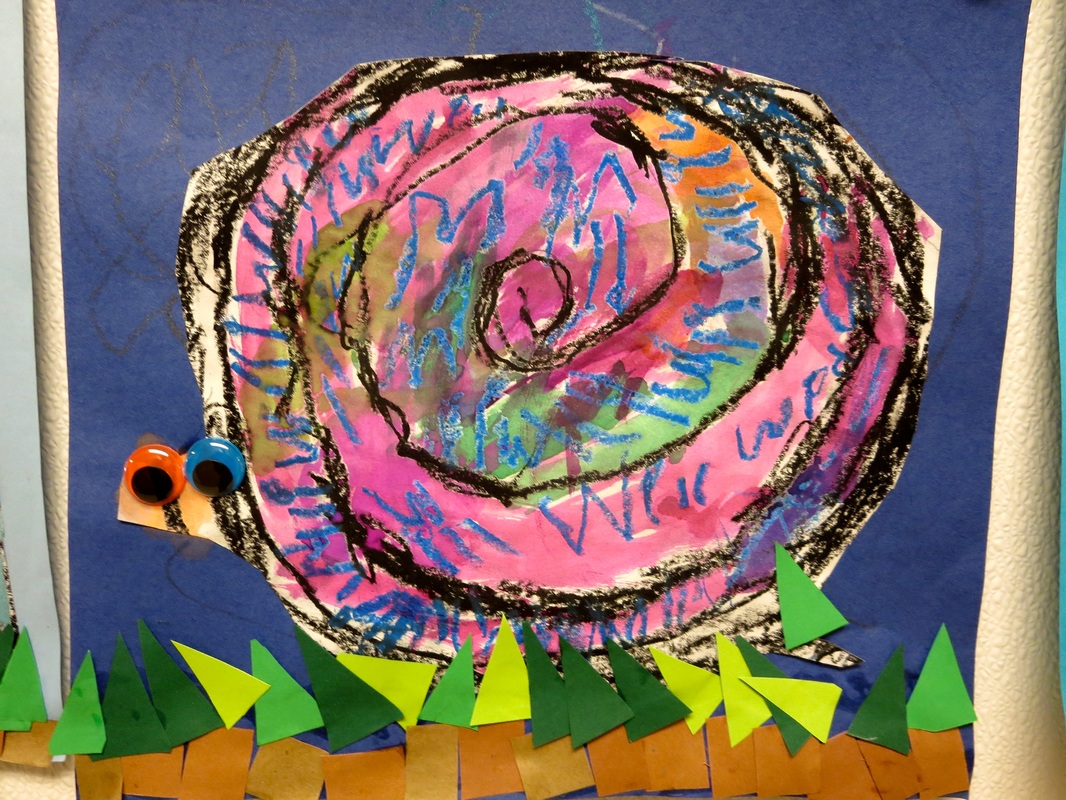 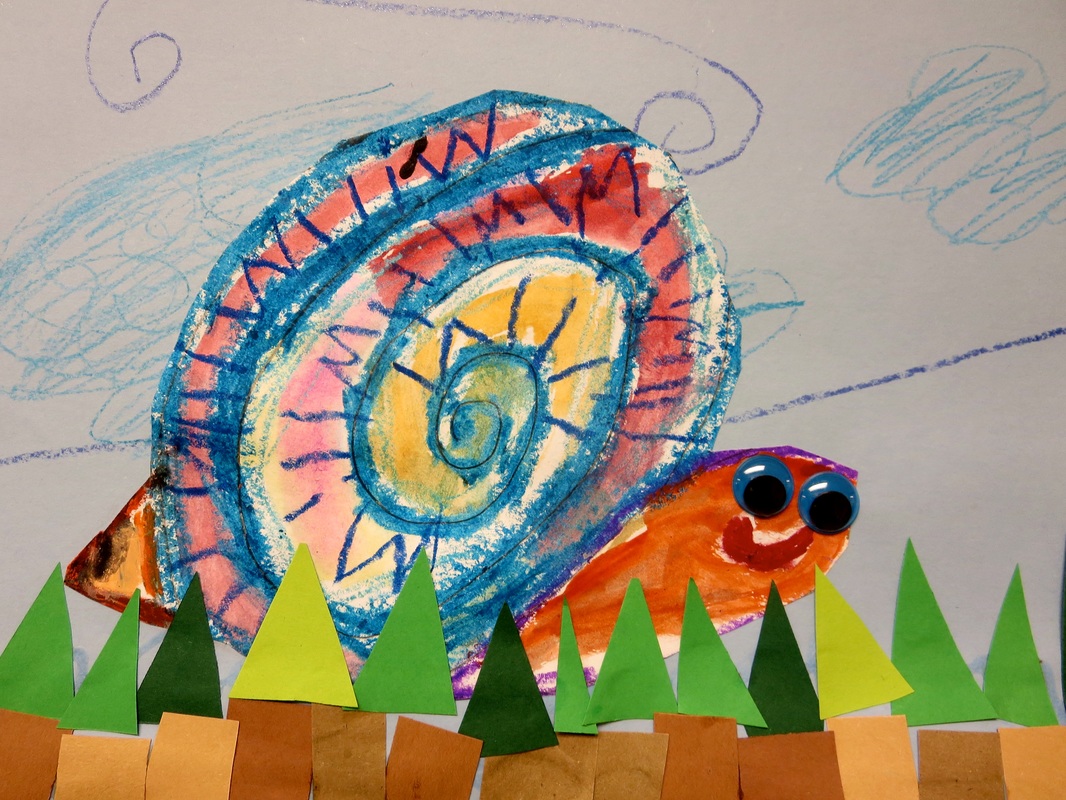 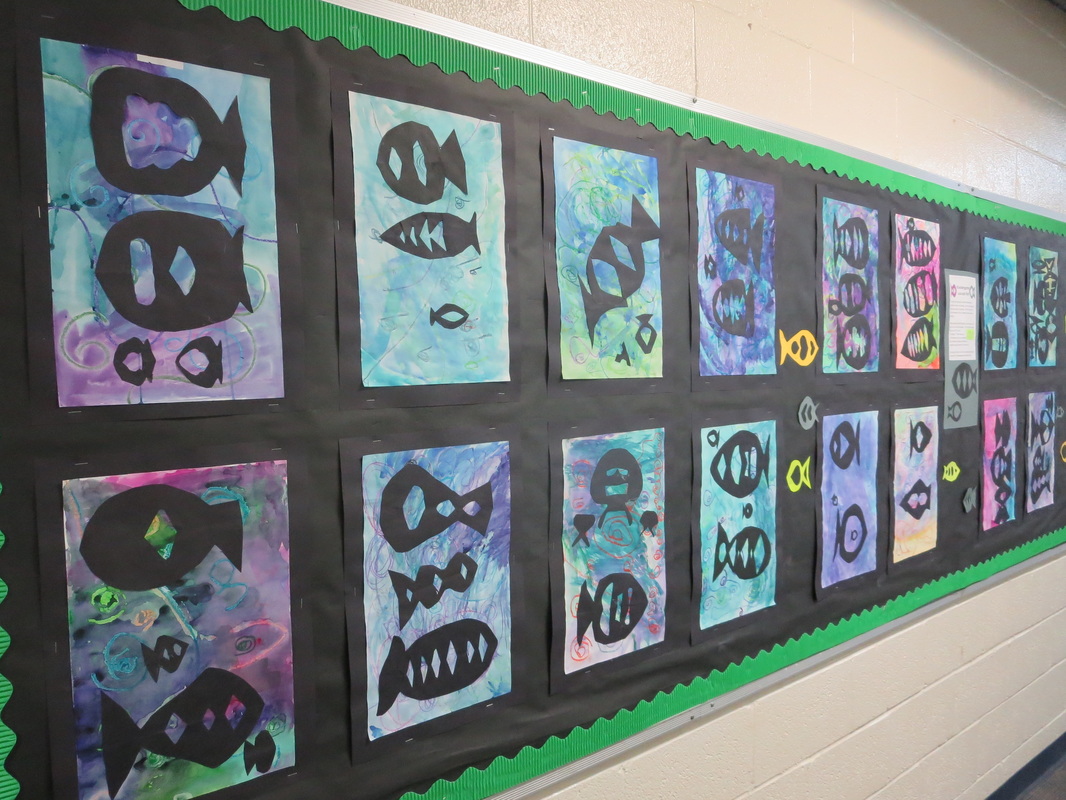 After coming upon this blog post on Pinterest, I felt inspired to teach this project myself. Results=AMAZING! The Kindergarten students really blew me away on this one. This was a project that every single student's artwork turned out great. Like frame and hang on the wall worthy. And although they definitely had to follow step-by-step instructions, there was room for each student's personal touch and unique style to shine through. 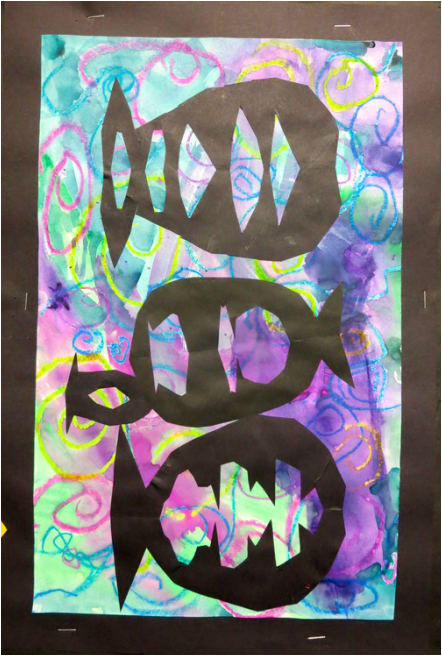 To begin this project, students were asked to imagine a lake, an ocean, a river or the beach and say what colors they saw. With the colors that they visualized, they created a flowy watercolor painting. Next students folded black pieces of paper in half and cut out a fish shape. On the fold of the paper, they cut a ‘hill’ and a ‘triangle.’ Next they cut out shapes such as squares and circles to create interesting negative space within the fish body. By gluing the fish onto the watercolor background, a beautiful underwater scene was created. 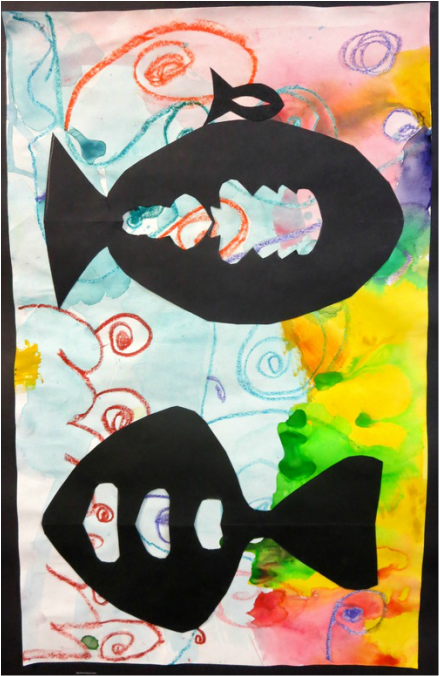 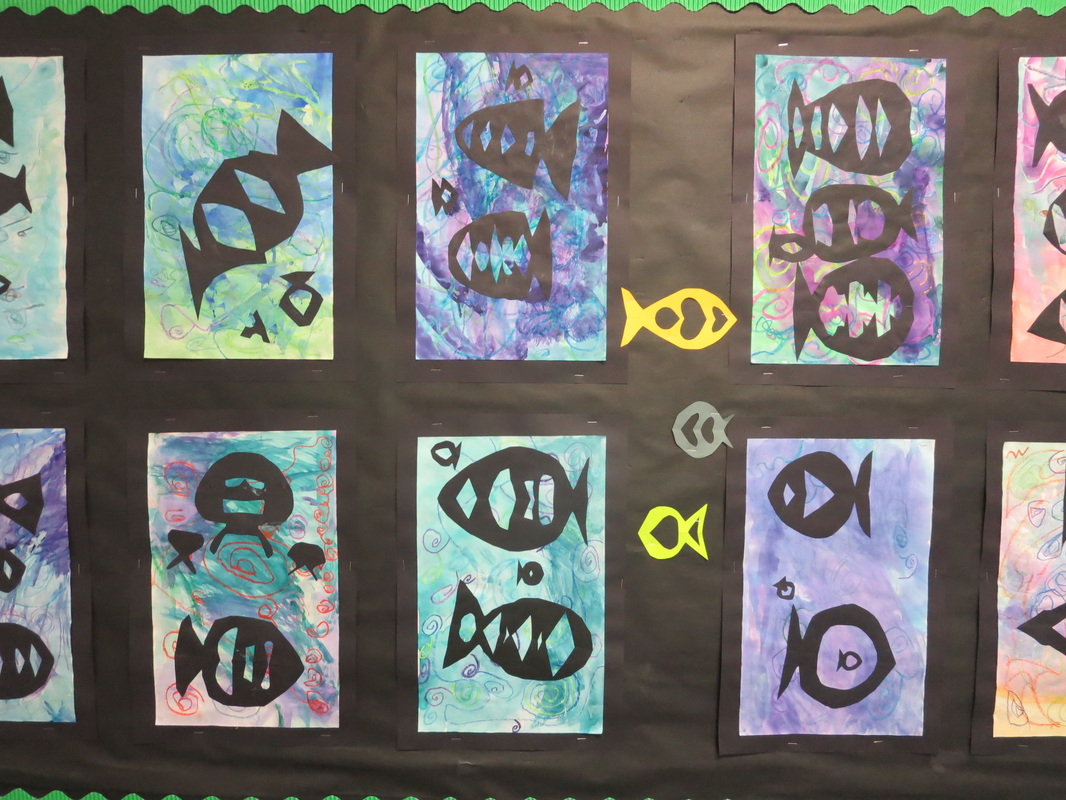 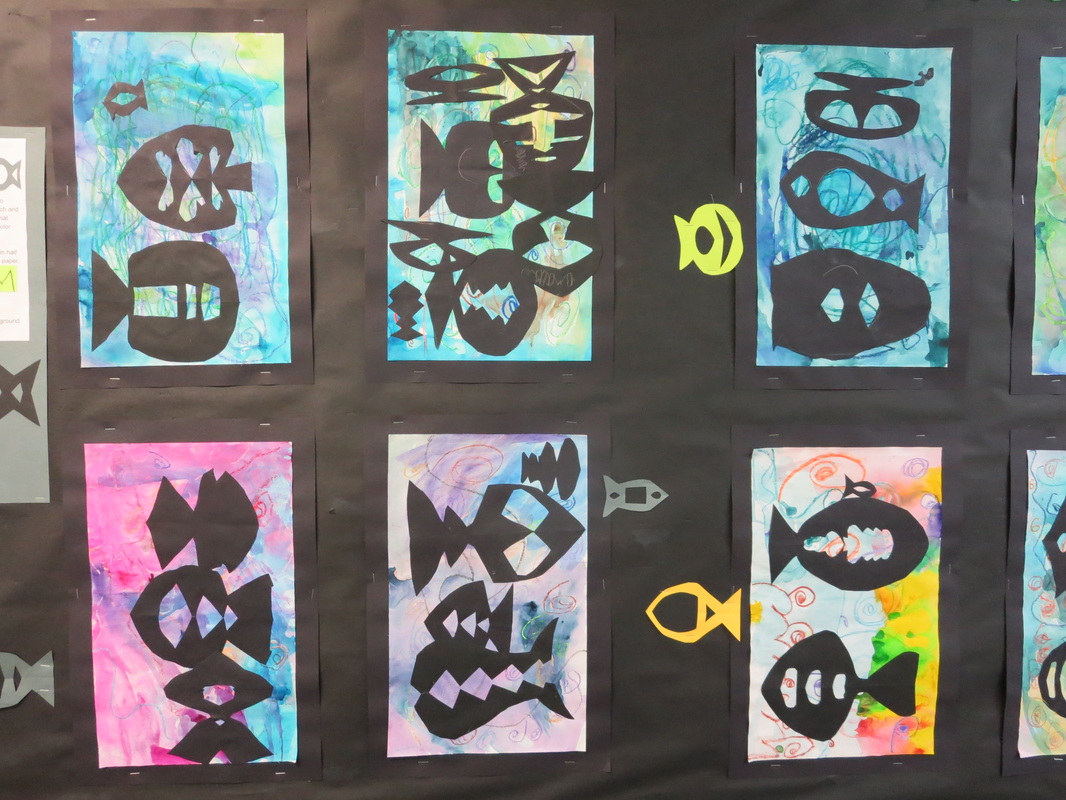 To study shapes and lines, Kindergarten students experimented with cutting out different colored shapes, and used brightly colored markers to trace around them. Students cut out squares, triangles and rectangles quite easily. To practice more difficult shapes such as diamonds and circles, we cut out the shapes step-by-step. To cut out circles, students drew circles on their paper first, then cut out their drawing. To cut out diamonds, students folded their paper in half and cut out a triangle on the fold. When opened, it makes a diamond. Students glued down their shapes on the paper wherever they wanted. Some students created strategic patterns while others just glued them down randomly. To practice drawing shapes and to focus on repetitional drawing, the Kinders traced around each shape over and over and over until the entire page was filled with a pattern. They had the choice of which colors to use.   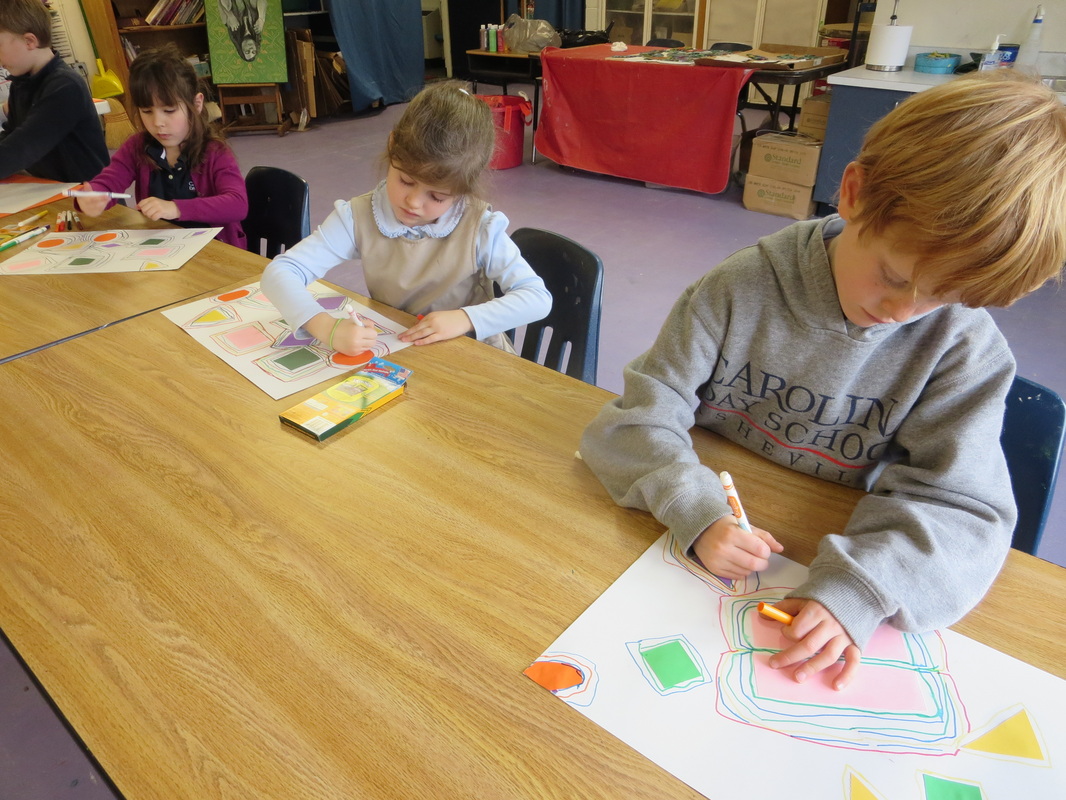 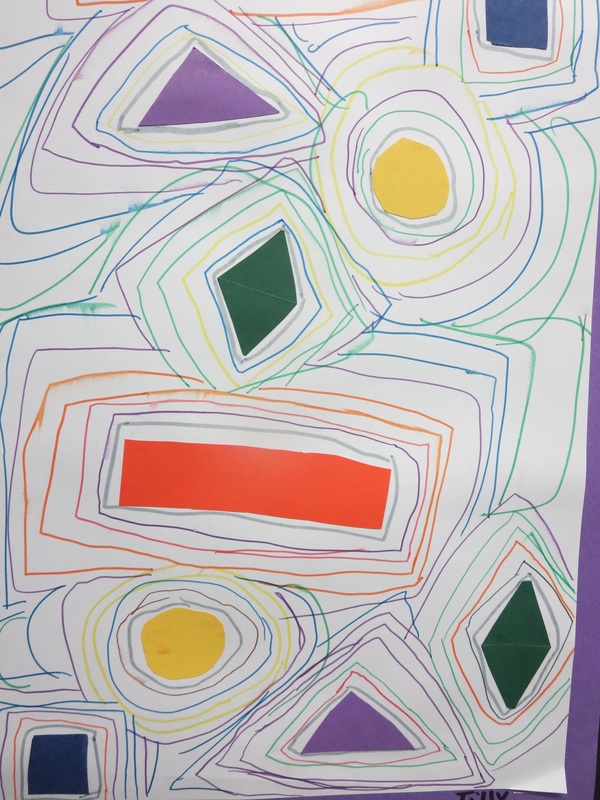 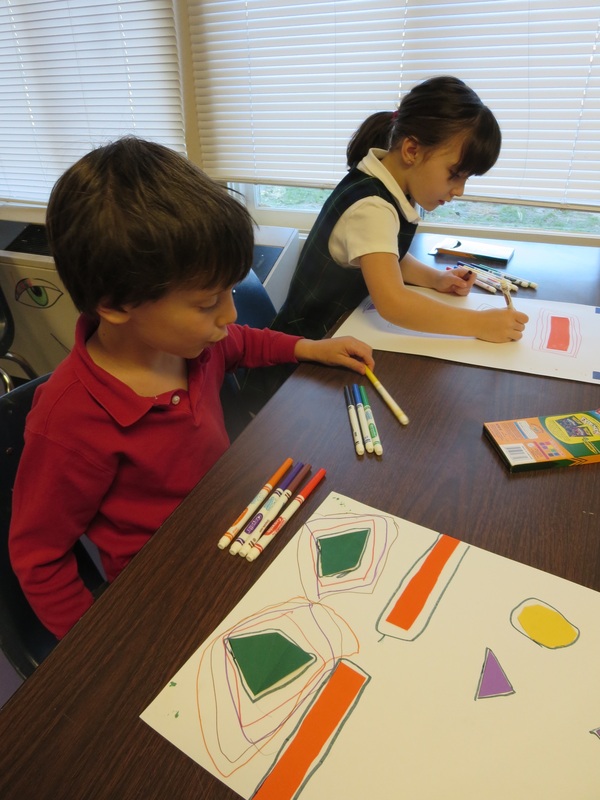 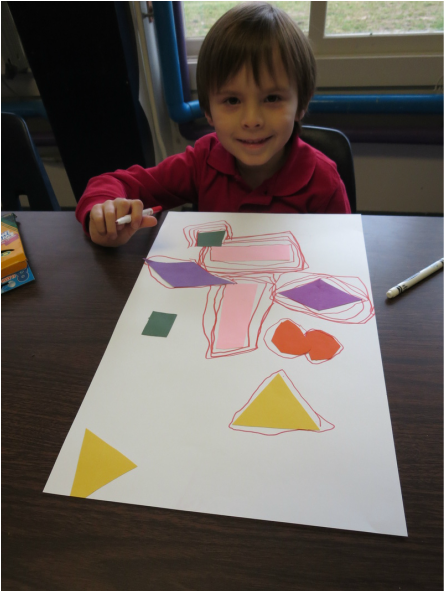 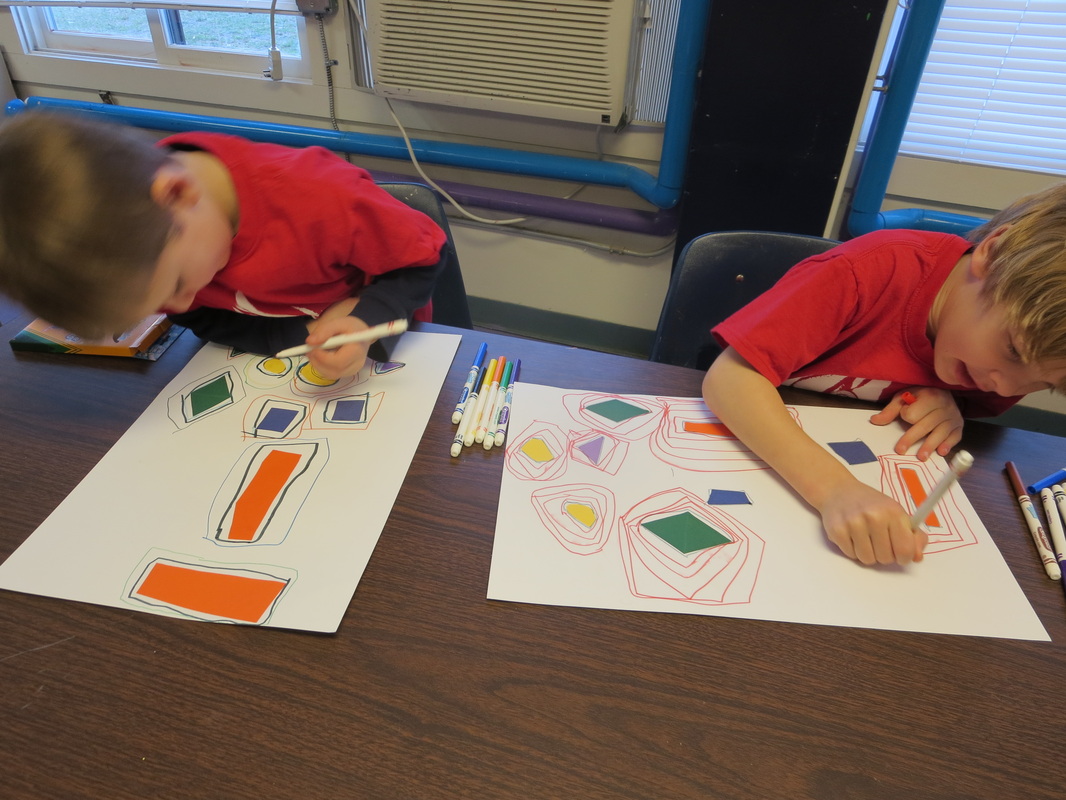 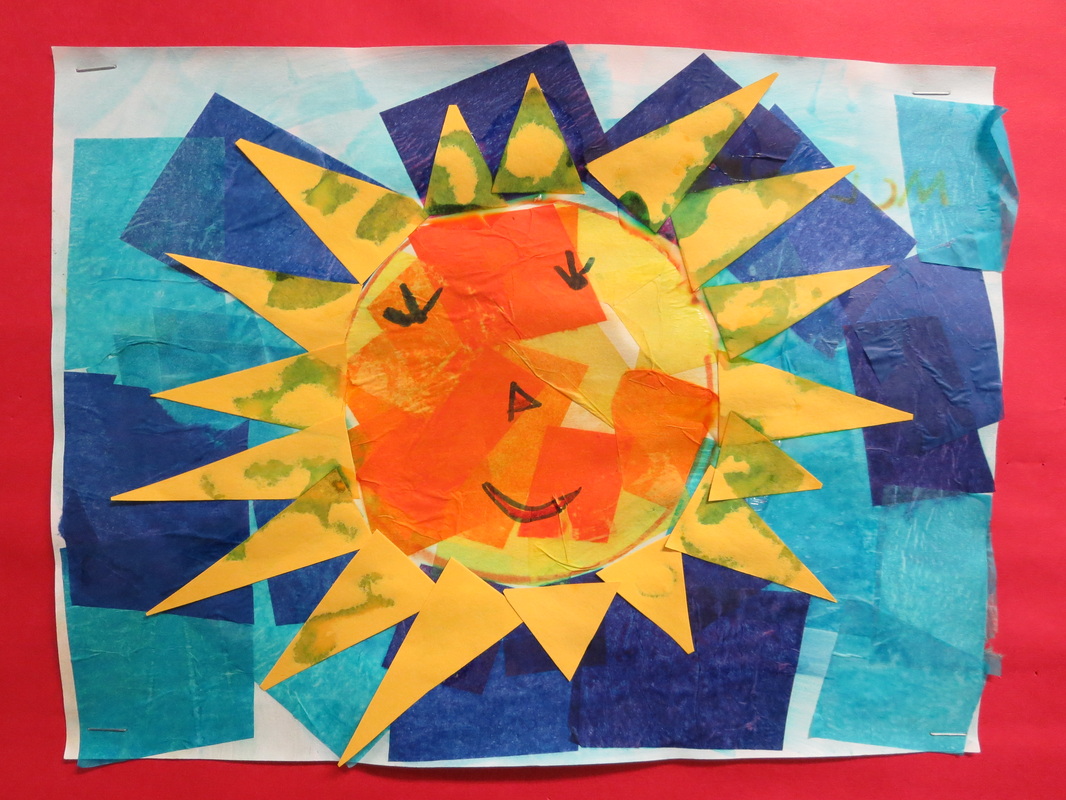
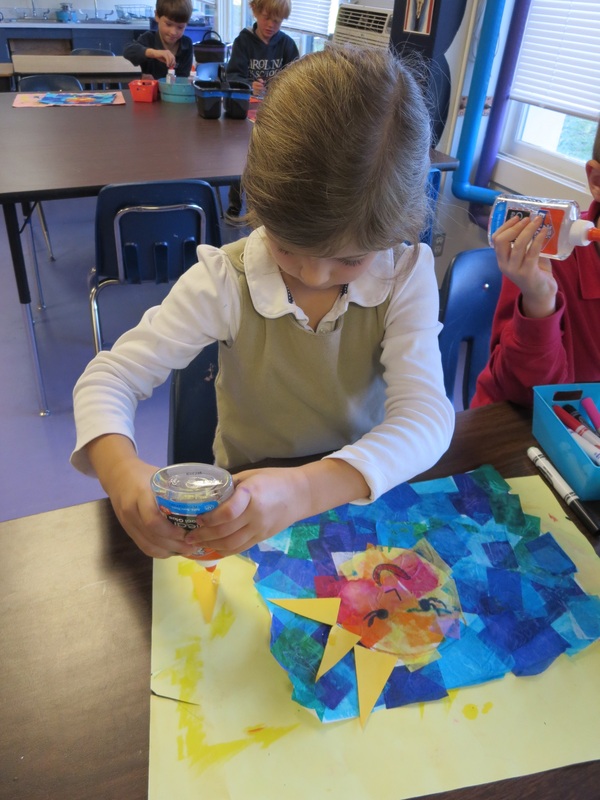
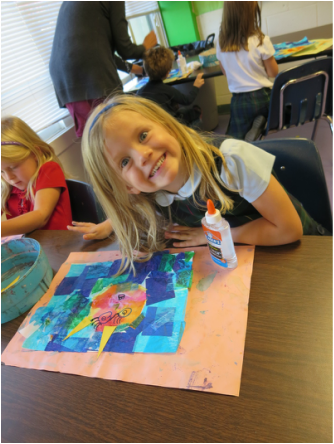
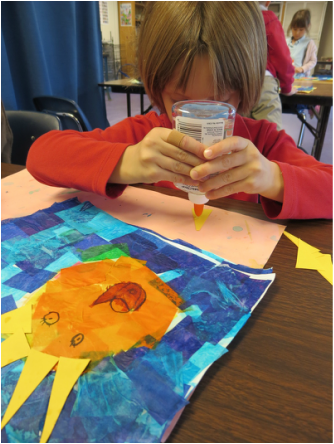
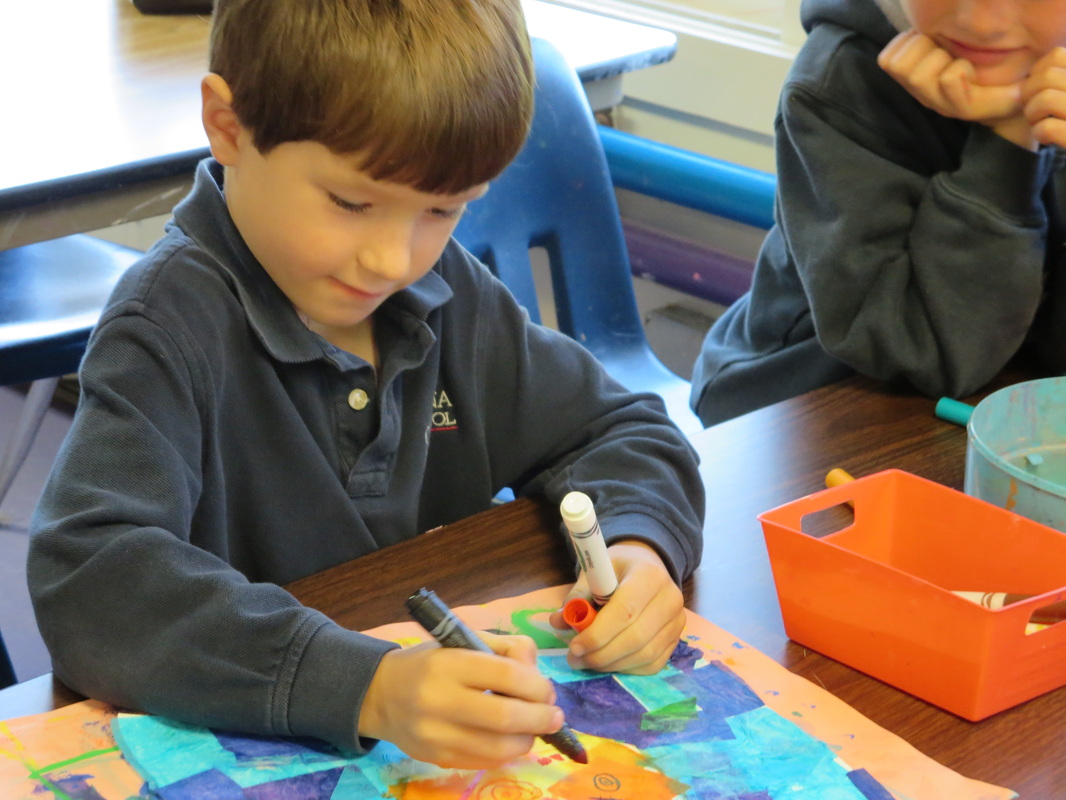
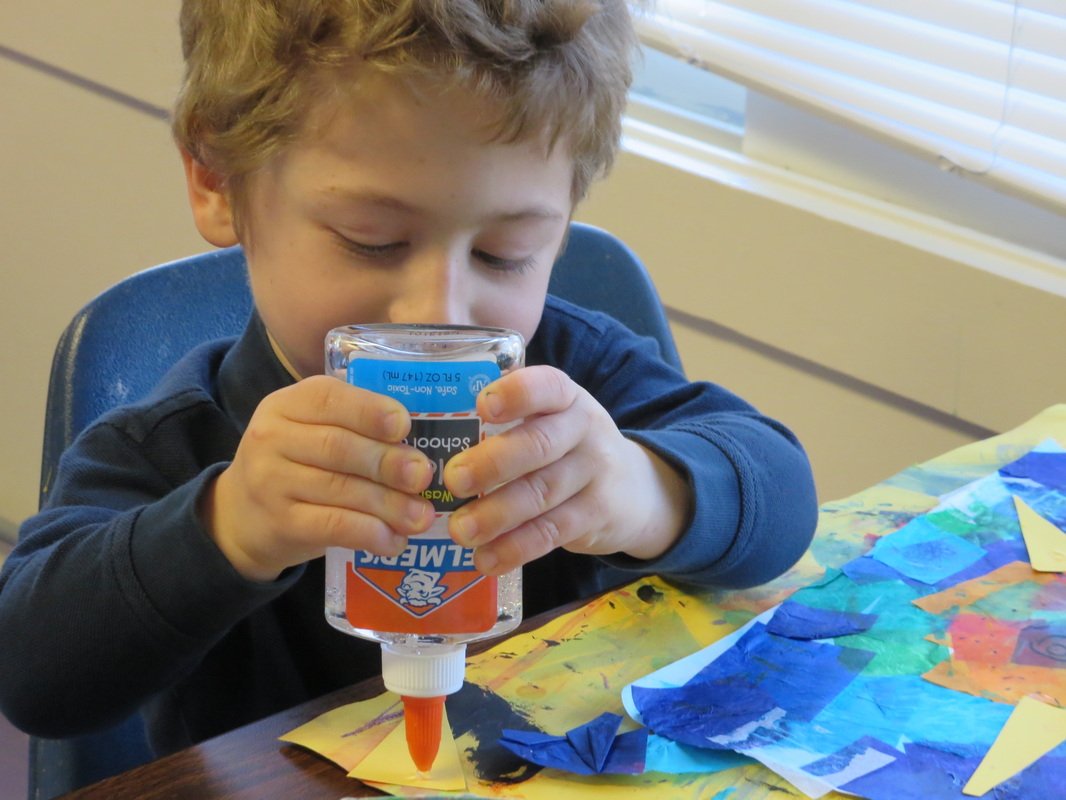
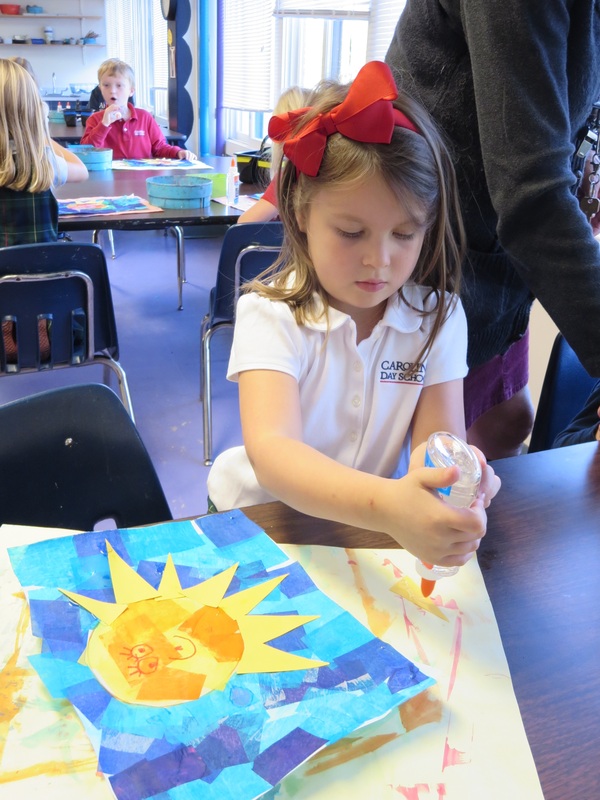
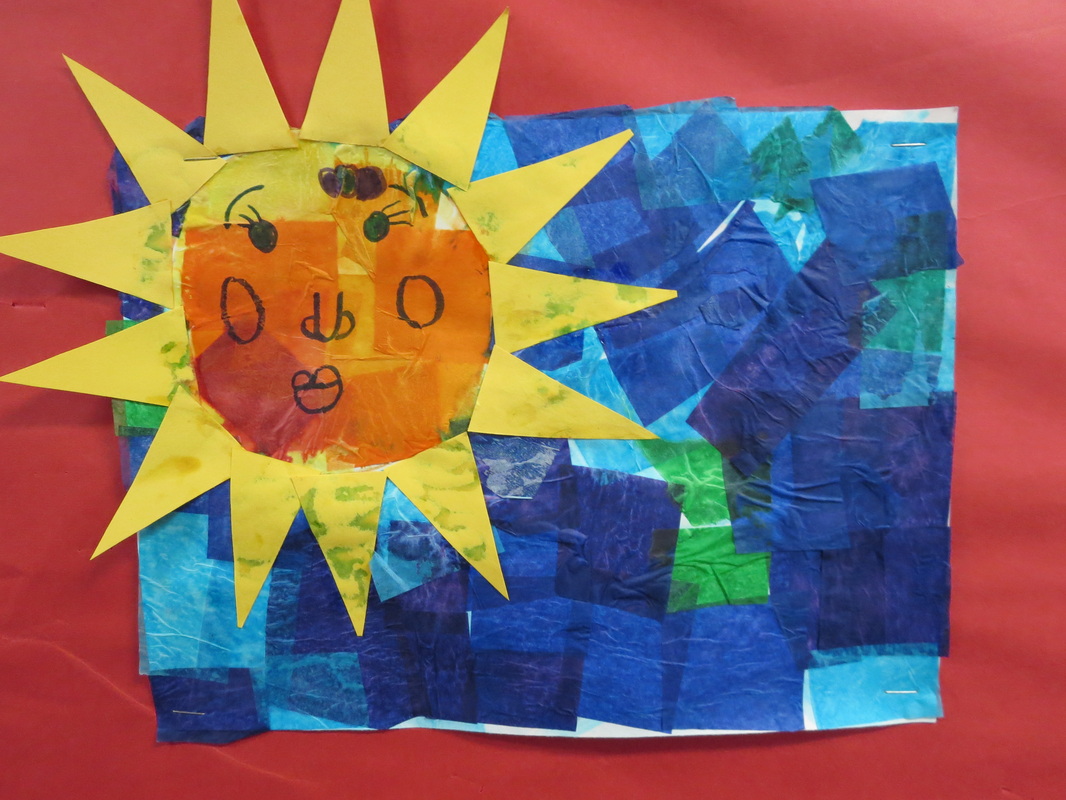
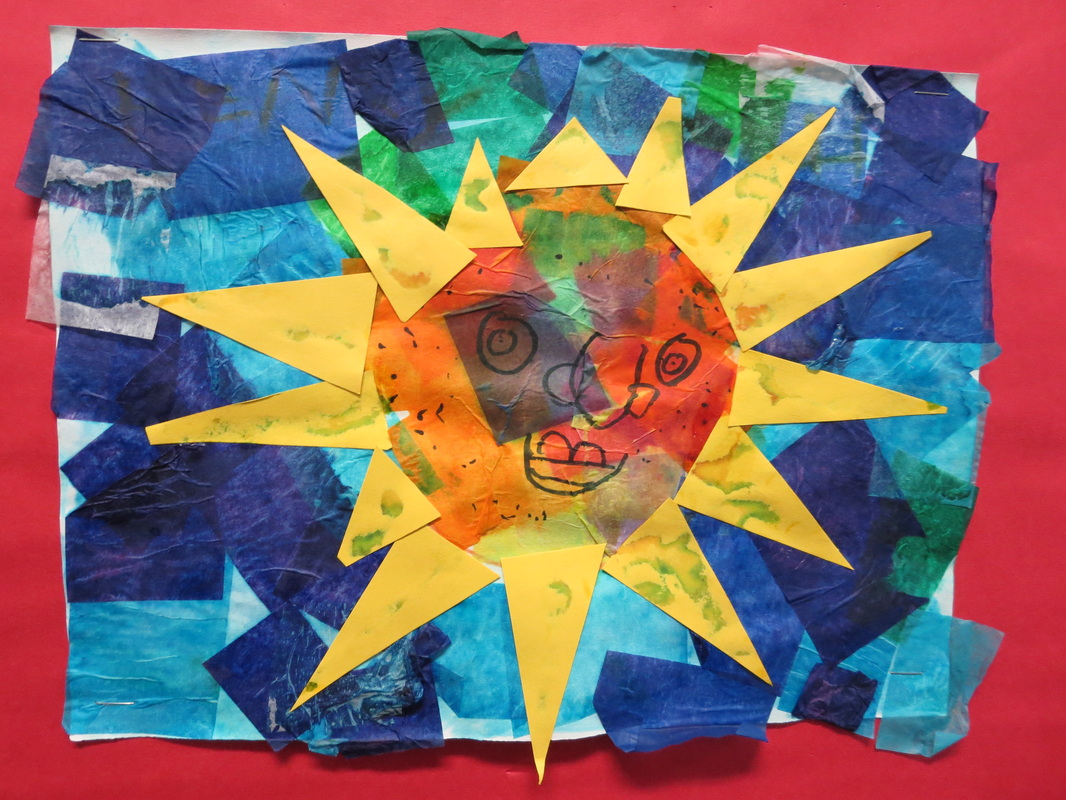
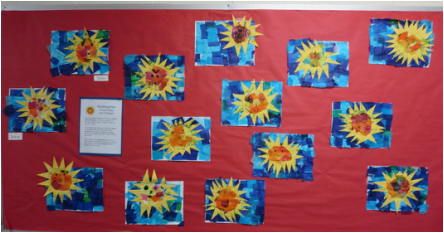
This Kindergarten project focused on shapes and colors. The students began by tracing a circle to represent the sun. On the outside of the circle, the student did a tissue paper collage with cool colors-purple, blue and green. On the inside, they used warm colors-yellow, red, and orange. After collaging, student used markers to draw a mouth, eyes, and nose to make fun sun face. The students used triangle pieces of paper to create rays for their sun. This project took three 45 minute class periods and they turned out adorable. 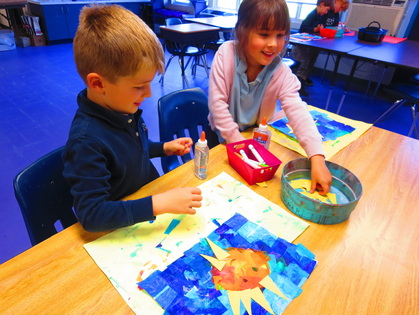
 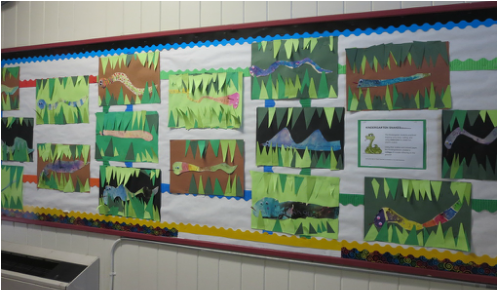 The Kindergarten students practiced drawing curvy lines, cutting, and using watercolor to create fun, playful snakes. Using their snakes and colored paper, the Kindergarteners created a collage of a snake slithering on the ground! I showed the students this video: (they giggled loudly and sang the song for days afterwards) 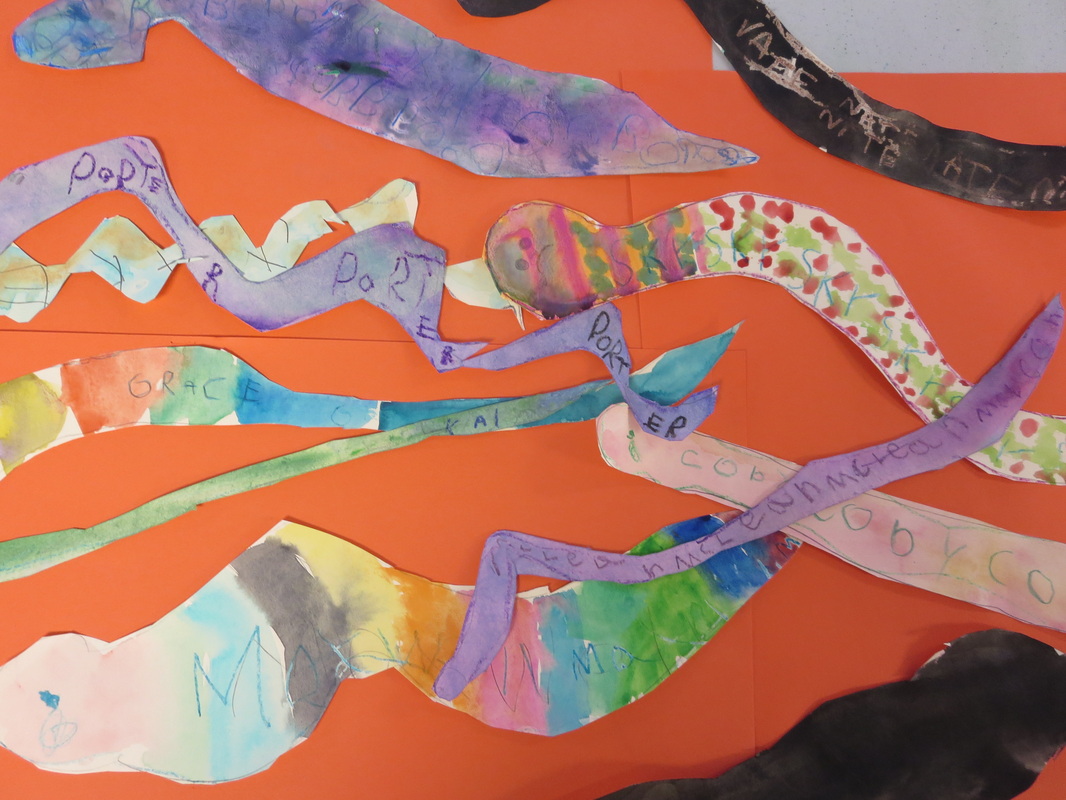 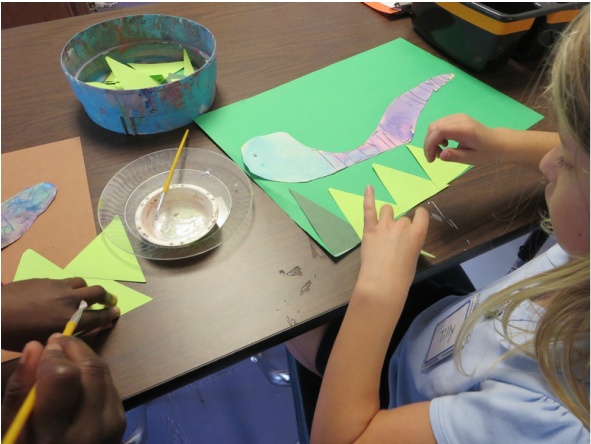 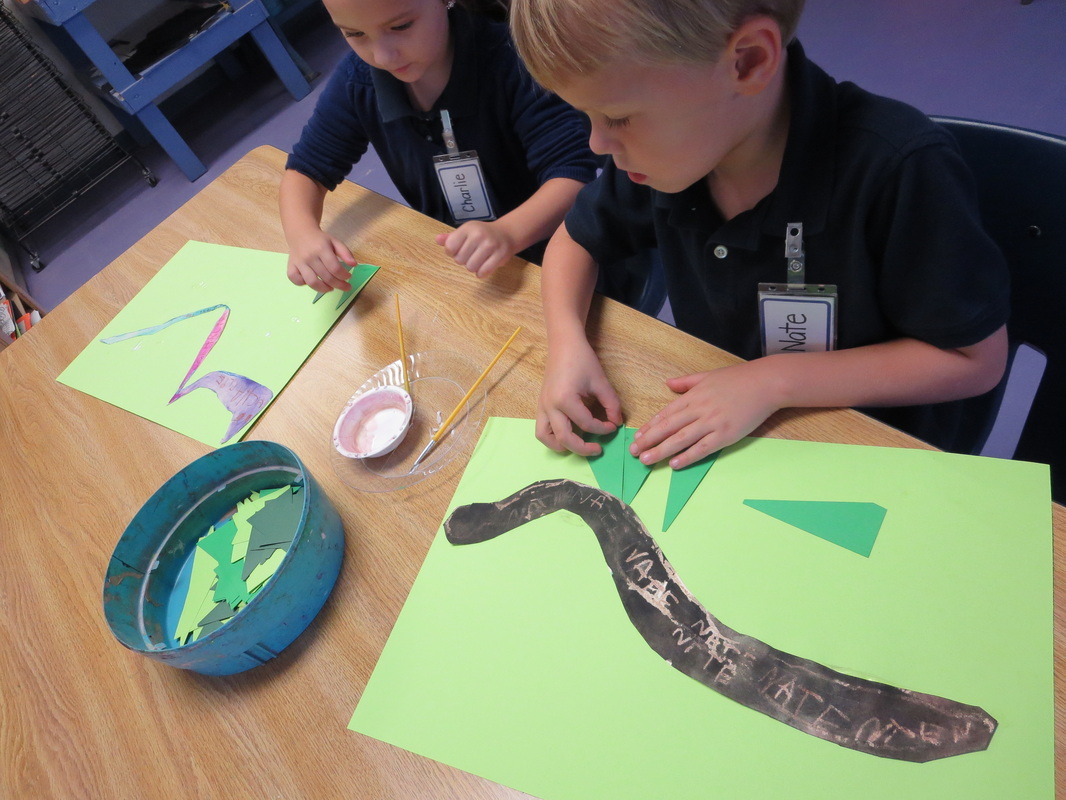  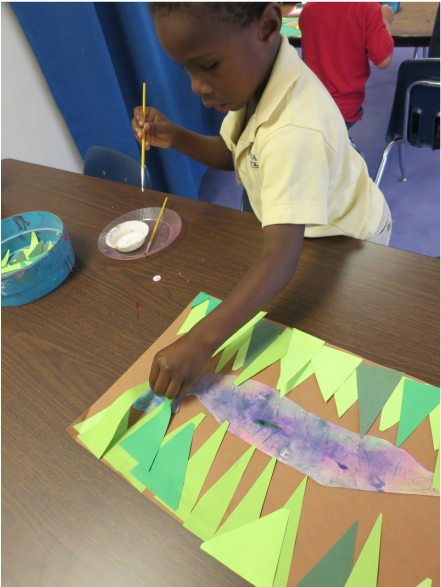 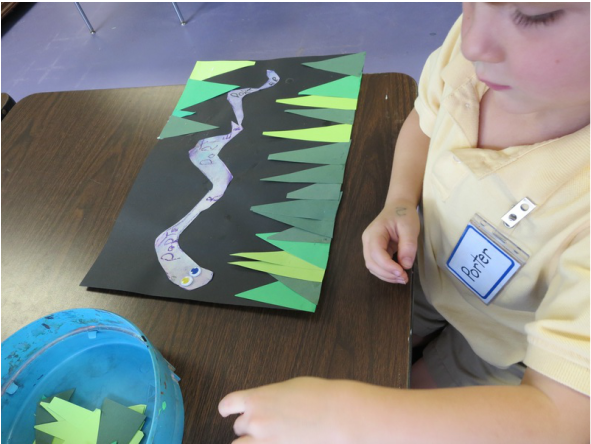 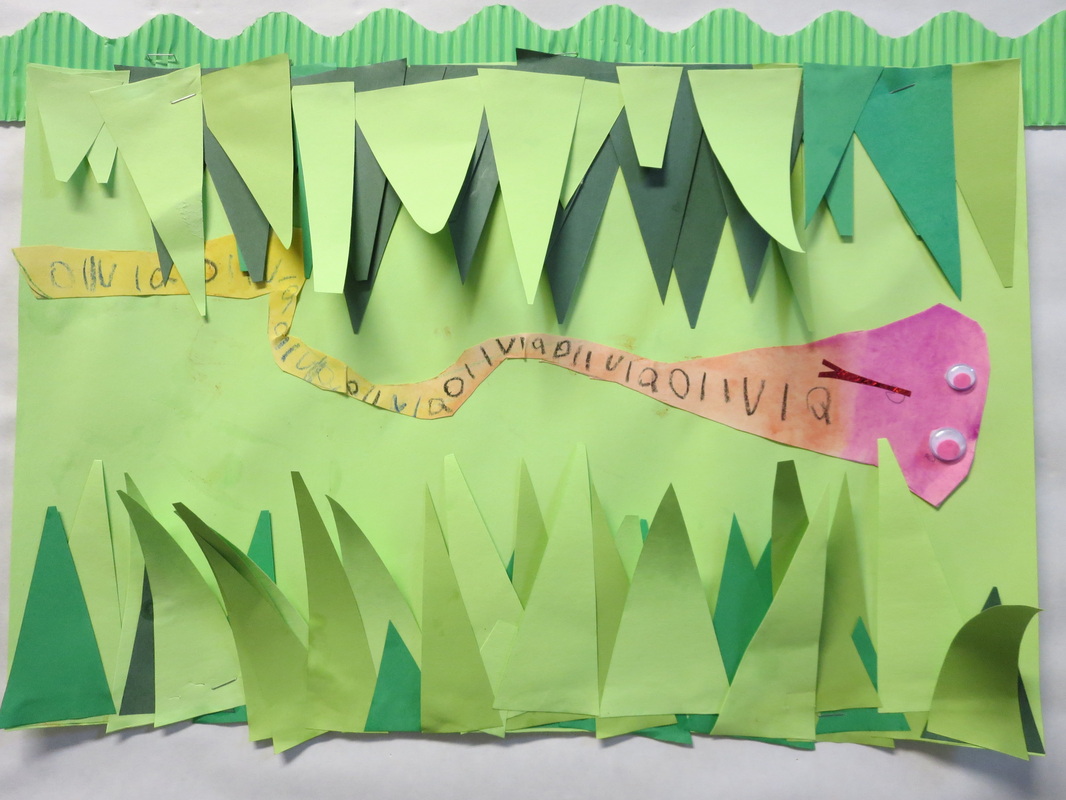 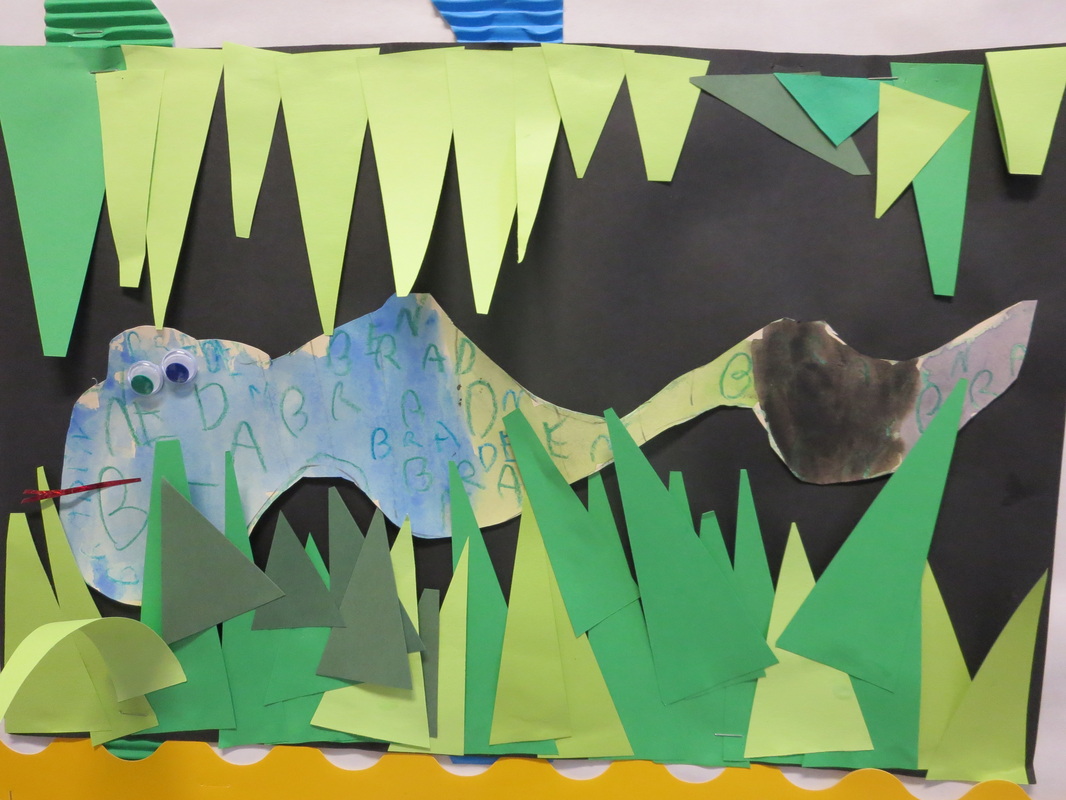 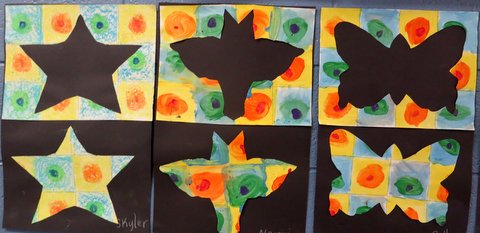 The Kindergarten students learned about warm and cool colors by painting a sort of checkerboard pattern using the different color themes. They did a great job of following directions and had a fun time doing so. After doing their paintings, at the next class, they learned about bilateral symmetry. To cut out symmetrical shapes, the students folded their papers in half, traced a half of a template, lined up with the middle fold, and while the paper was still folded, cut out their design. I mentioned positive and negative space as they worked. After they cut out their shapes, they glued their background piece on the top of black paper and their cut out shape below. The results are quite striking. Although this was quite the formulated project, I felt as though it was the perfect difficult level for the Kindergartners and they rocked it!  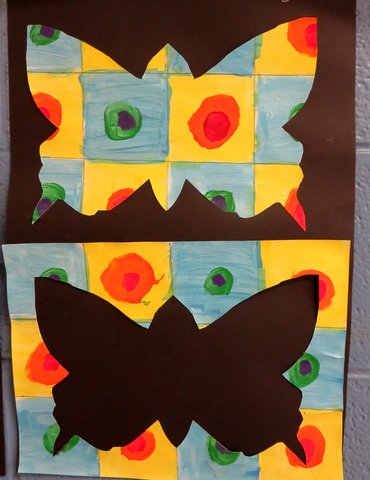 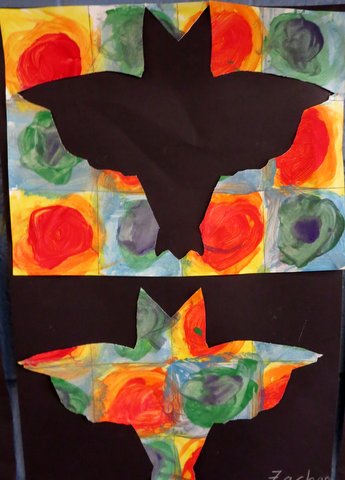 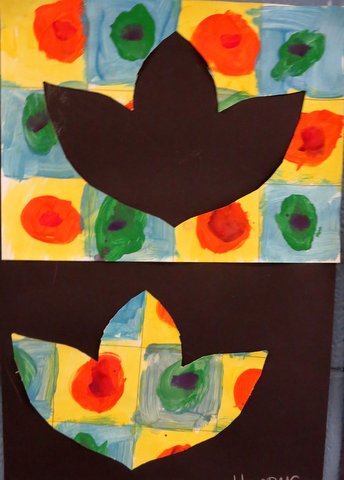 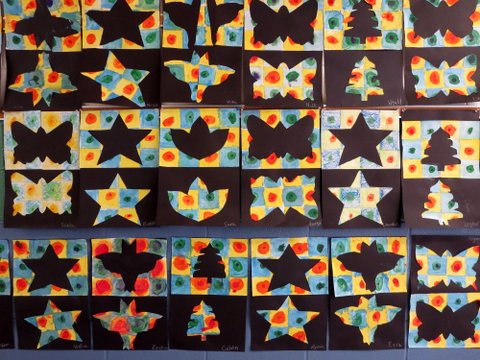 |
AuthorAnnie Monaghan. Categories
All
|
 RSS Feed
