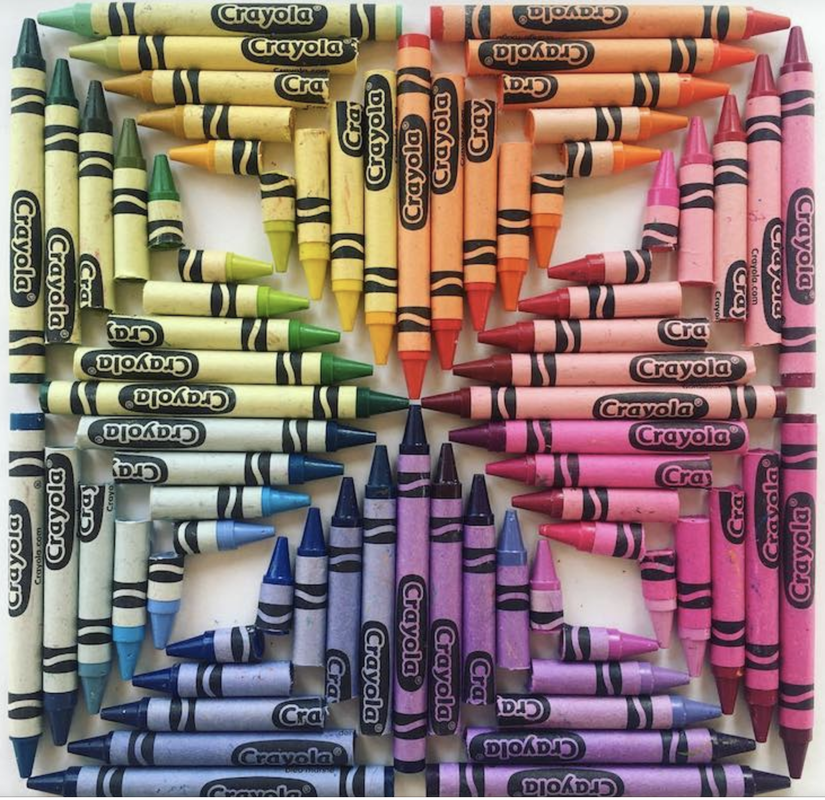
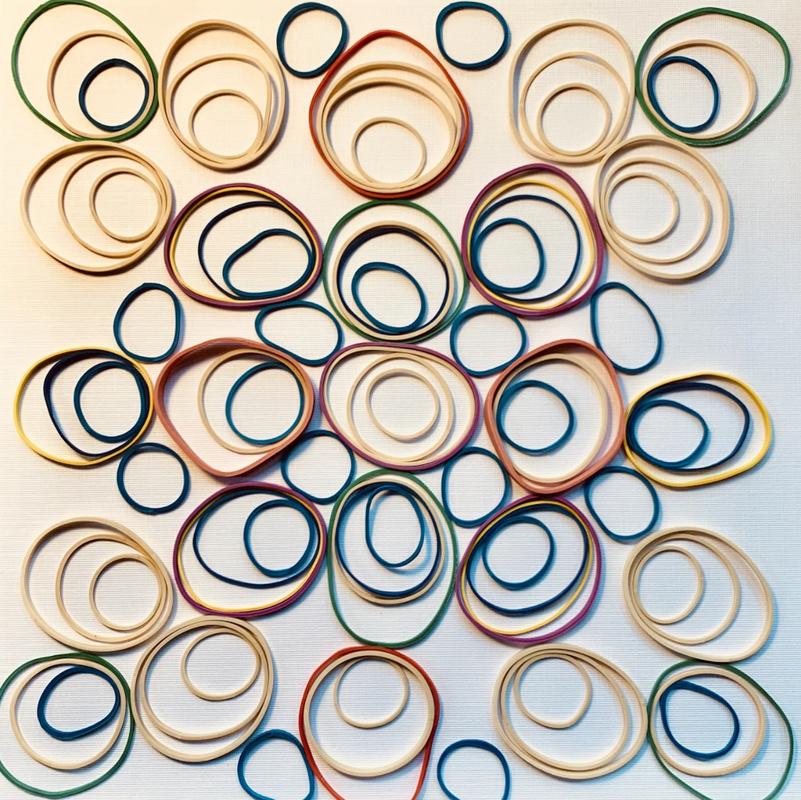
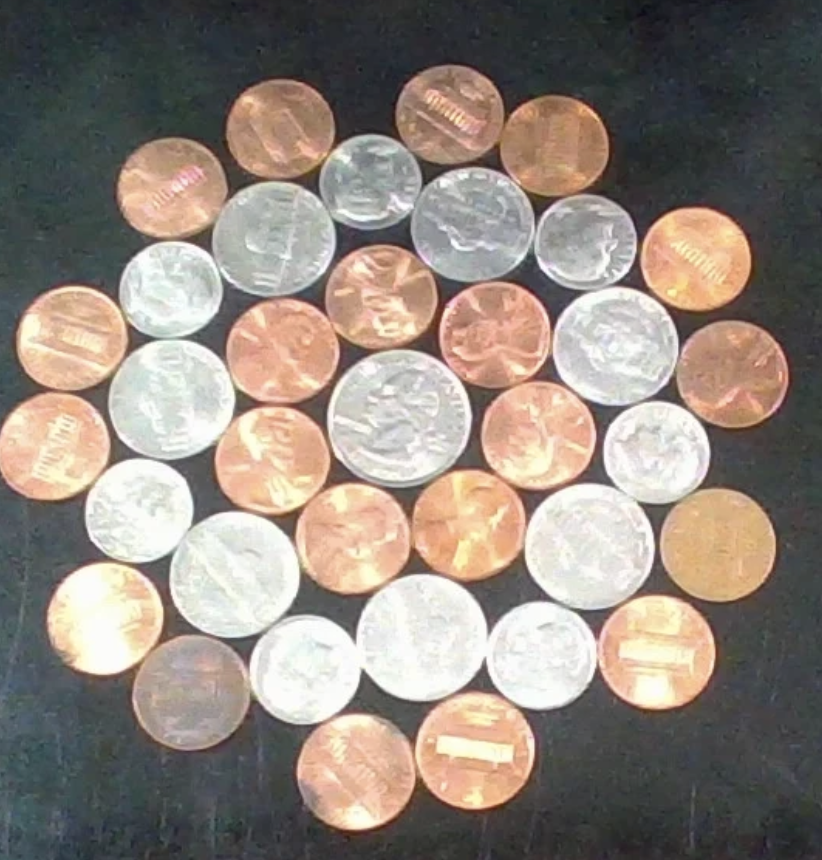
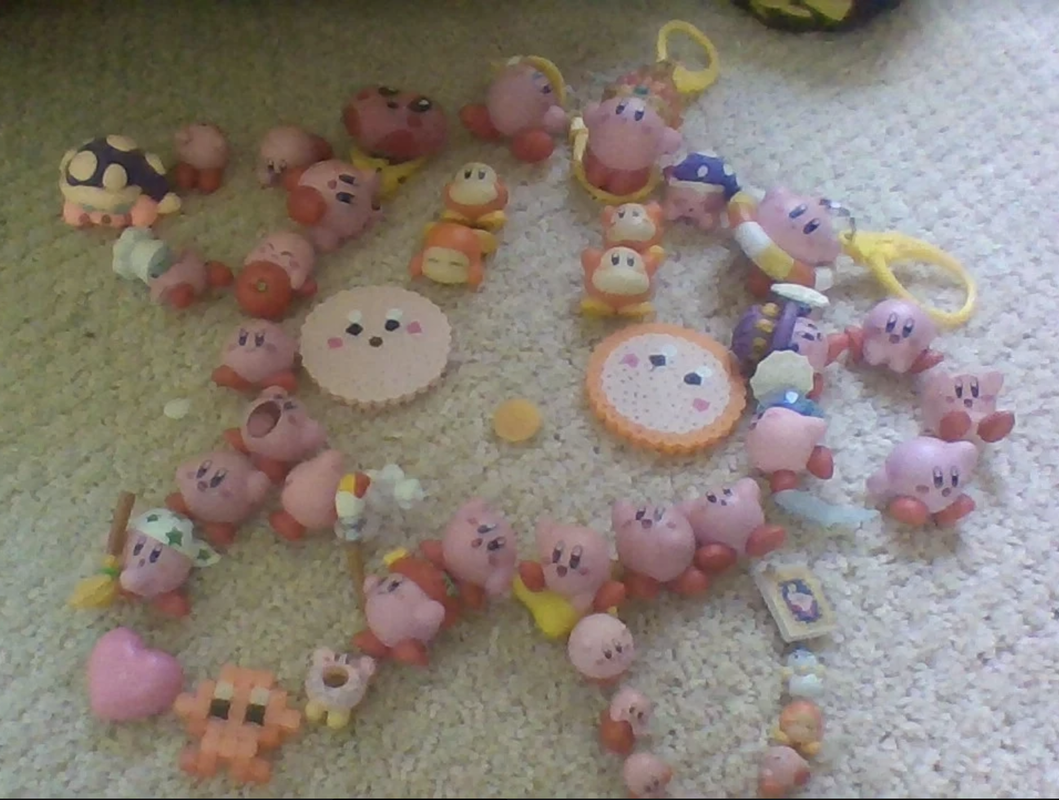
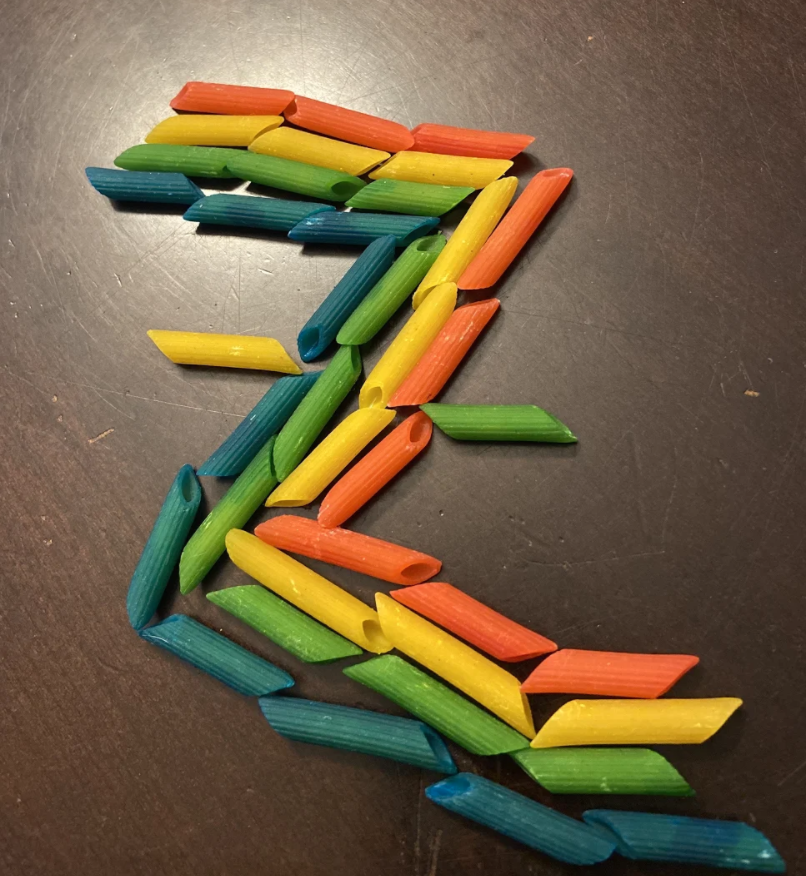
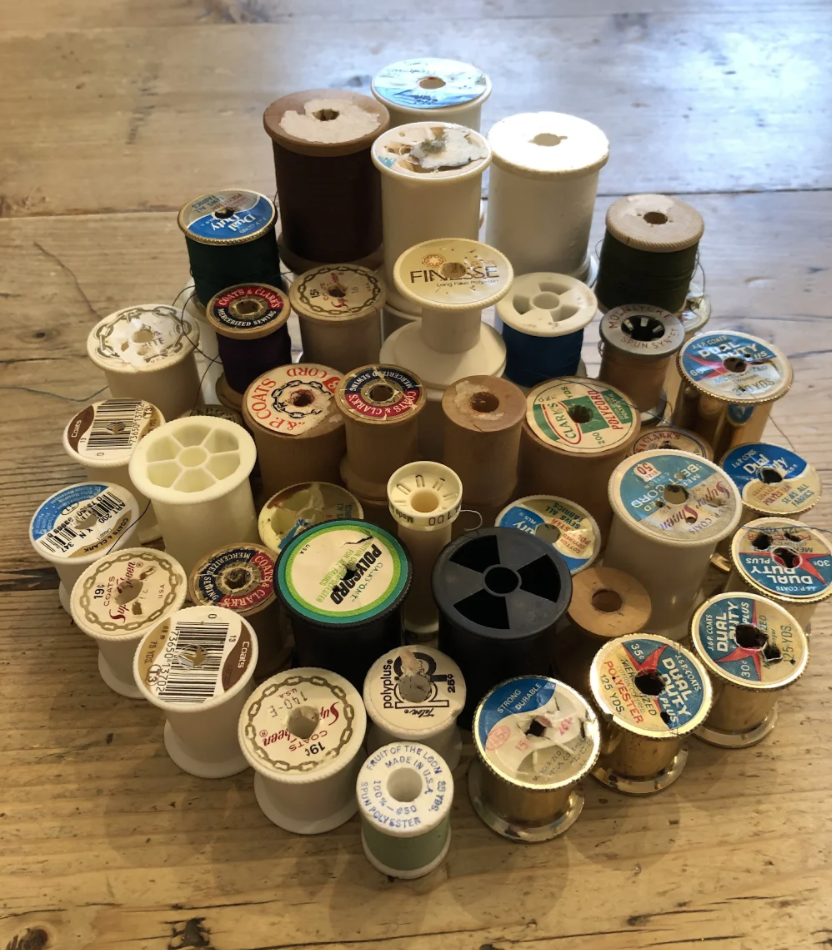
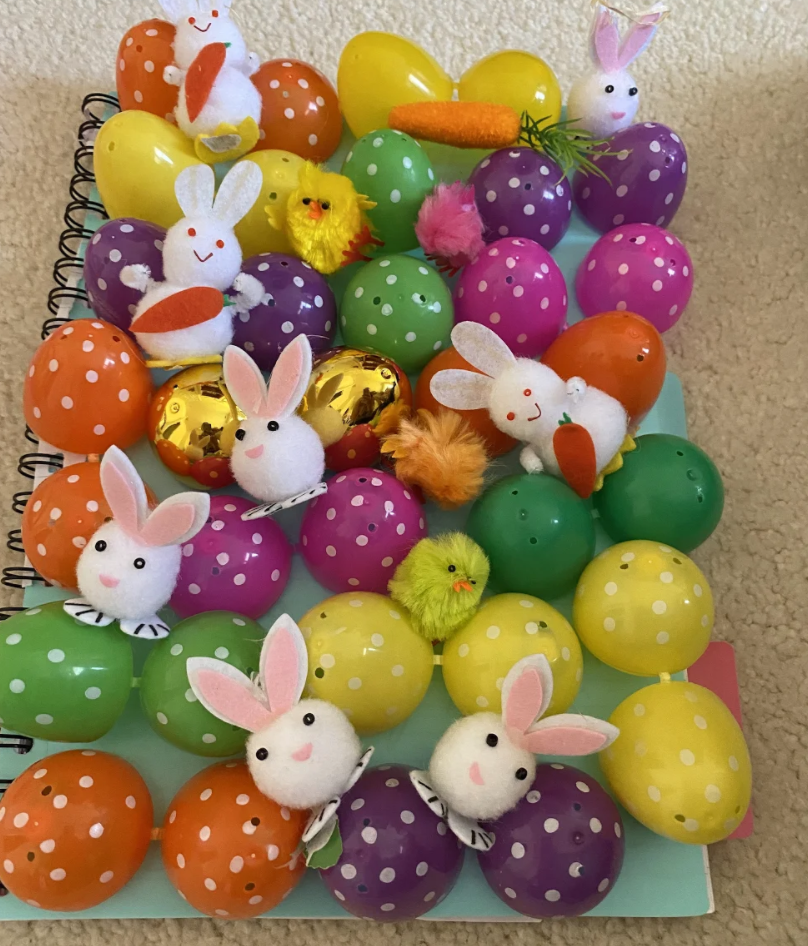
To inspire the 4th graders this week, I had them look at the artwork of Adam Hillman HERE. For their assignment, I asked them to collect at least 20 items around their home and arrange them in an artful composition. The feedback that I got from the students is that they loved looking at Hillman's artwork and had fun creating their own. These are a few of the photos that I received of the 4th graders artwork:
0 Comments
As a teacher, there are few things as awesome as hearing your students saying "I love this project" and "this is my favorite project we've ever done in art class." This self-portrait unit went super well this year and the 4th grade artists were really excited about it and proud of themselves. I consider that a teacher win! Before diving into the actual art portion of this project, I introduced them to six contemporary portrait/self-portrait artists. We looked at the art of Kehinde Wiley, Amy Sherald, Frida Kahlo, Diela Maharanie, Dean Russo and Jen-Michel Basquiat and discussed their distinctive styles. Each student then selected one of these artists to do their self-portrait in the style of. I photographed each of the 4th graders and provided them with the photo of themselves. To take the pressure off of them for the actual drawing of the portrait, they used light tables and traced the contour lines of their photo onto paper before beginning. Once they had their base drawing down, they continued to look at the artwork by their selected artist and their photos of themselves for reference. They carefully drew a background and colored their skin/hair etc inspired by their selected artist.
This allowed a lot of freedom of color use, patterns, etc but still gave them guidelines. The students absolutely loved this project this year and many chose Dean Russo and Kehinde Wiley as their inspirations. They turned out amazing!!! This is a very successful project and one of the few projects that I actually teach every single year. The kids love doing it and they always turn out gorgeous. Plus, it's a great math and art connection! Before beginning, we do a little lesson on radial symmetry (symmetrical in many ways from the center). I help them remember the name because it radiates out from the center. Radiate-radial. Knowing that, the students will create their paper designs in a repeating patter, radiating from the center. We also learn about relief sculptures. A relief sculpture is a type of sculpture that is flat on one side and generally hangs on the wall. So to set themselves up for success, they begin with a 12" x 12" squad pieces of black paper and fold it as shown below. Doing so creates creases where it was folded. These become the guideline to help create a symmetrical piece of artwork. Now, before beginning the really fun part, I usually spend about 30 minutes or so prepping the small colored paper squares for the project. I use a cutting board to cut a ton of 3" x 3" squares of all different colors. This way they are prepped and ready to go and I don't have to think about it again. To teach the students the folds, I actually like to show them the video I posted below. This allows me to pause, rewind, restart as much as possible and it's awesome because it is a large image for the kiddos to see and learn from. After learning the basic folds, the artists have a great time creating their designs. They overlap the paper, insert them into each other and glue them down to create unique and colorful designs. This year when I taught this project, I had them stick to a color palette of 3 or 4 colors. I love how they turned out with a limited color palette and so did the artists.
A winning project for sure and one that the kids always love the process and the end result! This is definitely another project that I wish I had taken more in-process photos of. Really though, we had so much fun making it that I forgot to take photos. The students enjoyed learning about Keith Haring and found his life-story and artwork very interesting. They had a lot of questions to ask about him and his artwork. They were especially intrigued by the idea of him creating art that was free and cheap for people to enjoy. I paired the students up with a partner and after looking at Keith Haring's artwork and talking about his 'stick figures' that show movement, they took turns posing for each other and drawing stick figure versions of each other onto their large white paper. Next they used black paints and added squiggly, curvy, curly lines to fill the background space. These were inspired by many of Haring's work that used these black lines to show movement and to add pattern. To finish their work, they painted the figures bright colors. The artwork was already beautiful but to make it more awe-inspiring and like Haring's wall paintings, we decided to hang these on the wall outside of the art classroom. We spent one class period hanging these up and getting them looking just right. They look amazing and bring so much life to the hallway! And I want to leave you with this cute video of the 2nd graders walking to lunch and discovering our new Keith Haring mural for the first time. haha, they were so excited! OK, so here's the thing. My 4th graders did an incredible job on this project, they did better than I could've even imagined and silly Art teacher me forgot to take any in-process photos. I'll do my best , though, to explain what we did.
Before beginning the project, I gave the students a two week notice that they each needed to provide a grayscale printed photo of an animal. I gave them the option to email it to me if they don't have a printer at home. I told them that it could really be any animal as long as it was a close up and the photo should be about the size of their hand. When it was time to begin the project, the first step was to have the students paint their background. I asked them to select one color but a few begged to use two colors and I agreed, because why not. I suggested bright colors that the grays would really pop on. Turquoise and pink were popular choices. The next step was setting up my two classroom projectors around the classroom, dimming the lights and teaching the students how to use them to project their image onto their canvas. They worked together with a partner to figure it out and then traced their animals with a white pencil onto the background. This ended up taking a lot longer than I expected and if I teach this project in the future, I'll definitely find a couple more projectors to borrow. From here, I printed out some grayscale images for the students to reference that went from white to black in 10 steps and were number 1,2,3......10. I had the students all start by looking at their photo and finding the areas that were a shade of 10 (black). They all used their photo for reference and paint the black into their image. The next step was to find all of the 1 shade (white) and paint that. Next we all found the shade 5 and painted that. From there the students were to find the different shaded 2-9 and to paint them accordingly. Although this is easy to explain, it is a quite difficult process, especially for 9 year olds. They really blew my mind though, I didn't realize how amazing that these would turn out and it was sooooo awesome watching the students persevere through this. They were sooooo proud of themselves and I was an extremely proud teacher (like usual). 4th graders first clay project this year was inspired by this blog post I found a couple of years ago (room9art.blogspot.com/2011/06/plants-on-parade.html). After we all circled around a table and I demonstrated for the students, they began the project by ripping their clay in half and making a pinch pot with one half of clay and using the other half to make different sized and shaped coils. They attached the coils to the pinch pot and formed them to look like different succulent plants. The goal was to have at least 3 plants in their pots. Some students only had three and some probably had closer to ten. Once the clay sculptures were dried and fired in the kiln, students used bright colored acrylic paints to paint the succulents and the pots. Once dried, I filled them with small stones as well. This made them look more finished and realistic.
Teaching this project was such a cool experience for me! I learned so much about Romare Bearden, I jumped out of my comfort zone by teaching a collage, and the students wow'd me with their awesome creations during this super fun collage project. Last summer our 4th grade language arts teacher reached out to me and asked if I could do an art project to accompany her classroom study of Langston Hughes and the Harlem Renaissance. I love doing cross-curricular projects and was excited about the opportunity. I went into the project planning on doing a project inspired by Aaron Douglas as I've taught his work before and love him but instead decided to try something new. At the NAEA conference in New Orleans a few years back I took a workshop on Romare Bearden so this was a perfect opportunity to use that experience in my classroom. I started by researching Romare Bearden because I honestly knew next to nothing about him and his work. As I did so, I fell in love with his collages and am so intrigued by his process. Bearden created his art using painted paper, magazines, photos, and patterned paper. He did layers of paper and also painted some to create very intricate images depicting stories from his life and stories from the bible and books. 4th graders watched a slide show of his artwork and we discussed his life and his process of creating art. The students had lots of interesting insight and ideas about his work. Before beginning the project, students had to come up with a design inspired by a dream, a memory or a story. They began by doing a quick sketch of the composition. The class before beginning the collage, students used texture plates, oil pastels and watercolor paints to make colorful textured painted paper. Using this, construction paper and magazine clippings, students started their collage. They began by collaging the backgrounds of their designs, they thought about the sky, the ground and things such as clouds, mountains or lakes in their images. After their background layer was done and the entire white paper was filled, students began to layer the rest of their designs on top. They added people, animals, buildings, trees, furniture and more.
The results were really awesome and best of all, the 4th graders really seemed to love this project. They were super engaged with the process until the very end. A lot of proud artists with this one. An oldie but goodie. There is an obvious reason why this is such a popular art project in the elementary art world. It is one of those projects that is always really successful and the end product is vibrant and stunning. I wish I could take credit for coming up with this project, but regardless, I'm proud of my students and their hard work they put into it. This project takes 3-4 class periods and is very engaging for all students. Even my students who "don't like art" got really involved in this clay project. Each student begins with a styrofoam bowl. Make sure to write the students name on the bottom with Sharpie before beginning. This will save you a lot of hassle, I promise. I did the clay sculpting with the students in two 40 minute class periods but you could do it in one if you're rushed for time The first day was spent creating the flower petals. They each started with a slab of clay and cut out 10-15 diamond (or oval or almond) shapes. They put a chunk of clay in the middle to create a base and "scratch and attached" the petals to that base. Next they used tools to create texture and some students cut out other shapes to add more dimension to the petals. The next class we added details to our center. They began by rolling out a ball of clay, squashing it with their palm and "scratching and attaching" it to the middle to start with a smooth area. Then they added texture and detail to this area as well. Between the two classes we kept the clay wrapped up in plastic bags so that it would stay good and moist. When the clay sculptures are dry, you can easily remove them from the styrofoam bowls and scratch the students name onto the bottom of the flower bowl. After the pieces are fired in the kiln, students used colorful Amaco teachers palette glazes to paint their sculptures. This is my favorite brand of glaze for the classroom. With just two coats of glaze, the result is bright and vivid!
Thinking prompt: "What do you do with your hands?"
To begin this project, I had a conversation with the students about all of the amazing things that we do with our hands. Some of the ideas that students shared were: playing football, gardening, writing letters, painting, cooking, hugging, taking care of pets, playing piano, holding hands, baking, sculpting, playing basketball, doing yoga, praying, etc. I'm ashamed to say that I somehow managed to take zero pictures of the process of this project but I hope you enjoy the images of the finished product. After brainstorming of things we do with our hands, students each traced their hand onto apiece of paper and selected an image or symbol to draw on their palm representing what they personally do with their hands. They filled in the background space with a simple pattern. They transferred these designs onto styrofoam sheets by tracing their drawing with a pen which created indentations of the design onto the foam. Next I set up printing stations for the students to roll ink onto the foam and to print the image onto paper. Over three class periods, each student created between 5-10 prints. For this project, 4th Grade students learned about bilateral symmetry by doing oil pastel drawings of beetles. To begin this project, each student got to select an image of a beetle that they liked. I had color printed images of about 20 different beetles for students to choose from. Once they selected their image, I showed them how to fold the paper on the line of symmetry down their beetle so that once folded, the image was mirrored on each side of the paper. Next they folded the image in half long ways. One 4th grade class used black paper for the project and the other gray. We used 12"x18" construction paper. After folding the photograph image, students folded their construction paper in the same manner. In half long ways, then short ways to create four quadrants. To begin the drawing, students kept the beetle image folded so that they were looking at the top right quadrant and I demonstrated how to fill the space on the same quadrant of the construction paper using this grid drawing technique to make the image much larger. First, 4th graders drew their image with pencil. They did both right hand quadrants then opened the paper up and drew the rest of the beetle. After completing the pencil drawings, students used oil pastels to create these colorful beetle beauties.
The first step with oil pastels was to pick a color that would show up well on the construction paper and outline the beetle. Next, I really emphasized that the students be observational artists and try to mimic the colors that they saw in the photographs. This meant that students had really think about WHERE they were using WHAT colors. This also meant that students had to layer colors and blend colors. The last step of this project was to create a fun colorful border. Not every one had a chance to do this because they took longer on their beetle drawing, but most had time. We used 18"x24" construction paper to make the borders. Students used oil pastel to make colorful repeating patterns to go around their beetle drawings. I love how they turned out with the beetles. I was super proud of the 4th graders on this project! The beetles turned out great and it was really neat watching the students really focus on replicating detail that they saw in the photographs! Fun project! I've been wanting to teach a Notan art project for years and finally did. It was hard work, the students worked through it slowly and thoughtfully and with much practice. I am very, very proud of the outcomes. Notan basically means the balance of lightness and darkness. It is traditionally a Japanese art done with 2-D mediums such as painting, ink, printmaking or paper cutting. The 4th graders created these beautiful Notans by blending the art of watercolor painting and paper cutting. To begin, each student had a very large sheet of white paper and we spent two class periods experieenting with different techniques of using watercolor paints. We tried splatter painting, we sprinkled salt on wet paint and let it dry before rubbing it off, and we put crinkled plastic wrap over wet paint and let it dry. These techniques each create a different effect. Students could use any color palette they wanted. Some used all cool colors, others went for rainbow colors and others more of a woodsy camouflage palette. After the paintings were finished, we spent two entire class periods learning about Notans and doing practice Notans before actually doing the final Notan on our watercolor paintings. I have had quite a few teachers ask me how I was able to get such great results from the 4th graders on this project and the key is practice, practice, practice. The first day or practicing Notans, I really pushed students to work slowly and follow my directions very closely. I will try my best to describe the process that we used here. 1. Beginning with one 8"x10" piece of white paper and another 5"x7" piece of black paper, center the black paper in the middle of the white paper. 2. Using a pencil, draw corner tab marks around all four corners of black paper. 3. Draw an X on the back side of the black paper, this is to know that the side with the X is always the back side, the side facing down. 4. Along the edge of the black paper (side with NO X) draw a very simple shape (a half circle is a great start) and draw a small X on it. 5. Cut out the shape. 6. Line the black sheet of paper up with corner tabs, the X should be facing down. 7. Using a glue stick, put glue on the cut out shape. Make sure that you glue the side that you drew the X on. If you glue the wrong side, this does not work. 8. With the black sheet lined up with tabs, put your cut out shape back into it's original place (like a puzzle). Now the X on the cut out shape should be facing up and have glue on it. Flip the cut out shape over like a door hinge. 9. Repeat steps 1-8 along all edges of black paper. 10. When all edges have shapes cut out and glued down, take large black sheet of paper, turn over and cover the side with the X on it with glue. Flip over so X is facing down and line up with corner tabs and glue down. ---------- The next class period, we did another practice Notan using the same steps above except I had students try this with more complex shapes and cutting shapes inside of their shapes. I gave some specific instruction to those who needed it but mostly let students figure it out on their own the second practice day. ---------- Finally, we spent the next two class periods doing their final piece. We used a large sheet of black paper and students followed all of these steps to create a Notan on top of their watercolor paintings. The most important steps for having success:
-practice, practice, practice -drawing the X on back side of black paper to remember that that was the back side. -drawing the corner tabs These Notans turned out amazing and I was blown away by the amount of attention to detail that students put into this project. These 4th graders should really be proud of themselves! To start the school year off, 4th graders used their names to create a design with bilateral symmetry. Last year 4th grade students started the year with a similar project but instead of doing monster/masks, they created insects. Click here to see. To begin this, students used Sharpies to write their name in cursive on a long piece of paper that is folded "hot dog style." The bottom of the name goes onto the fold. Next, using a window or light box, students trace over the mirrored image of their name onto the other side of the folded paper. When opened, it makes a symmetrical abstracted line pattern. (the image below is my example) The next step proved to be quite challenging for many students. They had to really push their imaginations to figure out how they could add more lines and shapes to their design to transform it into a sort of face. I really pushed them to be very creative, get silly, fantastical! Totally acceptable for the face to have six eyes and two mouths or horns or wings or mustaches... To finish up the project, students used colored pencils to blend colors, create color symmetry, and focus on making different areas of the face really pop. This entire project took about six or seven 45 minute class periods.
To learn about tints, shades, and complementary colors, 4th grade students created colorful radial paintings.
When the students came into class, I had written on the board: Tint=___________________+_____________________ Shade=_________________+_____________________ Complementary colors=_______________________________________ We discussed how these different words are used in conversation. Shades are another word for sunglasses. Shade is the area that is hidden from the sun and is in shadows. A 'compliment' is when you tell someone you like something about them. Tint is a word used when windows are darkened (unfortunately this is misleading). In art terms, a Tint is a color plus white. A Shade is a color plus black. Complementary colors are those opposite of each other on the color wheel. For instance, orange and blue are complements, red and green are complements, and yellow and purple are complements. Students each began by doing a complementary colors. They chose the two complements they wanted to use and began by painting one color dot on their page. Next they added just a teeny tiny bit of the complementary color to that color, mixed it well, then painted a thin ring around the dot. Next, again, they added a teeny tiny bit of the complementary color, mixed it well, then painted a ring around the first. Students continued this until they filled up the entire sheet of paper. The next class students did the same technique with tints and shades. For the tints, students started with a white dot in the center and slowly added a color to it. For the shade, students began with a color dot in the middle and slowly added black. To finish up this project, students each selected their two (of the three) favorite paintings and glued them down on black paper together. While they were doing this, I heard multiple students saying things such as "My mom is going to love this" and "These turned out so pretty" and other joyful exclamations! GERM MONSTERS AHHHHHHHH!!!
As the 4th grade students study germs in science class, I thought this would be the perfect way to integrate that learning with a fun hand-sewing project! Students used images of different sorts of germs as inspiration to draw their own germ monster. The drawings were used as a reference point to create their large, stuffed "animal" germ monsters! Students dug through scraps of fabric and felt to select colors for their germ monsters. This gave students the opportunity to use different materials and techniques than we usually use in art class. Students cut crazy germ shapes and layered on patterns and goggly eyes and all sorts of fun germ-like characteristics. They had to create two matching sides for their germ. Once both sides were done, students learned how to hand-sew around the edges of both and filled their germ monster with stuffing. Students loudly dreamt of snuggling with their germ monster at night, hiding their germ monster to scare people, and taking their germ monster on long walks on the beach. Students seemed to really love this project and many have already asked if they can do more hand-sewing projects in the future. What a joy as an art teacher to see students so excited about their work! As the 4th graders studied the Medieval Times, I felt like that would be a great time to tie in the study of radial design in art class. We looked at a bunch of pictures of Rose Windows from the Medieval Times and discussed the patterns and colors. Inspired by Rose Windows, we did radial designs two ways. This project here is the more free-flowing, organic radial design project. We began with large pieces of poster board cropped into squares. No drawing to begin, rather students used thin black paint and created their own large radial design. The design must start near the middle and radiate outward and off the page. After filling the page with black lines, each student selected one base color for their painting. For every new color mixed, their original base color must be included. The students had a fun time experimenting with mixing new fun colors. What happens when you mix pink and green? How about purple and blue? Yellow and brown? So for instance, if a student chose blue for their base color, all other colors must be mixed with blue. blue and white, blue and black, blue and white and black, blue and pink, blue and pink and purple...and on and on. After fill in the entire page with color, with no white areas showing through, the students repainted over each and every black line to really make those lines bold and separate the colors. We actually found that by repainting those black lines, it made the colors POP even more. and all of my students know that I love it when colors POP!
The really fun part of the project was that after they finished the black lines, students all had to use clear gel glue to trace over some of their black lines. Then.....we added glitter! At first some students were reluctant to add glitter but in the end, everyone was so happy. We used black glitter over the black lines so it really accentuated the design rather than drawing attention away. These look so awesome lining the stairs near my classroom. On certain days, the sun shines in just right so that I can see a beautiful sparkle all along the artwork. These forth grade students seemed so proud of their artwork and look forward to bringing them home.... |
AuthorAnnie Monaghan. Categories
All
|