Annie Monaghan's Art Room
  • Home
  • Elementary Art
  • Middle School Art
  • Camp projects
  • Lesson Plans
  • About Me
  • My Artwork
  • Art is everywhere!
  • Contact me
  • Professional

4th grade radial designs 

1/5/2015

0 Comments

 
Picture
Picture
Picture
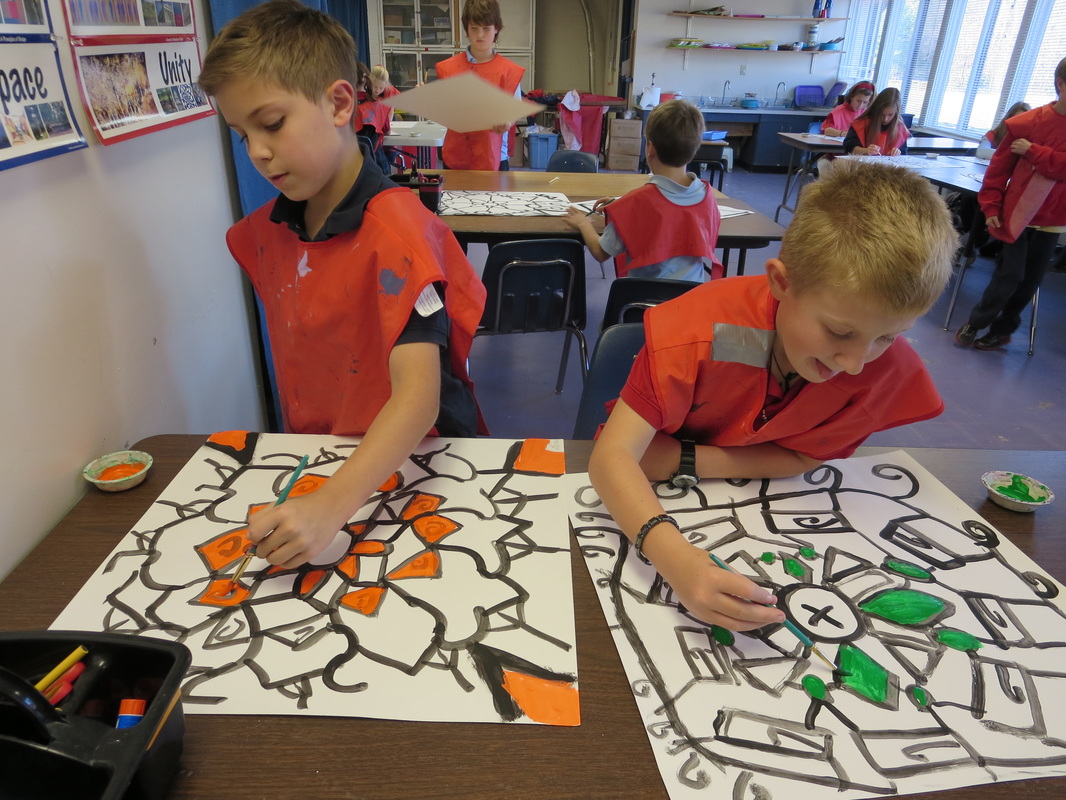
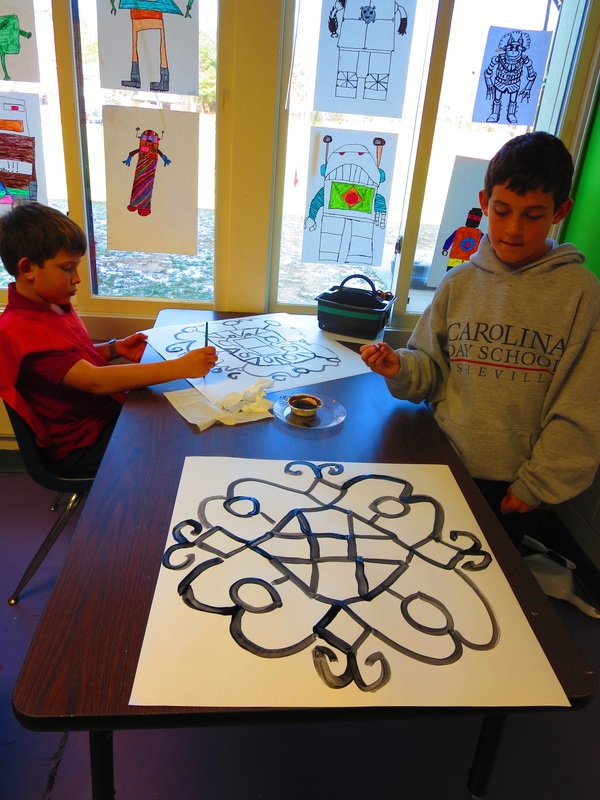
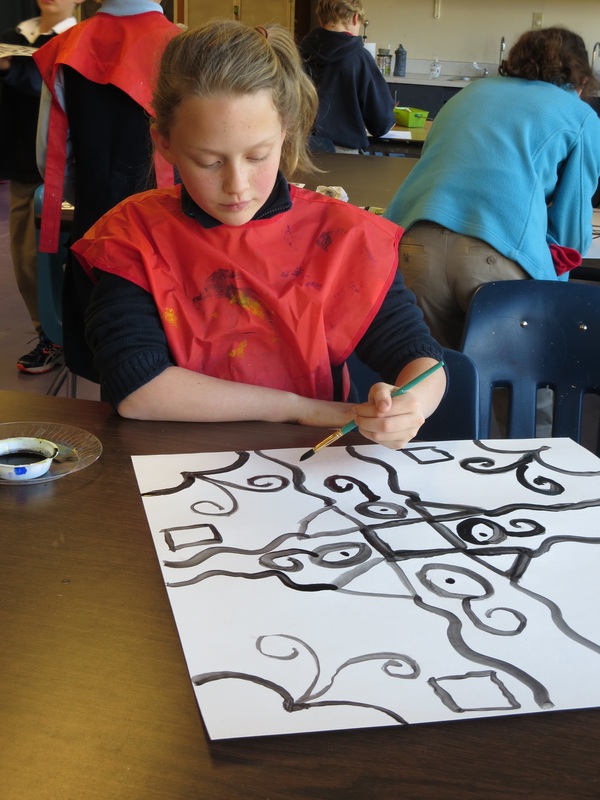
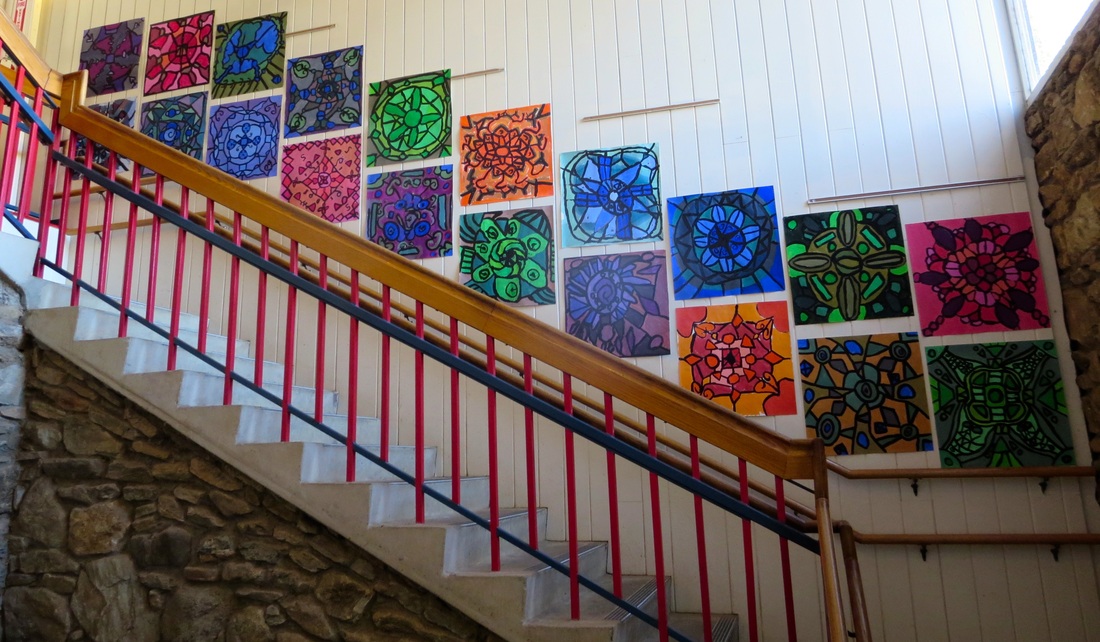
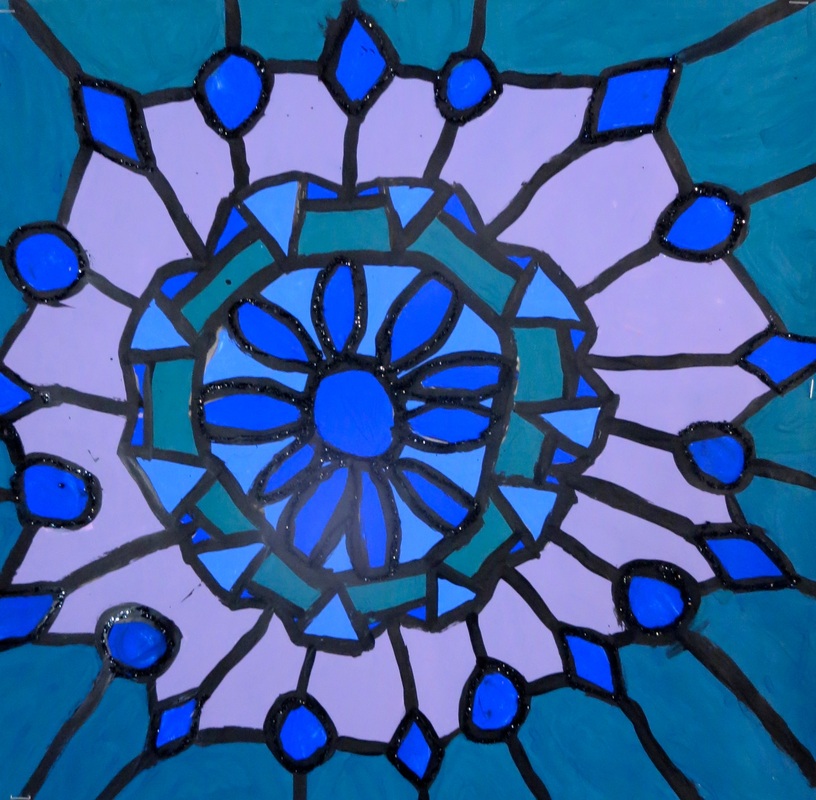
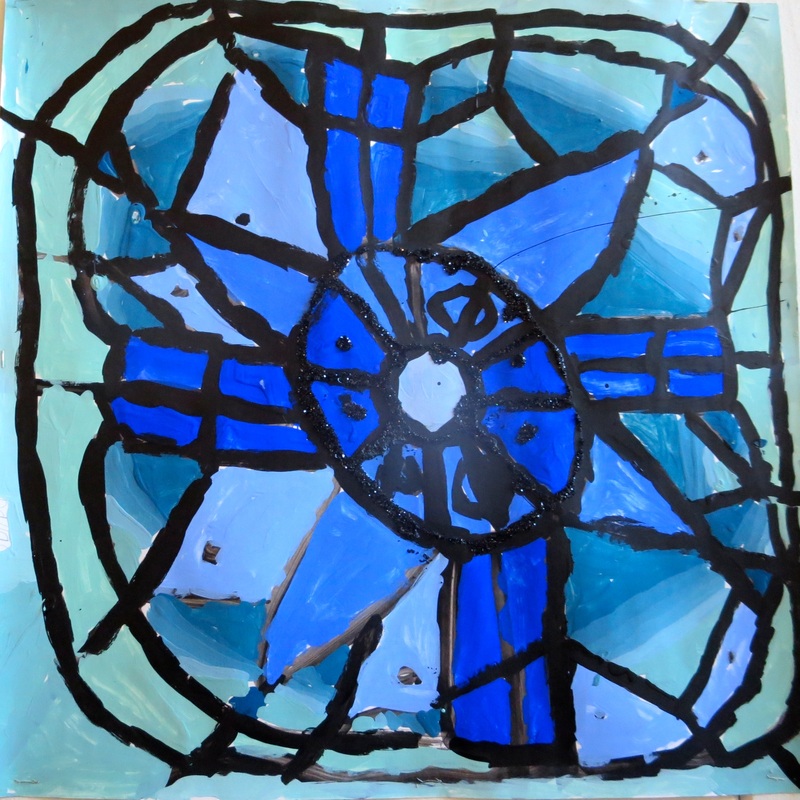
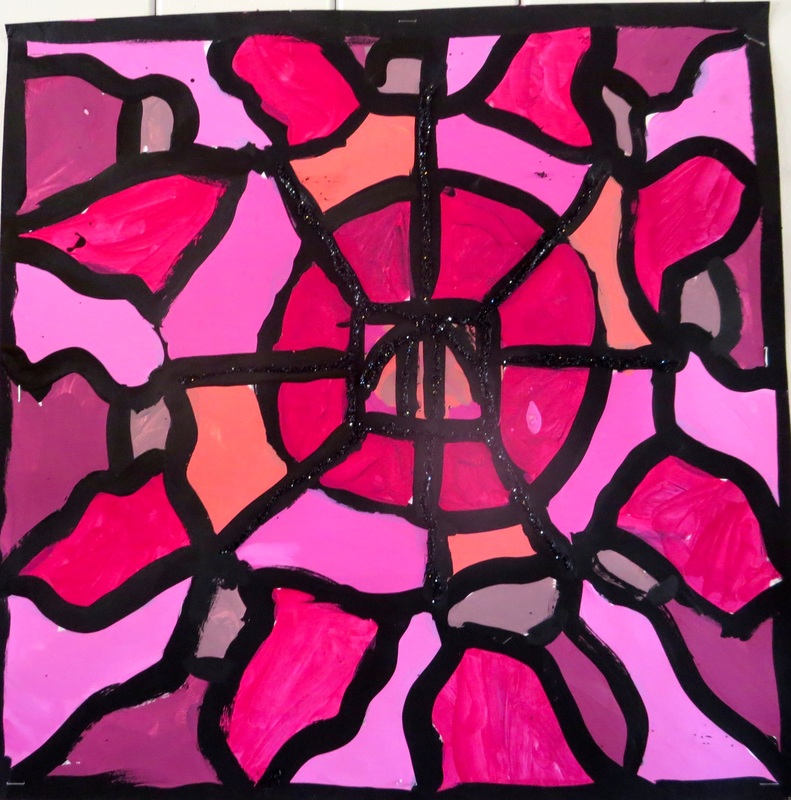
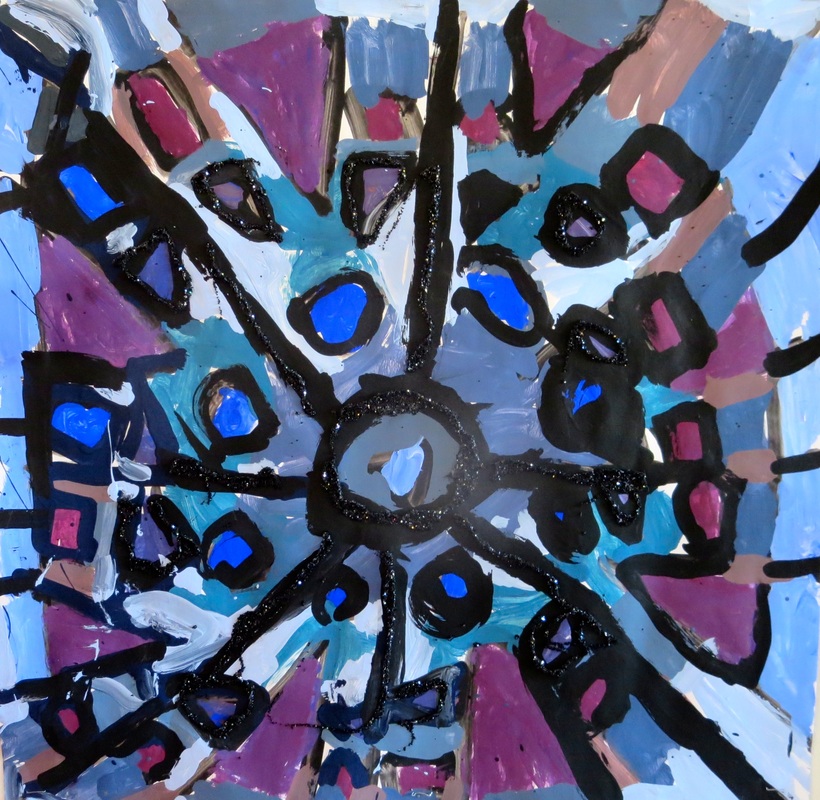
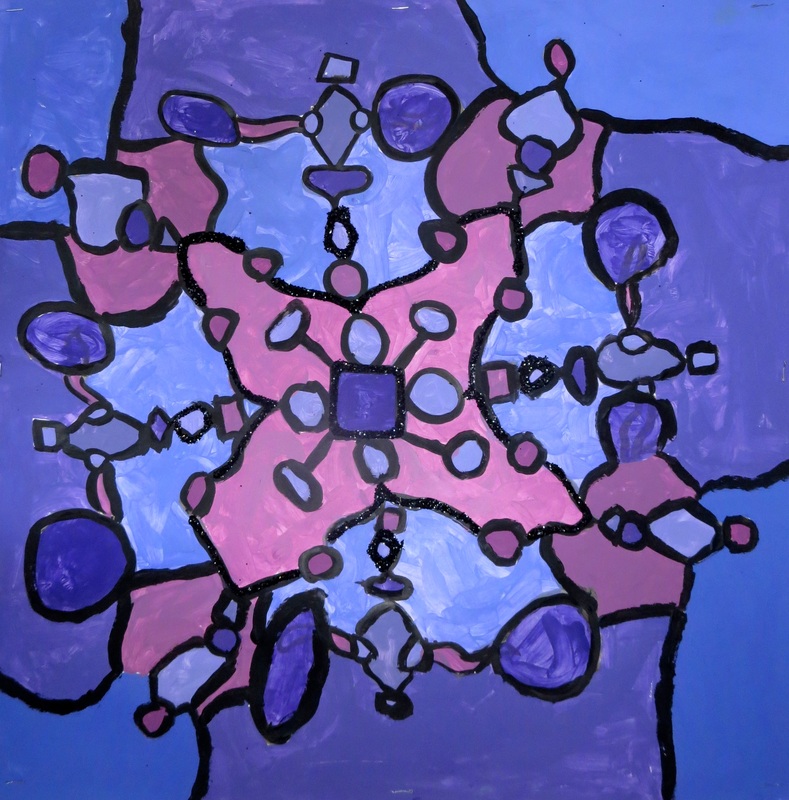
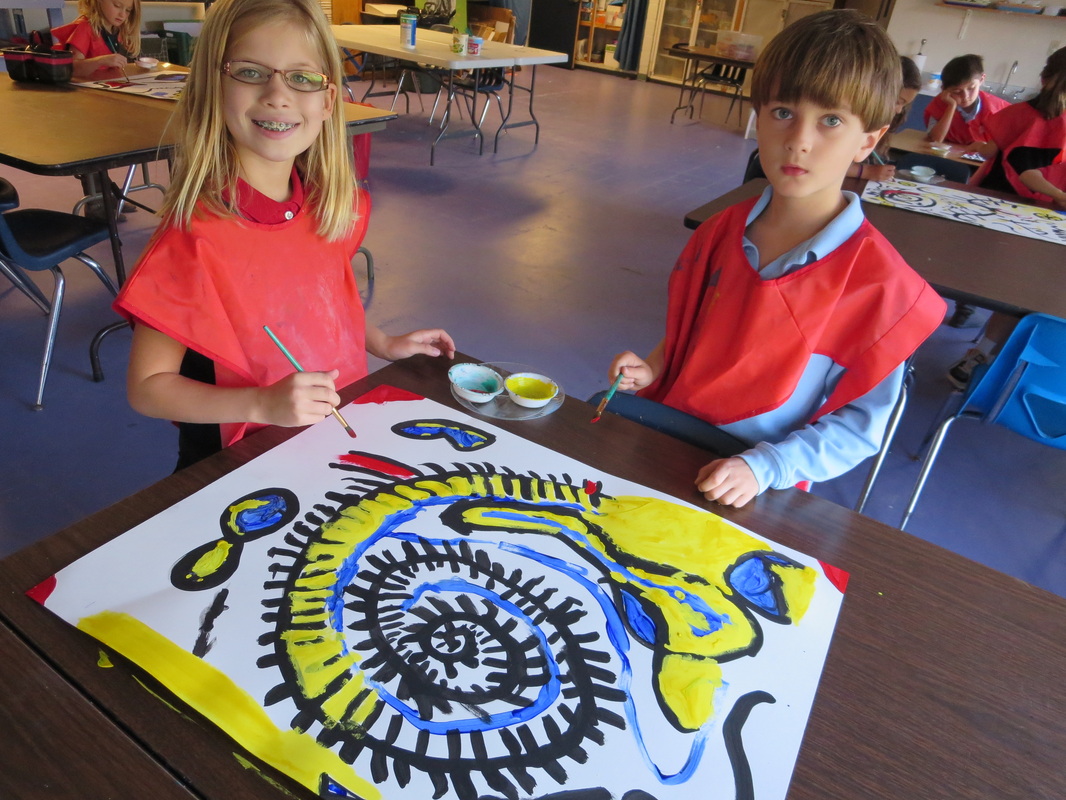
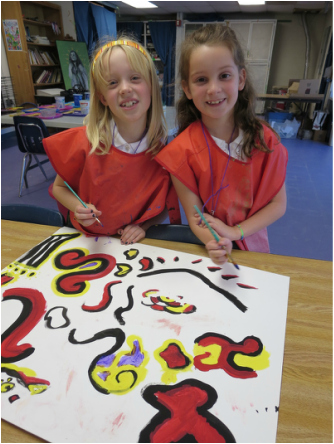
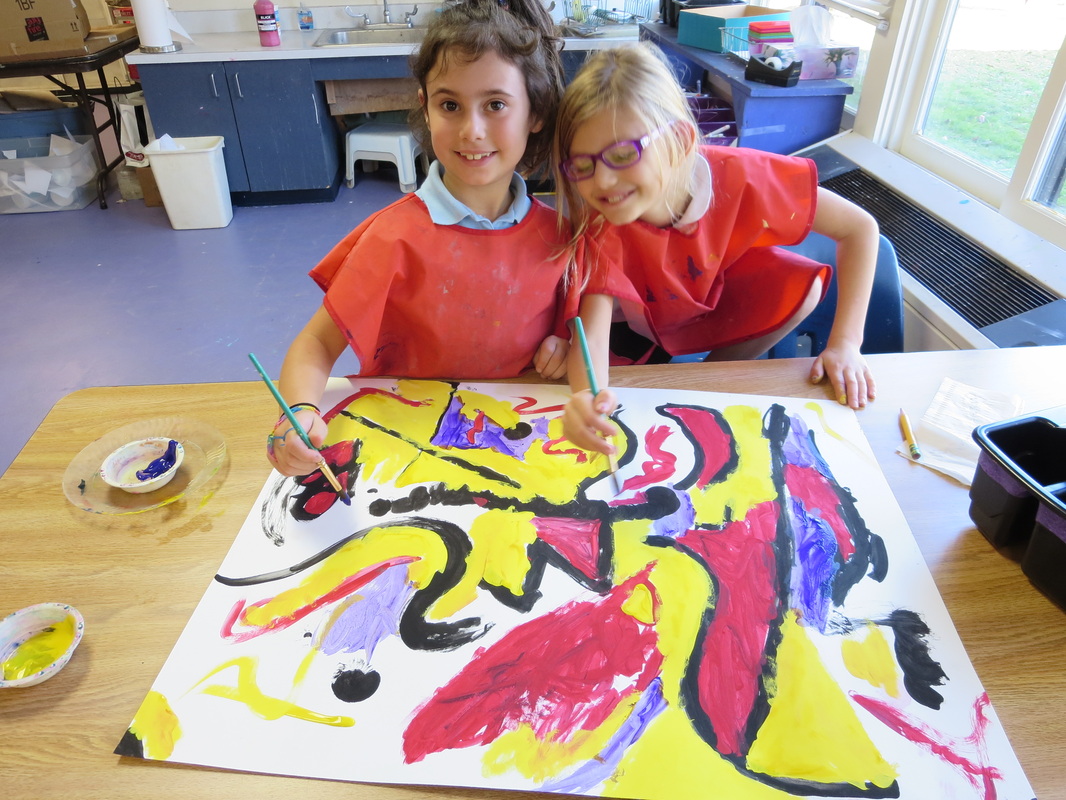
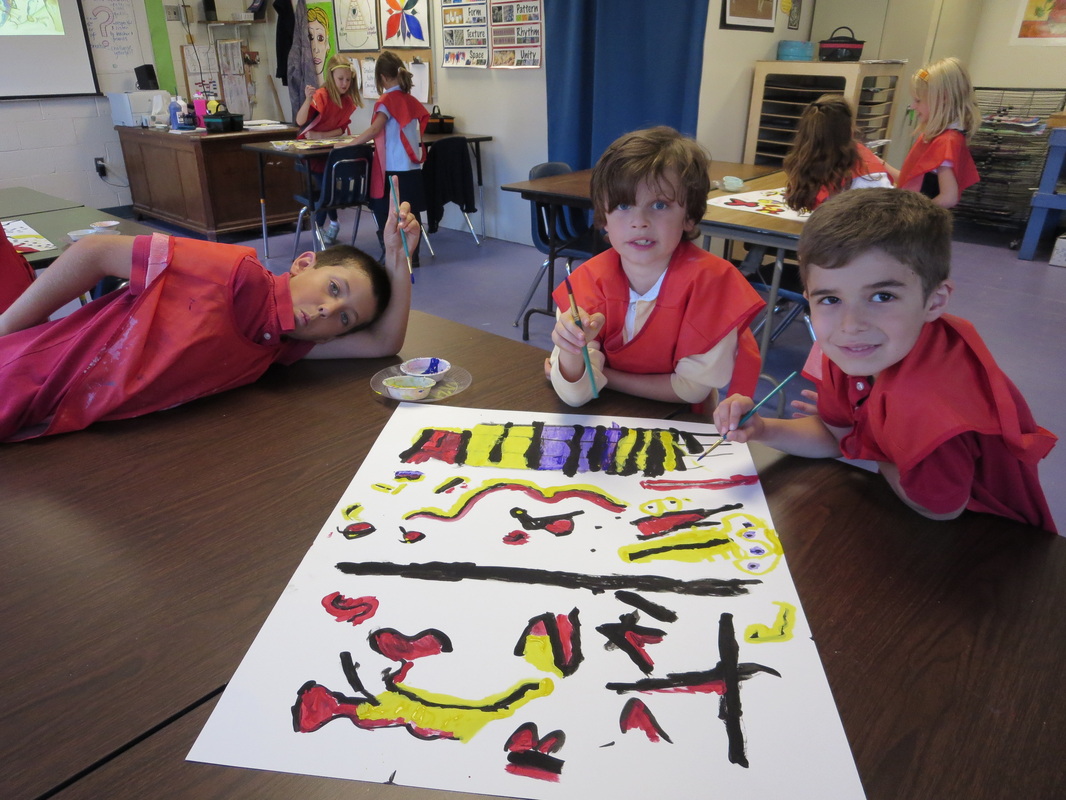
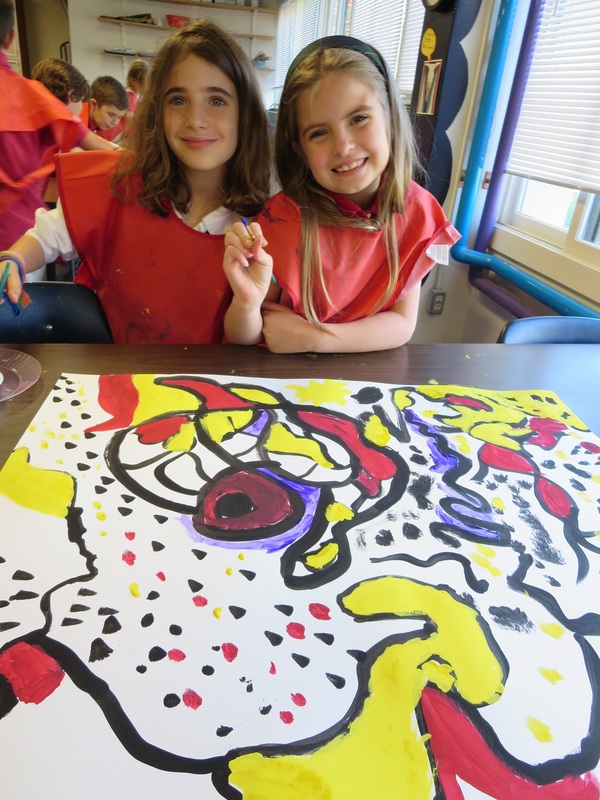
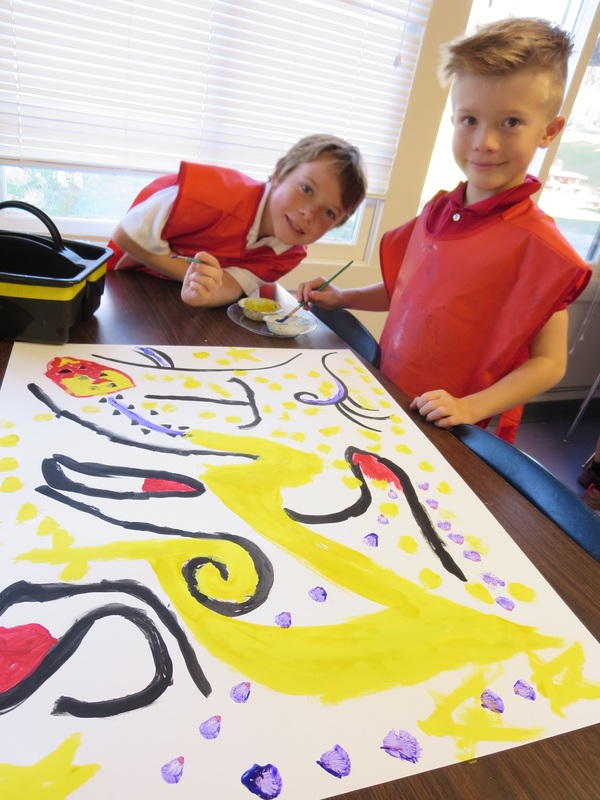
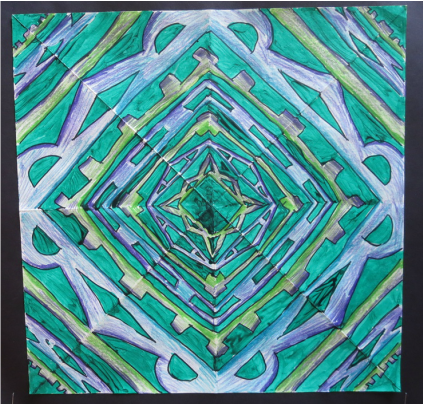
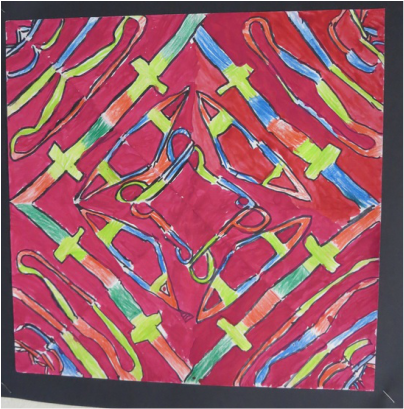
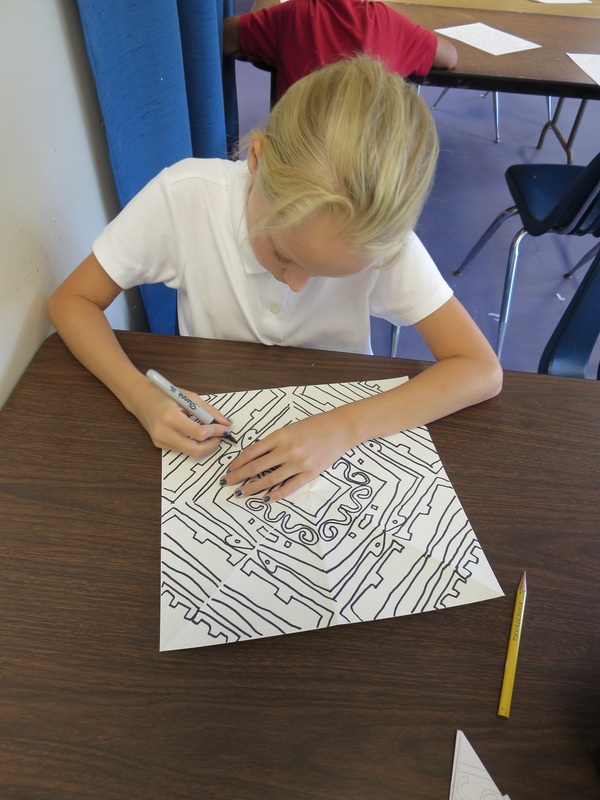
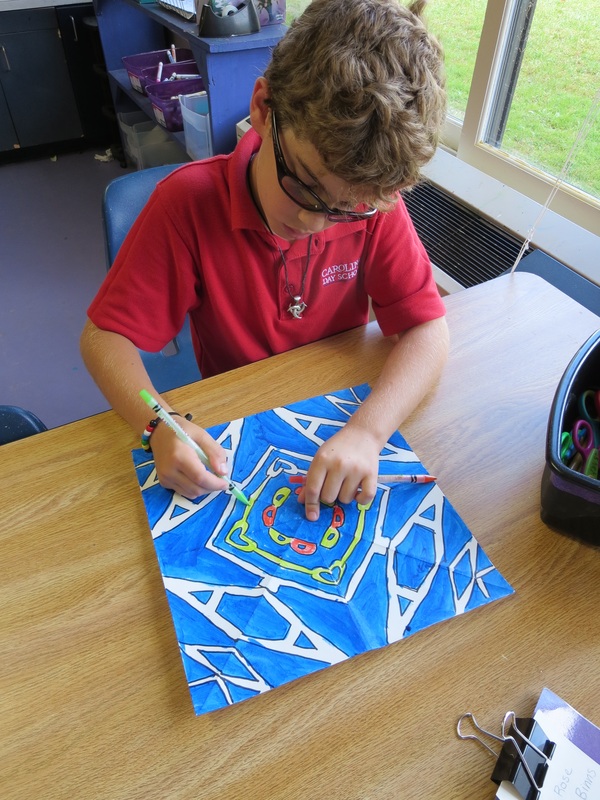
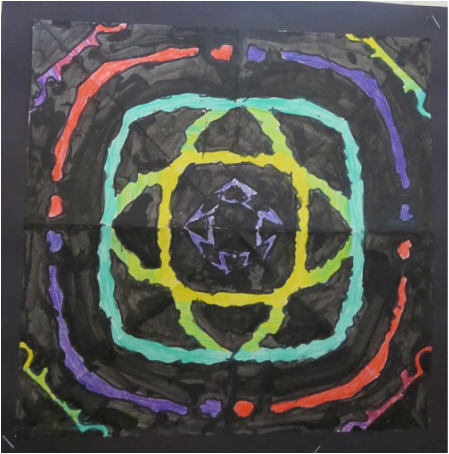
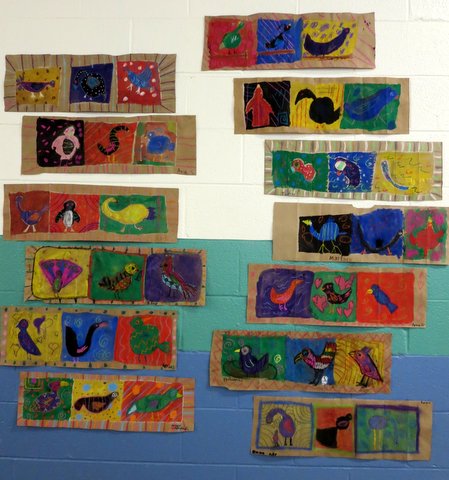
As the 4th graders studied the Medieval Times, I felt like that would be a great time to tie in the study of radial design in art class.  We looked at a bunch of pictures of Rose Windows from the Medieval Times and discussed the patterns and colors.  
Inspired by Rose Windows, we did radial designs two ways.  This project here is the more free-flowing, organic radial design project.

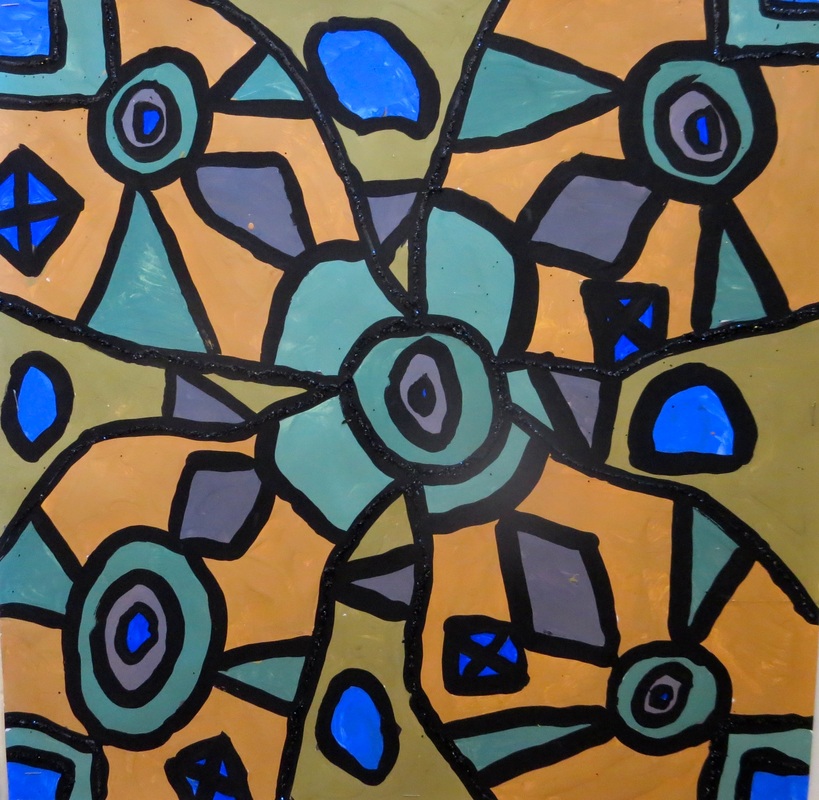
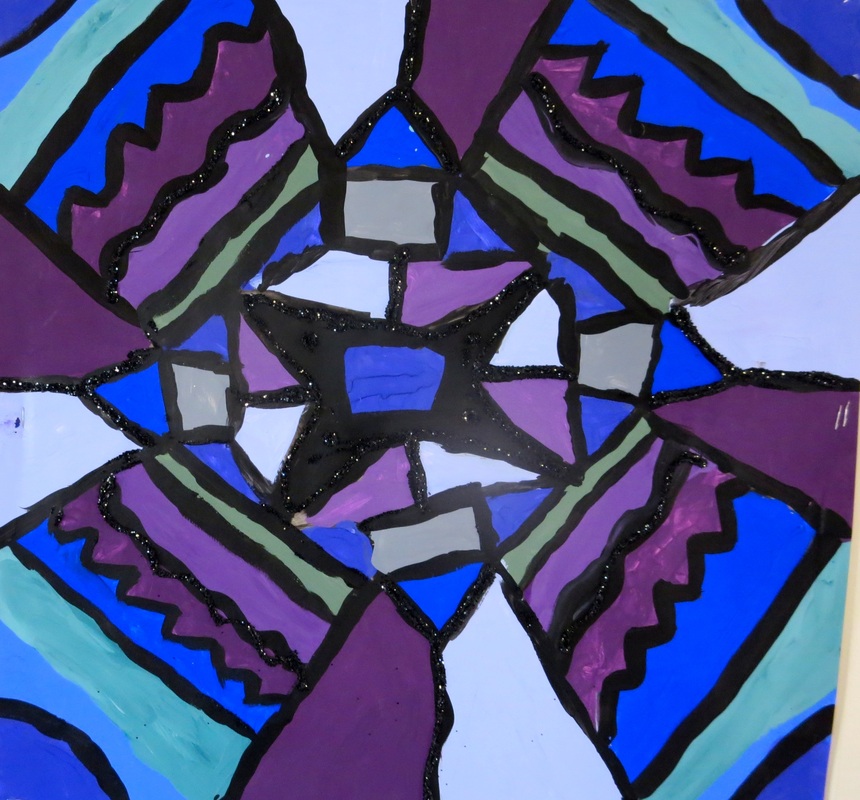
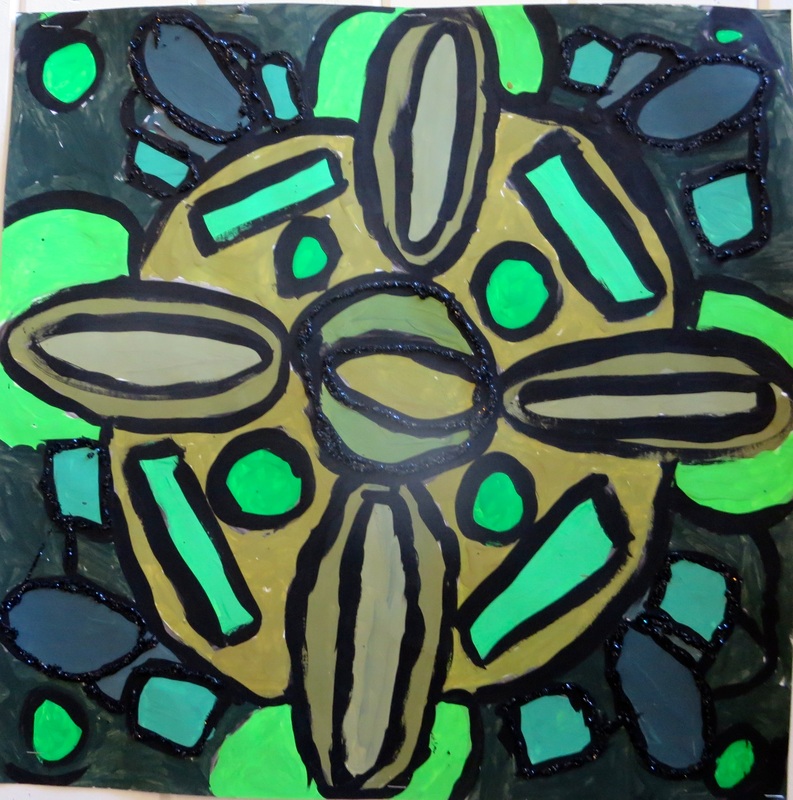
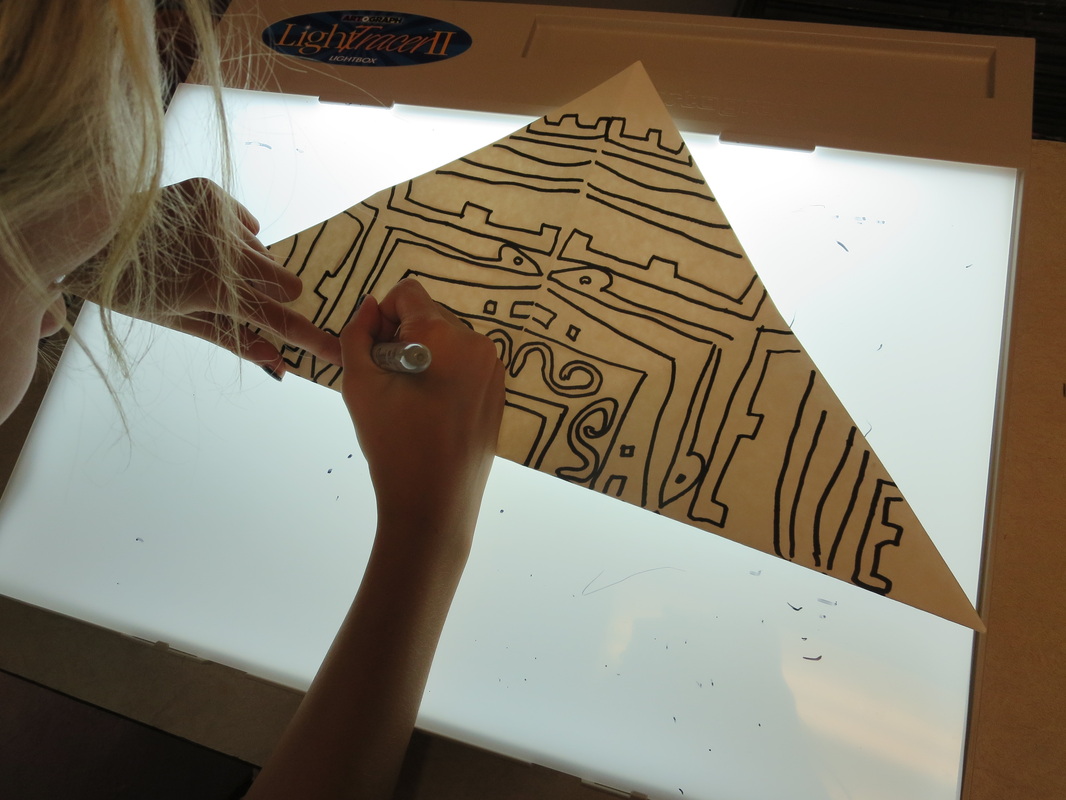
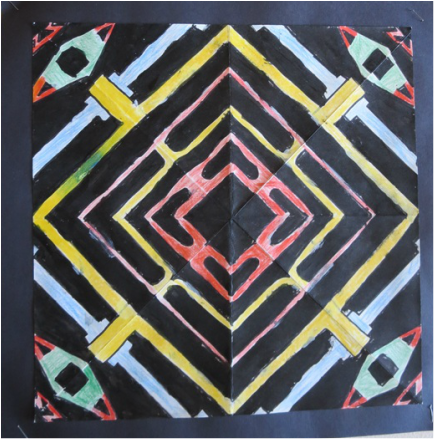
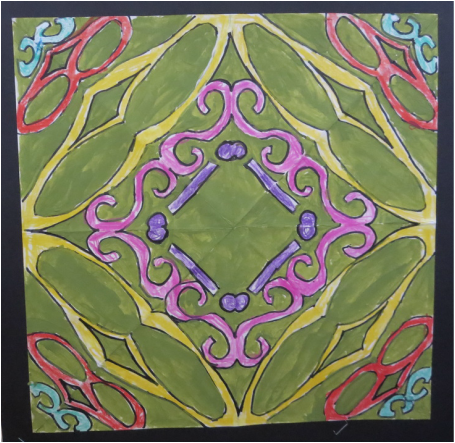
We began with large pieces of poster board cropped into squares.  No drawing to begin, rather students used thin black paint and created their own large radial design.  The design must start near the middle and radiate outward and off the page.

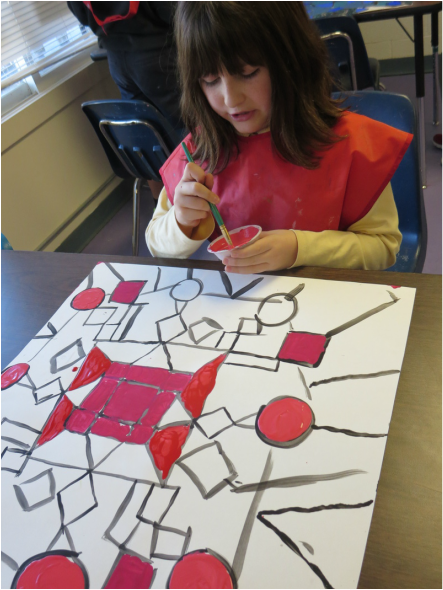
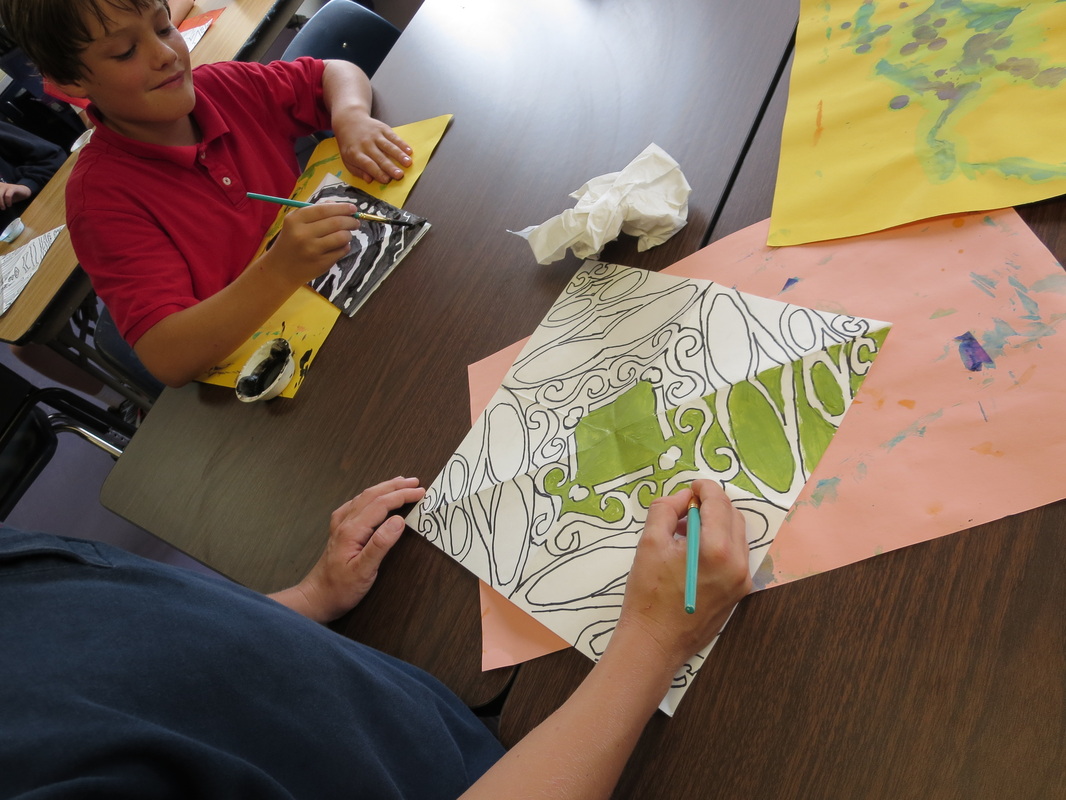
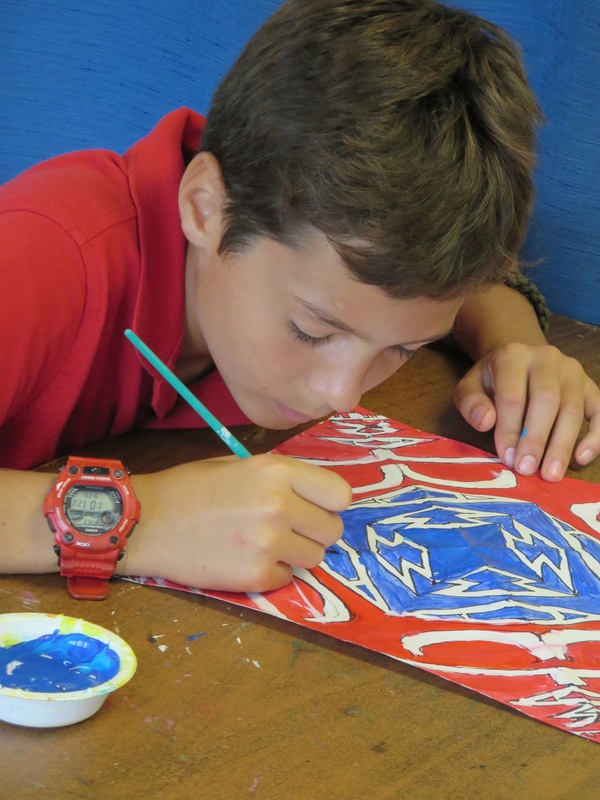
After filling the page with black lines, each student selected one base color for their painting.  For every new color mixed, their original base color must be included.  

The students had a fun time experimenting with mixing new fun colors.  What happens when you mix pink and green?  How about purple and blue?  Yellow and brown? 

So for instance, if a student chose blue for their base color, all other colors must be mixed with blue.  blue and white, blue and black, blue and white and black, blue and pink, blue and pink and purple...and on and on.
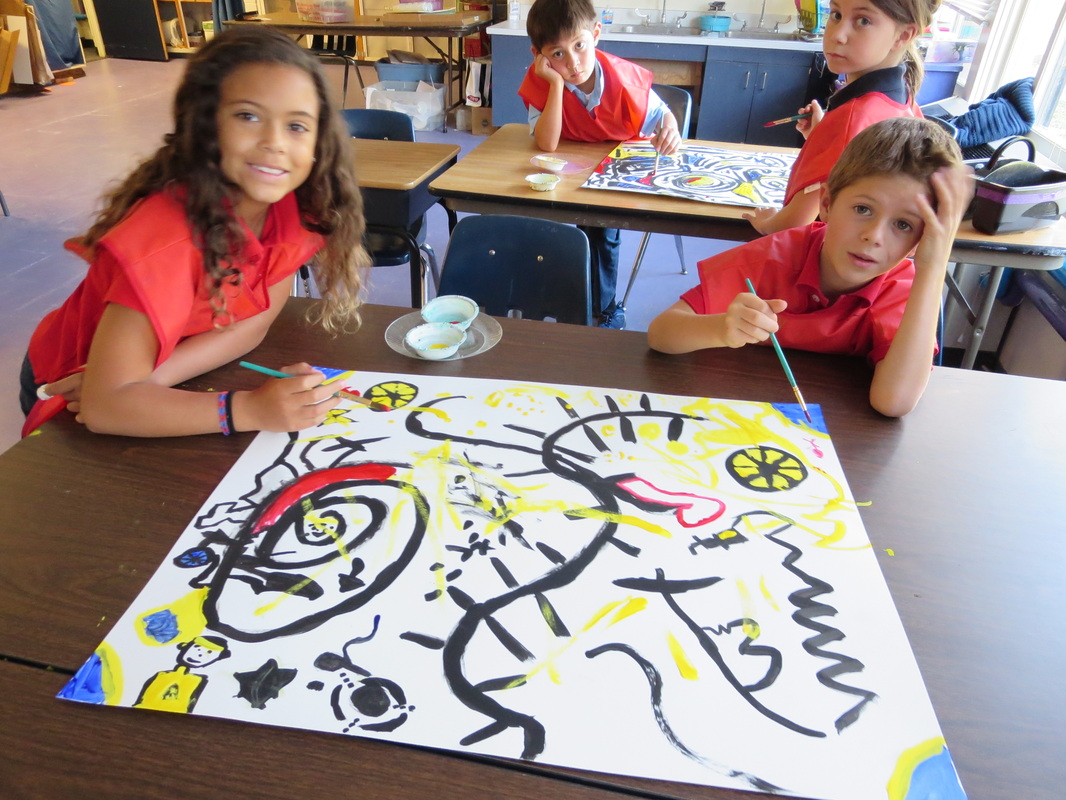
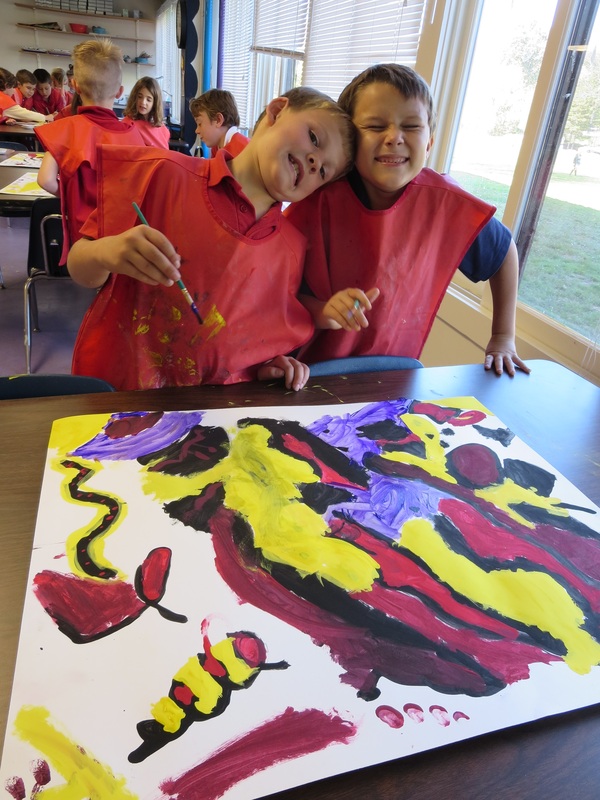
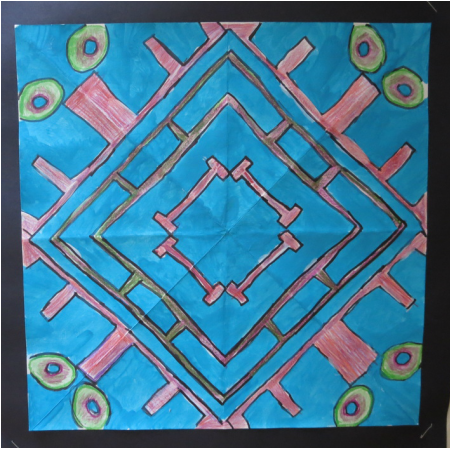

Picture
Picture
Picture
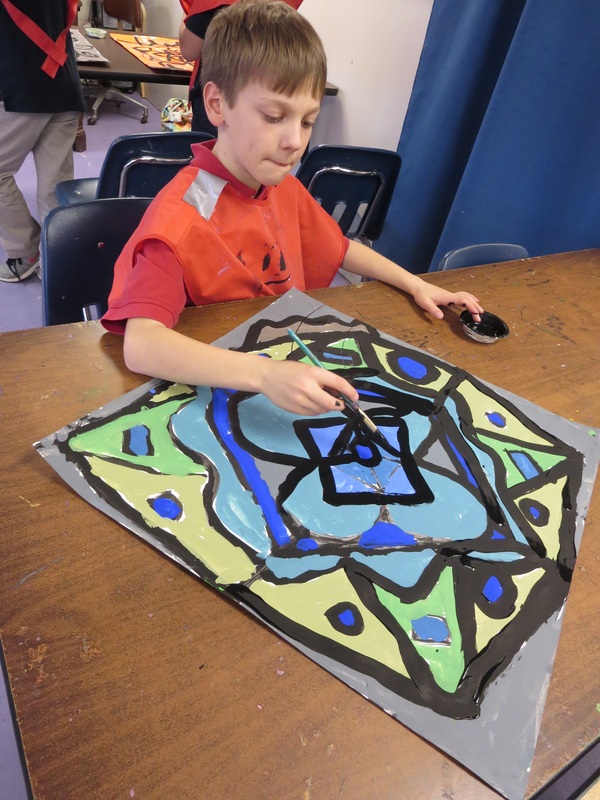
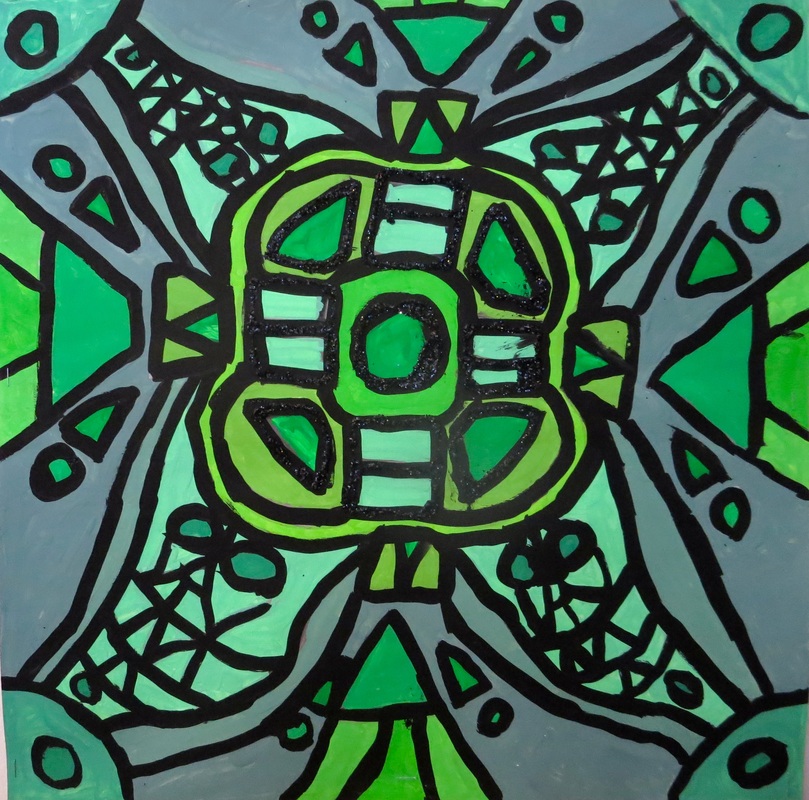
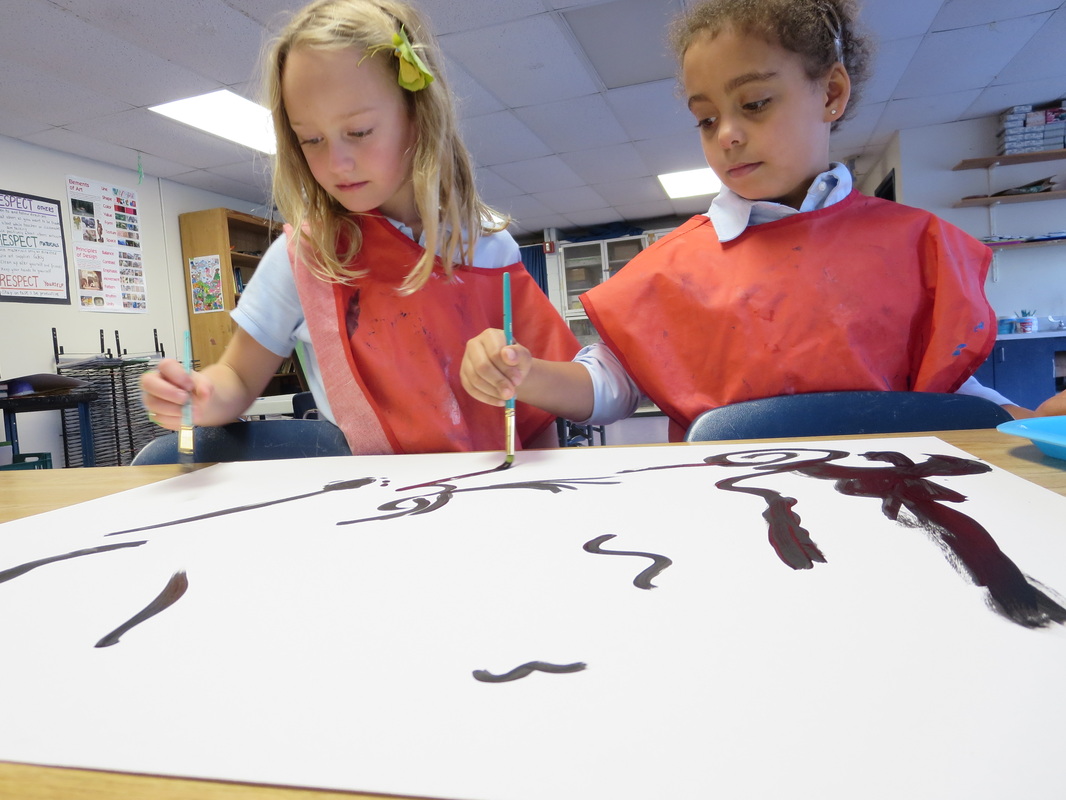
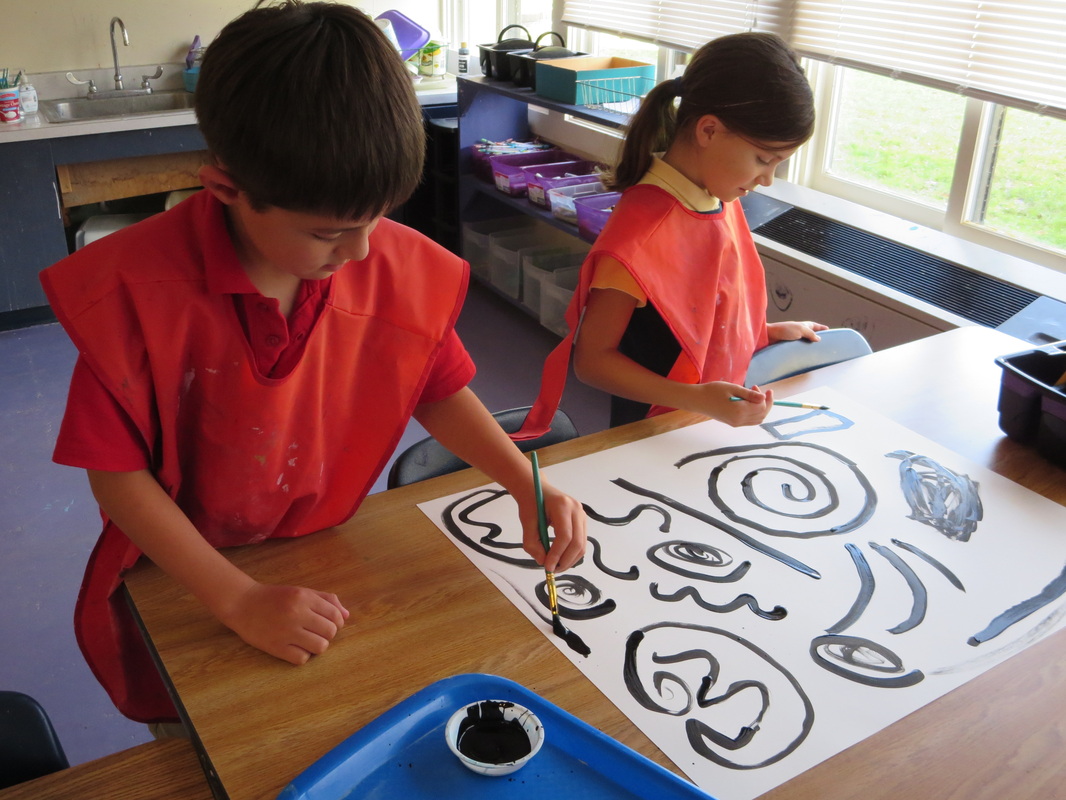
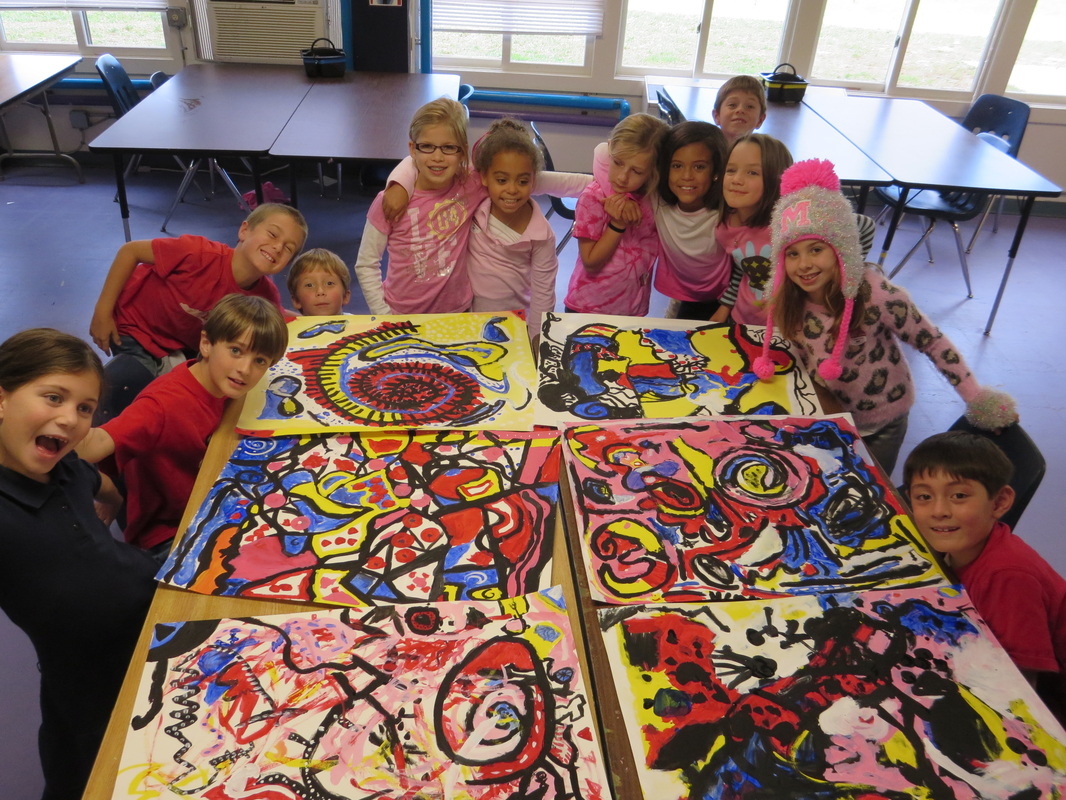
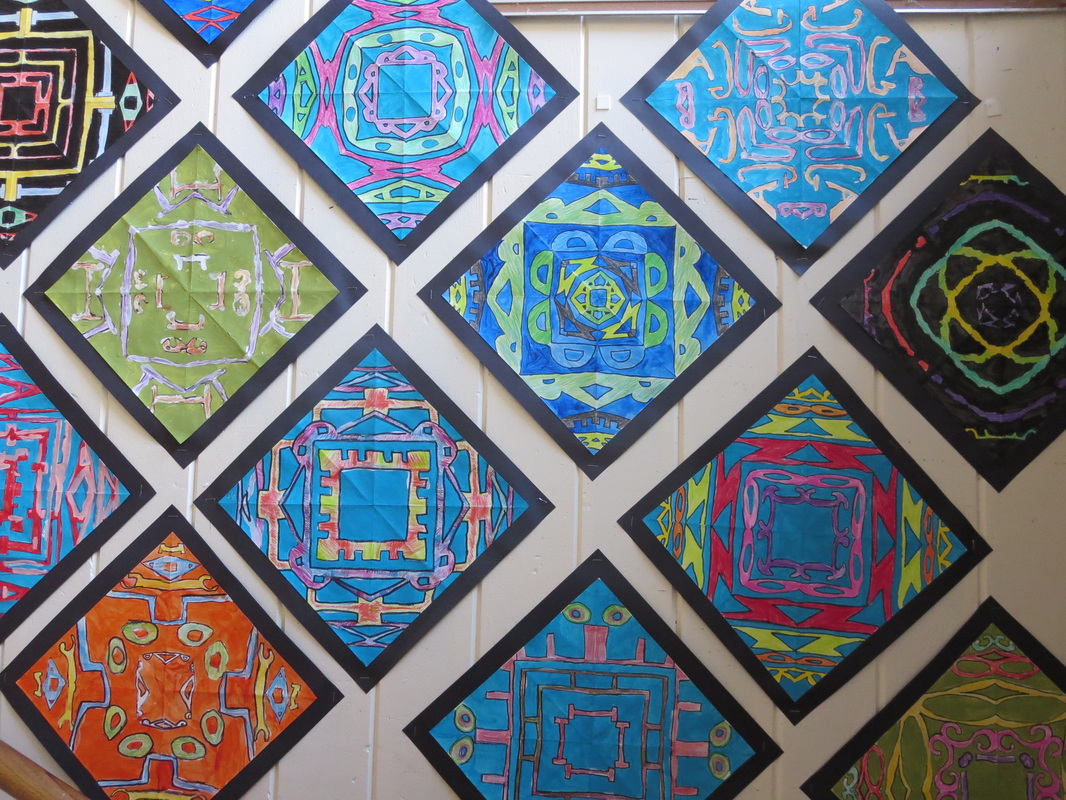
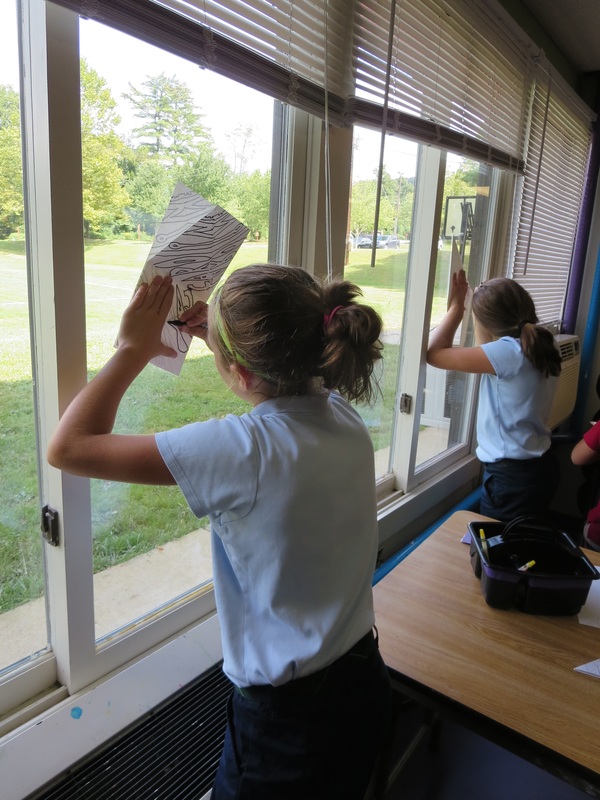
After fill in the entire page with color, with no white areas showing through, the students repainted over each and every black line to really make those lines bold and separate the colors.  We actually found that by repainting those black lines, it made the colors POP even more.  and all of my students know that I love it when colors POP!

The really fun part of the project was that after they finished the black lines, students all had to use clear gel glue to trace over some of their black lines.  Then.....we added glitter!  At first some students were reluctant to add glitter but in the end, everyone was so happy.  We used black glitter over the black lines so it really accentuated the design rather than drawing attention away.

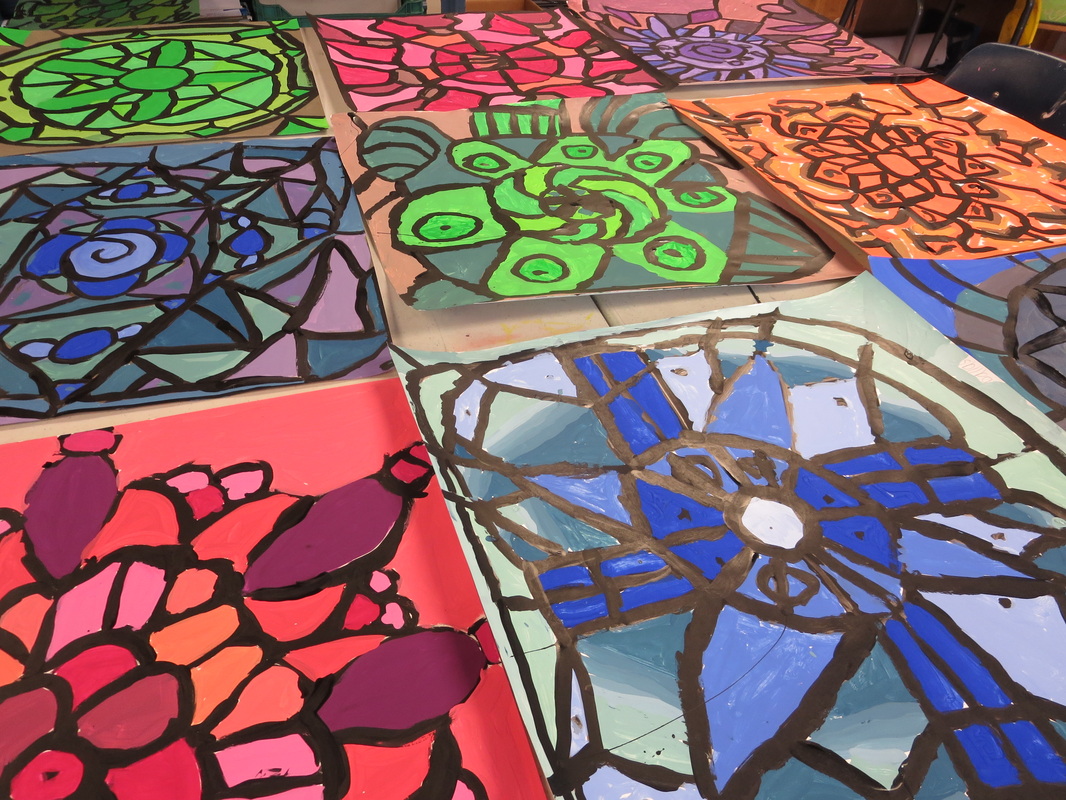
These look so awesome lining the stairs near my classroom.  On certain days, the sun shines in just right so that I can see a beautiful sparkle all along the artwork.

These forth grade students seemed so proud of their artwork and look forward to bringing them home....
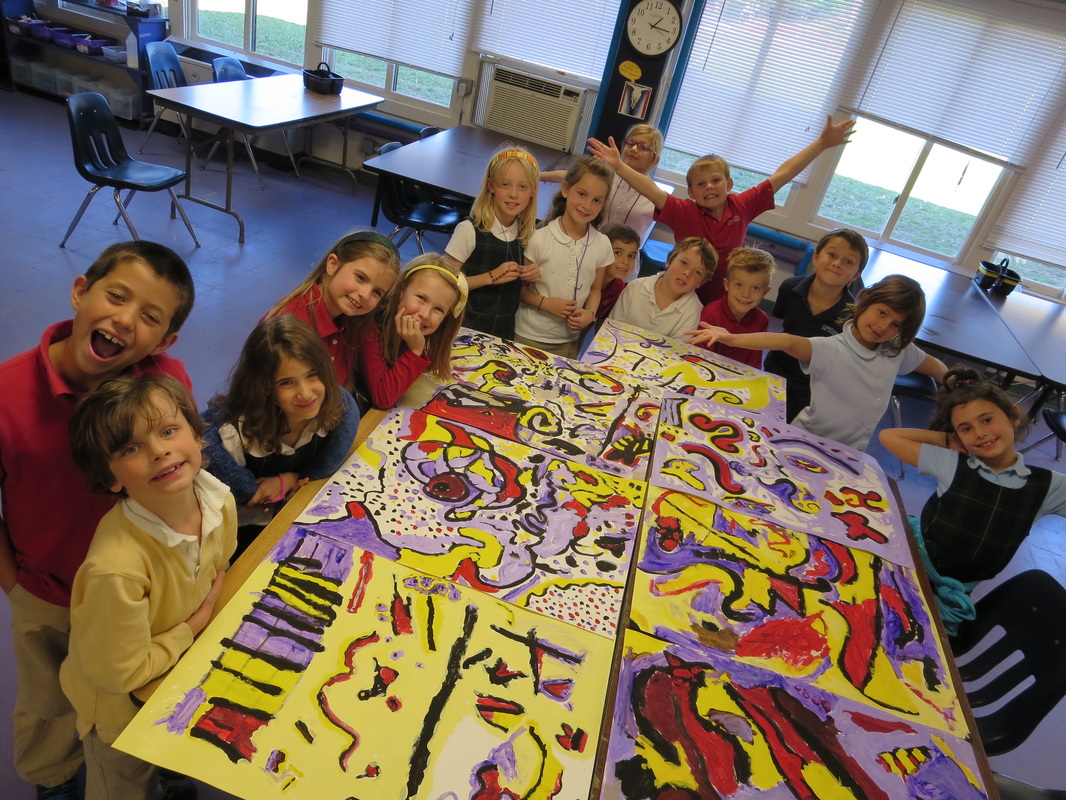
Picture
Picture
Picture
Picture
Picture
Picture
Picture
Picture
Picture
Picture
0 Comments

2nd grade collaborative kandinsky paintings

11/1/2014

0 Comments

 
Picture
I was exploring the wonderful world of Pinterest a while ago and came across this awesome blog post smART class: Hip Hop Kandinsky murals and was super excited about the project.  I took direct inspiration from this super fun project.  I decided to take it into my own hands and do a similar project with my 2nd graders.

 After looking at and discussing the artwork by Kandinsky, 2nd grade students were paired up or put into groups of three to create a painting together.  The students had to really focus on collaboration and working as a team.  Each time we began with a new color, they had to talk to each other about a few places to paint with that color.  We also talked about being accepting of the others' choices with painting even if it might not be the same as theirs.  Every five minutes or so, I had them rotate the paper (poster board) so that they were constantly looking at it from different angles and painting along their partners painting.
The students said they had never did art with another person before and loved it.
Picture
Picture
Picture
Picture
Picture
Picture
The students started on white paper and began painting with black lines. We talked about what abstract means and to draw lines, shapes, and designs rather than things like cats, houses, and trees.
After using the black, students in one class added red, yellow, and blue. The other class used red, yellow and purple.  This was mostly so that the two classes artwork was slightly different.
Picture
Picture
Picture
Picture
Picture
Picture
Picture
We spent three 45 minute class periods working on these.  Once finished, I put them all together and the students discussed what they found interesting and fun about this project.  

"It's neat how we all had to follow the same directions, but they all turned out really different."

"When they are all next to each other, they look like one big giant painting instead of a bunch of small paintings."
Picture
Picture
0 Comments

5th grade name mandalas

10/15/2014

1 Comment

 
Picture
Picture
I was super excited about starting out the school year with this project with the 5th grade students.  I really love radial symmetry and I enjoy teaching it so was quite pleased when the 5th grade students seemed just as into it as I was.

To do this project, you begin with large square pieces of paper.  Fold in half, corner to corner.  Fold in half again, corner to corner, then one more time.  After you've folded it three times, you have a triangle.  On that triangle, you write your name in large bubble letters to fill the entire space.  Then you open the square back up partially and using a light table or sunlight on a window, trace the name drawing.  You continue to do this over and over until all of one side is filled with your name flipped and mirrored.  This creates a beautiful radial symmetry name mandala.

This project was mostly for an introduction to my art class and to learn their names, but we took a bit of time to discuss radial symmetry and how to create bold bubble letters.

After the names are all written with a Sharpie, the students painted in the 'background' with acrylic paint and then added color in the letters with colored pencils.  They were limited to four colors.

The results are amazing.  Each and every single name mandala turned out great.  It is really cool to put two different students with the same name next to each other.  There are two Isaac's, two Taylor's.  Even though they wrote the same name, they turned out totally different.

SUPER FUN PROJECT! 
Picture
Picture
Picture
Picture
Picture
Picture
Picture
Picture
Picture
Picture
Picture
Picture
Picture
1 Comment

Student teaching at evergreen             Kindergarten cut outs

3/27/2014

1 Comment

 
Picture
The Kindergarten students learned about warm and cool colors by painting a sort of checkerboard pattern using the different color themes.  They did a great job of following directions and had a fun time doing so.  After doing their paintings, at the next class, they learned about bilateral symmetry.   To cut out symmetrical shapes, the students folded their papers in half, traced a half of a template, lined up with the middle fold, and while the paper was still folded, cut out their design.  I mentioned positive and negative space as they worked.  After they cut out their shapes, they glued their background piece on the top of black paper and their cut out shape below.  The results are quite striking.  Although this was quite the formulated project, I felt as though it was the perfect difficult level for the Kindergartners and they rocked it!
Picture
Picture
Picture
Picture
Picture
1 Comment

student teaching at evergreen          3rd Grade Folk Art Birds

3/9/2014

0 Comments

 
Last week, the third grade students finished their Folk Art birds project.  Before beginning, I introduced the students to the term "Folk Art" and showed them local folk artists work.  
"Cornbread" is quite the well known local artist.  He does really fun, colorful bird and fish paintings.  The students really enjoyed his work.
http://www.jtfolkart.com/artist/john-cornbread-anderson/
Picture
I also showed the students artwork by Kent Ambler.  http://www.kentambler.net/
Picture
As the students viewed the bird artwork by local folk artists, I pointed out the simplicity of shape used to create the birds bodies and talked about how these were not realism but are more fun, free and expressive.

The Folk Birds that the students did were really cute and some are quite funny! 

Process:
1. Cut paper bag into long strip.
2. Using chalk pastel, draw three large connected squares to break up area into three.
3.  Draw large, very basic shapes for bird bodies.
4.  Using tempera cakes, paint inside bird body shape, do multiple layers if necessary for opacity.
5. Using a contrasting color, paint the inside of square shape surrounding the bird.
6. Use chalk pastel to add details of beak, eyes, feet, wings and tail.
7. Use chalk pastel to create pattern design behind bird.
8. Use chalk pastel to create border pattern.


Picture
Picture
Picture
Picture
Picture
Picture
After the projects were completed, a family member of one of the 3rd grade students was inspired by the project and did her own take on Folk Art Birds. Instead of using paint and chalk pastels, she used hand-dyed fabric and sewing instead! How cool!
Picture
3rd grade Folk Art Birds Lesson Plan


Overview
3rd grade
3-4 days
Students will observe local folk art and create unique multi-media art of birds.

NC Essential Standards
3.V.1.1 Use art vocabulary, including specific artistic terms. 3.V.1.4 Understand characteristics of the Elements of Art, including lines, shapes, colors, textures, form, space, and value.

3.V.3.2 Use a variety of media with refined skills. 
3.CX.1.1 Exemplify how visual arts are used by various groups for artistic expression within the local community. 
3.CX.1.3 Classify artists, styles, and movements. 
3.CX.1.5 Use local, natural, or recycled resources to create art.

Materials
Used paper grocery bag, chalk pastels, tempera cakes

Art Vocabulary
Folk Art, lines, shapes, colors, Kent Ambler, "Cornbread", contrast


0 Comments
Forward>>

    Author

    Annie Monaghan.
    Art lover.
    Art creator.
    Art teacher.

    RSS Feed

    Categories

    All
    1st Grade
    2nd Grade
    3rd Grade
    4th Grade
    5th Grade
    Abstract
    Art History
    Art Videos
    Auction
    Batik
    Cardboard
    Chalk Pastel
    Clay
    Collaboration
    Collage
    Colored Pencil
    Color Wheel
    Contour Lines
    Drawing
    Highlights And Shadows
    Kindergarten
    Landscape
    Mural
    Names
    Notan
    Observational Drawing
    Oil Pastel
    Online Art
    Origami
    Paint
    Painting
    Papier Mâché
    Patterns
    Portraits
    Pre K
    Printmaking
    Relief Sculpture
    Remote Art
    Remote Learning
    Sculpture
    Self Portrait
    Self-portrait
    Sewing
    Shapes
    Sharpies
    Still-life
    Symmetry
    Texture
    Tissue Paper
    Warm And Cool Colors
    Watercolor
    Weaving

Powered by Create your own unique website with customizable templates.